Showing posts with label Dinosaurs. Show all posts

Saturday, May 2, 2020

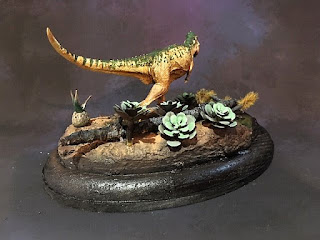
Protoceratops

This is another kit in my stash so long I no longer remember who it was produced by. I'm sure after a few people see this, they will know and tell me. 
Anyway, I'm guessing it's a 1/10 -15th scale kit that came in 2 parts - the animal and the base. The only thing was that three of it's feet are attached to the base. They didn't line up so you had to do the best you could and then start sculpting with the Aves. 
You can also see all the repairs made. I really dislike when the sculptor/producer try to "help us out" by getting rid of flash or seam-lines - especially when they are aggressive about it.
Base can be seen in the background
While beginning to prime in noticed an imperfection that turned into a big bubble on the edge of it's frill. Despite me not liking the scales just being  small tube marks pushed into the clay for scales - it did make the repair a little easier to hide.

First round of priming revealing more ankle work needed. 

Was going to leave it at this point, but felt I needed to do a little more...


 Added a little more color, defined the eyes, and emphasized the muscles a little more. I also added some foliage to the nest material, and also created two bushes to finish it off. Thanks for looking.


Monday, April 15, 2019

Deinonychus Finale

(See part 1)

This guy has been languishing on my side table since last Nov! Time to finish it off. Having just shown the kit parts, first thing to do was assembly -


Giving the rock base some color


This is where the model sat and sat. 
In all honesty, I usually don't start painting until I get an idea. VERY few times that idea never comes. This is one of those times. So I stuck to colors that went along with the tan Stynylrez primer, and threw in another color to make some things stand out. A few washes later, I glossed the eyes and mouth, and put Satin on the claws and I was calling this one done.  Thanks for looking. 

It was so big I couldn't fit it on my "set."


Friday, January 4, 2019

Krentz Presentz T-Rex

I had this Krentz Presentz T-Rex hanging around seemingly forever, and decided it's time to give him some color.
I got so into it, that I forgot to take any WIP pics - but it's my typical layering approach. 


I felt it also needed something for and a little resin oval for a base. So out came some scraps of foam. I was doing 3 bases at the same time so the Rex base is lower right - 


Added some colors and poured some realistic water into the cutout - 

Time to try him out- 


I added some painted aquarium plants - ALWAYS paint aquarium plants, even if they are already green. I also took a twig, and with a downed Monkey Puzzle tree in mind, added glue to the branch tips. Then with a static grass applicator, added some dead grass.

This completed the simple base. Thanks for looking. 


Sunday, December 16, 2018

Creative Beast's Saichania

I haven't built a dinosaur in quite a while, and since this one has been on the Pile, I decided it was time to do Creative Beast's Saichania. 

The Saichania is a robust ankylosaurid dinosaur first found in the 1970s in and around Mongolia and China. It was about 15 ft. long and weighed 2 tonnes. It's know from a number of partial skeletons. 

The kit is in 6 parts of white resin. There are some flash here and there and one or two pinholes - none of them being in any place of importance.  

The base is very well detail (as is the rest of the kit).

I wanted to keep this model simple so I chose only a few colors - a "burnt flesh" from V's Flesh set, a brown for the top part and a blue gray for the scutes and spikes. 

To finish it off I drybrushed a lighter gray on the scutes and spikes, some Agrax in the darker areas, and some Sepia on the lighter parts. Thanks for looking


Thursday, November 8, 2018

Deinonychus

The actual full title is Dinonychus: The Wolf of the Early Cretaceous.  With my table cleared, this is my next project. This kit was the result of a Kicstarter a year or so ago. The creative  guy behind this is Nick Fonseca.  His website isn't up but his work can be found on DeviantArt.  

The kit is 1/5 scale and is 24" long. It comes in 8 parts - the face, body tail, 2 arms, 2 legs and a rocky base. 
After a wash, I gave the kit a once over, and there was some small instances of a seam here and there. It took about 20 minutes to get it clean and then the rock was given a black prime, and the dinosaur primer in a tan. Once the primer was on, I found a few more spots that needed a little more cleanup - 

Now normally the paint scheme is modeled after a modern day animal. So I think I'll give this kit a few days to think things over and pick a paint scheme. Be back soon. Thanks for looking. 

Saturday, June 30, 2018

Saurosuchus and Dinodontosaurus Finale

Continuing on, I painted the Sauro a sort of orange brown - 
From there it was a quick run to the finish line. I added Hull Red down the back and then a dark wash to create speckles. 
I had a few plastic plants in the drawer. So I primed them and then did a dark green up from the bottom and a lighter green from the top down (always paint plastic plants or they will keep looking plastic!).  
I was done. Thanks for looking.


Tuesday, June 26, 2018

Saurosuchus and Dinodontosaurus

These next few models builds come from the discovery of that stash I found in the attic. This one is the Saurosuchus and Dinodontosaurus vignette. Sculpted by Chris Lynch and was offered by Ravenstar Studios. which oddly enough offers mostly sci-fi vehicles and mech miniatures.  As a matter of fact when I couldn't remember the names of these animals I did remember Ravenstar. When I went looking they are no longer in the Store.  I wrote and was told the names, as well as being reminded it is a very old kit

The kit depicts  the carnivore Saurosuchus taking down a Dinodontosaurus on, from the rounded stones, a river bank.  The model was very nicely done in the cream color, odorless resin. There was one or two bubbles on the bottom of the log (out of sight) and only 1 small shift in the mold that was easily repaired - 
 Giving it another look, all was well so it was primed.  
Now's the time to start picking out colors. The ground was painted a brown color and the rocks and logs were left primer black as they will get a dry brushing later on. The Dinodont got a base coat of ocher. I'm still thinking about the Sauro. ;)


Stay tuned for part Two. Thanks for looking.

Wednesday, January 24, 2018

Paleo Productions Camarasaurus Skull

This newest model by Paleo Productions is the result of a Kickstarter.
Camarasaurus was a sauropod that roamed North America during the late Jurassic.
 The model is 1:3 scale, resin model. It is one piece and arrived painted in the dark tinted stain.

Thursday, June 29, 2017

Paleocast's Lepidoderma mazonense

This is probably my last aquatic "dinosaur" kit for a while. It's the Lepidoderma mazonense, commonly known as a Sea Scorpion
I don't remember how I found it on Etsy, but it's from an artist called Paleocast. The kit comes with just the animal. 


The base is a re-purposed aquarium decoration I got from Pet Smart. Pet Smart has a lot of terrific looking resin decorations - rocks, corals, trees, branches, etc... The very bottom is a simple pine base topped with sand my my nearby beach.

The model is one piece - the animal. Despite being well packed, one of it's legs was snapped off. It snapped cleanly and was super glued back on with no problems.
The only thing that looked odd to me was that the legs seemed to be connected to nothing as well as that appendage hanging out the back. I didn't research the anatomy figuring that it really wouldn't be seen, so I just connected everything with some Aves Apoxie Sculpt. 

The next thing was to paint the animal brown, and then with a piece of sponge, dabbed an orange brown of the model. Then washed it in Citadel's Agrax Earthshade. He's standing on his head while he dries, as I look at what pine base will fit the animal and little resin decoration (in the background).

Finally I carefully drilled a hole in the thin body and one on the coral. A clear acrylic rod put him in place.  I added my beach sand and then toss on a few tiny shells from the beach to finish off the front. For the back (which was pretty empty) a created a trilobite with some Aves. 
To finish it off I mist coated the whole thing in a thinned down Turquoise and gloss clear coat to make believe it's all underwater.  
Thanks for looking. 


Wednesday, March 15, 2017

The Caveman T-Rex Part 2)


It's been a while, so to see part 1 - click here - http://kevtk.blogspot.com/2017/03/caveman-dinosaur.html

Picking up where I left off I primed the model black and started painting. In the movie the dinosaur was, depending on which image you looked at, simply all gray or a gray green color. I thought the gray would be a little plain so I used 2 Vallejo colors. Oddly enough they are both named Green Gray (?!). But the loc. numbers are different - 101 & 106. Number 101 is also know as RLM 2 for all you military plane modelers. 101 is darker than 106. So the painting began.

 While the T-Rex is drying I turned my attention to the base. This time around I just wanted something really simple. But first I looked up the movie poster and saw the typical 3 color blend to the logo letters. I gave my best shot trying to mimic the look, first by spraying the yellow and then the orange - 
By adding the red and then the black background. I was finished with the logo - 
From there I set upon the rest of the base - 
Then I set the T-Rex on the base and I was done - 

I used wire to loosely pin him to the base. But it just didn't sit right. It looks like one guy sculpted the dinosaur and someone else sculpted the base and didn't communicate. I couldn't find a spot where he stood squarely on the base. In one of the pic you can see a toe on the left foot off the ground. That would definitely get "points off" at a model show...  I may go back and cut that toe off and modify it so it touches on the ground.
I also just saw a You Tube VIDEO where this polymer artist sculpted some plants. I have some green FIMO somewhere and just may give that a try to fill in the base a bit. 

Thanks for looking.