Monday, December 30, 2019

BPMS Day to Bulge Contest

At the December meeting of the BPMS was the D-Day - to Bulge contest. With armor and the like not really my thing, I defaulted to what I know best - figures.

My figure was an Alpine Miniatures 101st Airborne Screaming Eagles soldier.  They were there at the Battle of the Ardennes, so that gave me the background for the figure.

The post I made a few weeks ago describe THE BUILD, so refer there for that.

I was happy that the vignette received the 1st Place Award, and also got the certificate for Best American subject.  Thanks for looking.


Thursday, December 26, 2019

2019 Review

Looking back at 2019, it was a pretty good year in my attic lair. What helped me out was that I declared myself a sculptor (haha) and actually showed people the garbage I was making. LOL ;)   Anyway, here's my review (asterisk pics are my sculpts).


Friday, December 20, 2019

Masterbox Medusa

Another Medusa to add to my collection was Masterbox's 1/24 scale styrene Medusa.


I built this kit so long ago I have no idea how longs it's been. I was waiting until I finished a little vignette to show it off. Well I finally created the base, so now she's officially finished.

Built according to instructions, I took liberties with the paint job -


 The base I made was decidedly simple. Cork for the floor and steps. A plastic cake tier for the column, and a piece of foam for the top framing of the vignette. All of it got a few coast of V's white primer.


The vine was  homemade with the longest piece of the hanging basket liner thread I could find, and then I placed some of the seeds that look like leaves for miniatures dioramas, one by one on the vine. They are a tan, but I colored most of them green. but did leave a few as dead for contrast. Some pigments as staining on the ground, and a few resin skulls from Green Stuff World. That's all it took. Thanks for looking.


My usual comparison pic with the soda can. ;)

D-Day to The Bulge Model Challenge

My local model club - BPMS - announce a model challenge to coincide with the 75th Anniversary of the US's entry into WW2.

Not being a military model guy, I had a hard time decided what I was going to do.  Being figures was my thing, I looked for something that might fit the bill. I found this 90mm Alpine Miniatures kit of a 101st Airborne Screaming Eagles soldier from Last Cavalry.  Doing a quick search I saw that there were there at the Battle of the Ardennes Forest. From a friend building a similar scene with armor vehicles I know that there are many pine trees in the forest, and with that I had the vignette in my head.

I started with the figure, and honestly the box art was of little help. But doing an online search led me to a seller that had a series of 360° view of the model. They didn't call out the colors so I did my best to match them up. 


Because the soldier wasn't dressed for the Ardennes winter, and I would have to use artistic license, I decided to help it look better by adding a bit more red to the soldiers cheeks, nose, and hands to give the illusion he's very cold. 


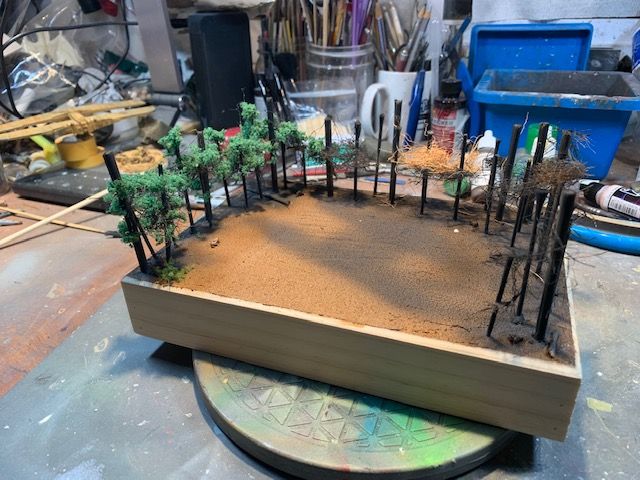
I found a section of log in Michaels, and two two different sized dowels to represent the trees. This is supposed to be an old growth forest so I took it that the trees would be pretty large.  I cut the dowels at 7in. lengths, which is plenty of room above the soldiers head. They were screwed thru the base and into the dowels from below.  The ground is the Plastic Wood putty, because it dries incredibly fast. 

 I wanted to make a sort of "roof" for the top of the vignette to frame the scene so I have to make a few pine branches.

I started out with 3 or 4 long folds of florist wire and tightly twisted them. 


 After taking it out of the drill I untwisted a few strands to create the smaller branches. Next step was to dip the branches into Mod Podge.

After making sure I only had a thin glue layer at the ends of the branches I pour whats know as Chinchilla Dust over the glued wire. This is sand for... chinchillas... apparently they can't take water and only takes dust baths. It's used here because it is incredibly fine grained and helps maintain the scale look. You buy it in a jug the size you see and one of these jars will last a life time!


The Mod Podge also dries *very* quickly and I was able to glue them into drilled holes at the top of the trees. I did leave one on the forest floor with yellow leaves to busy up ground with a few dead branches. You can see I also added dusted Mod Podge to help simulate some roots for the trees.  The trunk of the trees also got glued and then a dust bath to help simulate the bark.


 Next step was to add the dirt. It's that pre-mixed  stuff you get from miniatures dealers. You can see I also added the "needles" to the pine trees. They are just 2mm static grass tufts grabbed with tweezers and the bottom dunked into Mod Podge.  After dunking, hold the tufts for a few seconds and the Mod Podge will start to skin over. Then push it into place on the branch and the tuft will stay put. They made pretty good needle bunches! Do that a few dozen times, and you have nice pine branches.


Adding a few layers of yellow and brown grasses to the forest floor, it was time to add the snows that was seen in pics of the Ardennes. My soldier didn't have the heavy winter jacket on so I took artistic license and only added a little snow... And with that I was done. Thanks for looking.


Troop Transport

This kit has been in my stash for a very long time. So long in fact that it outlasted the producer - Two Fat Guys.  Sidebar: one of the guys went on to form JPG Productions. The 1:2256 scale model came in 7 or 8 parts (I forget now) and was very easy to clean up and get ready for building. The parts went together effortlessly.


Looking at images from the Phantom Menace movie, it had this beige, almost rust looking color. What I decided to do was start dark and then mask off sections which would be panels. Then sprayed a lighter color. 
 I did the masking and painting for a number of levels until I had my lightest color. Then removed all the masking tape. Thankfully no paint peeled off from this procedure. This made the wings look "busy."  Then I weathered the ship.

Then it sat and sat.  I knew I wanted to do a little vignette of when the ships landed in the forests of Naboo. finally when I found time, I took an open ended box from Michaels which I turned over and used for a base. Then I took 3 different sized dowels (one size was wooden cotton buds) as the trees. I used cut up pieces of the fiber hanging basket liners as branches.


When that was done I added two different times of ground foam as leaves and I finished it up by gluing the ship in place. Thanks for looking.


Friday, December 13, 2019

Jacob Marley

Another excellent sculpt from John Dennett and Moondevil Studios. The 1:5th bust was cast in a light green odorless resin. The kit comes in 2 parts - the bust and the base.

After washing with warm soapy water, and giving it a coat of primer I wanted to make Jacob the ghost he was when seen in his scene of A Christmas Carol.  I had used Citadel's Nihilakh Oxide on the Ghost Lighthouse Keeper and decided Jacob needed the same treatment. 

But first he needed his earthly colors. As this movie (1952 film) was in B&W, I was free to use whatever I want. So I decided on a white shirt, black jacket, and maroon tie, pale flesh and auburn hair. 

Ol' Ebenezer looking on favorably
From there I started his ghostly change - 
The purple is masking fluid to protect painted eyes


I went back and forth with Jacob adding and subtracting the green and white, until I got a look I liked. The base was painted, and I added a little snow. Done. Thanks for looking.