Showing posts with label SciFi. Show all posts

Friday, September 13, 2019

GFR Leia

After taking a few days breather after finishing good ol' Chuck, I picked out Leia, a recent pickup from JersyFest, as the next bust. This is a very nice model from Good Fellas Resin.
I figure with her costume white, and her blaster black (according to the pics) all I really need concentrate on is her face.

Time to clean. It is a very nice kit, but there was some very thing seam lines that need to clean. Also here and there it looks like there was some grow lines from the 3D printing process. It wasn't everywhere, just here and there. Some of the grow lines actually help out as it looks like the pattern in the fabric!

I sprayed the body with a gray primer to make the seams stand out and just went on from there.

Cleaning the seam down the gun with it's ridges was the hardest to clean

Leia/Carrie likeness was said to be hard to capture. Good job here.
 This tool is used to help make panel lines on planes etc... It cuts out thin ribbons of plastic. Here it helps define hair strands. You can get one from Micromark.

Check back for part 2. Thanks for looking.


Thursday, July 25, 2019

Needful Things' Leeloo

This time we have the Supreme Being from the film The 5Th Element.  This is a a 1:5th scale kit in white resin. Being that it was an older kit, it did have some seam lines and pinholes, but nothing anyone familiar with garage kits couldn't handle. She's dressed in her thermal bandages as she appeared right after she was reassembled. The base which is hard to see now are 4 connected tiles representing the 4 stones.
The face is a pretty good likeness  

Starting to clean the kit up, the first thing noticed was the pretty big hole at the bottom of her hair. No worries a little Aves filled the void, and then a little sculpting remade the hair strands.


The assembly was next and her head and arms went on with little trouble.

This was one of those kits where I built a little, put it aside and the came back to it a few days or weeks later, did some more, put it away again, etc...  I think it was the amount of skin and the seam lines that needed to be filled and have disappear into the paint that gave me pause. I must admit that this is one of my few 3 foot models. It's going to look good from 3ft feet away, but get closer and yeesh! some of the seam lines I just couldn't get rid of...

So her paint job is going to be basically a skin tone, orange hair and then the white bandages, The stones are a tan/brown color so that's what was done.

During this time, my A/C in the attic dies, and I had to leave it for a few days. When I came back to it, the oddest thing - cracks appeared in certain places. In the creases under both breasts and across her back had these hairline cracks. I never considered the heat until just now, but it was weird seeing them. Vallejo's plastic putty made short work of them tho, and I was able to quickly repaint.


After a quick shot of matte clear coat I went to work on the stones base. The base was fairly smooth. Starting with the darkest brown I had I gave it a coat. Then with progressively light shades going up to a buff I sponged on the colors creating as much texture as I could. Finally I got Vallejo's Brown wash and in the a/b gave it a mist coat. I needed a little something else, so I took V's black wash and did the edges and the seams of the stones. With that I was done.  Leeloo makes a nice addition to my meager 5th Element collection.  Thanks for looking.


The color variations of her hair is washed out in this pic. Sorry.

Monday, August 27, 2018

AT-99 Scorpion part 4

I needed to take a break from cleaning the bad castings and started to paint the few parts that I thought was ready to go. First up was the rotor blades - 

Then moved on the to fuselage - 


The final for the day is I took one of the pilots from the 1/72 scale pilot and crew set and painted him up. The pilots had just a typical green jumpsuit. The main characters had helmets with no visors, but mine did so I just painted them a gloss black. Thanks for looking. 


Monday, August 20, 2018

AT-99 Scorpion part 3

The torment continues. Moving on, I was up to tackling the missiles and their racks.  Once again I had to dig the missiles and racks out of a lot of flash - 

 I cleaned two of them, and noticed that, once again, the mold had slipped or something - the missiles had this wide seam down the side and was also twice as wide as it should have been.  Ok, I'll have to make my own. I cut the tip off one of the missiles and took my trusty 1.2mm rod to make up the length of the missile. With the vanes were equally wonky, I took some flat styrene stock and cut out a rectangle. gluing it to the rod, it became quickly apparent this wasn't going to work. I had 8 missiles to do.   Nope I was going to buy some aftermarket missiles. 
Heading to eBay I quickly found quite a few missile sets. The one I chose was this one - 
 I noticed that while I needed 8 missiles - on the model they were all the same type - none of the aftermarket ones had 8 missiles. This meant that I would have to buy two boxes of them. Am I out of my mind?! I'm not paying an extra $10 for 2 missiles from the second box. So this AT-99 will have 4 of one kind and 4 of another.  There was no way to pay for shipping (it was free) to get them here faster, so I'll have to wait for the 1st week of Sept. - when they arrive - to continue the missile part.

Then I actually caught a break. I was watching the Sunday marathon of military aircraft on the Smithsonian Channel. One show was the story of the Apache helicopter. Then it hit me where the design for the Scorpion came from. It was so obvious, I don't know why I didn't see it right away. It also solved 2 problems I had. On the kit there was these 3 protuberances. I couldn't tell what they were as each of them had a big bubble hole on the side. The instruction images were also useless (more on that later).  But seeing the show helped immensely. They ended up being two transmission gear boxes, and a light - 

Once again I cut the nubs off and for the gearboxes I found a styrene tubes of similar diameter, glued them on and then shaped it as close as I could get it to whats in the picture.  For the light I took a .5mm (?) clear rod and matched it to the size of the nub. I left a little of the nub to act as a seat for the light.  How could I make it a light? what I did was take out a micro drill bit and drilled out a hole as close to center as I could. Inside it looked a little rough, so having just Futured my canopy, I dipped the light into Future and it got rid of all the drill marks. :)   Images showed both a red light and a yellow light.  I took some Vallejo transparent red and a tiny brush and put some red into the hole. I'll install this after the painting and weathering is complete.

Enough for one day. More soon. Thanks for looking. 
 

Wednesday, July 25, 2018

TIE Experimantal Finale

Getting the craft together was pretty simple, but when I went to get the windscreen on, it just looked off. Not the fit, but I had painted the "guts" in the window too light. So I went back and darkened it up a bit. There's a lot going opn in there, and didn't want to just black it out, so I came up with what I think is a good compromise.  
With the windscreen on I was done. Thanks for looking. 


Tuesday, July 24, 2018

TIE Experimental

This build has been running in stealth mode for a while now. It's called the TIE Experimental from Trilliance Models. Looking up info forr Trilliance, I found nothing except a place holder at Scalemates. More than likely I got it thru Starship Modeler, but even they have no listing in their Store. 

It's obviously an older kit that was one of a number of kits that I pulled out of a separate stash I had. 
The kit comes in 4 pieces of gray green resin and 1 in a nicely done clear resin - 
  Most of it is very clean and has sharp decals. There is, however a weird area where the pour plug was in the power panel/vane - 
After cleaning the pour plug on the panel, I started in on cleaning up the pour plugs at the end of each pod arm.  Here I used a Dremel flat cylinder bit. I create a divot first and then it's easier to flatten the rest of it out. Makes it nice and easy. I learned this from one of the guys build launch vehicles over at the Yahoo Real Space Modelers.

 
Just the divot(L) and the cleaned one(R) on the pod arm

With the seam lines, flash and pour plugs gone, the first step I did was to glue the cannon onto the one pod. You can see the pod on the right, where the pilot should be, is filled with "electronics."  With that I called it a day. This will be an easy one. check back for the finale. Thanks for looking.

Friday, July 20, 2018

Pans Labyrinth's El Fauno

This is a bust I found on Etsy, by Noemi Smith. I 'm guessing she kept #1 as there was an inscription on the bottom of mine with an autograph saying "#2 of 50." How cool. Anyway, her store there is Angels by Noemi.
It comes with just about an invisible seam line. It also has it's eyes glossed, so if you just wanted it to leave as is, you could. Is it a perfect likeness? No. But it is very close and the perfect size for my shelves.  

At first I decided to make this a dry brush only experiment-
 Then it went a little farther -
Then finally I said "Who am I kidding?" And added more detail - 

It was here that I discovered whey the bust looked off. It was bald!  In the film, El Fauno definitely had hair.
Hairy El Fauno
 So besides the obvious of leaving it alone and hope no one else notices, I had two choices. Get out the Aves and start sculpting or go WAY out of my comfort range, get some hair and start winging it. 
Here's where the model sat for a month or more until I got up the courage, and stopped at my fav "online sculpting place" MoreZmore, who has all sorts of supplies for sculpting, dolls and more. I bought some Tibetan wool. 
I watcher her video on how to do it, as well as a few others on YouTube

Then I got out my glue, hair and scissors and started in -


The glue I got, Fabri-Tac was the sore spot. You had one chance to get it where you wanted it to go, or if you touched it again it would stick to your fingers and not the model - I learned that a wet finger left the sticky hair where I put it.  The other thing was that on one or more of the video's, they say when you come to an end put it on from the opposite angle and this way you don't get an ugly seam line. This didn't work out for me. So what I did in the end was put a drop pf the glue on the model and just jabbed a bit of hair in at a 90° angle. This ended up looking ok for me. 

After that I got out the scissors and pretended I was a barber, and grabbed the hairspray to make it stay where I "styled it. ;)   
I was done. Is it terrific? No way. But I'm happy with it. Thanks for looking. 


Saturday, July 7, 2018

Another look at the Pitch Black Marauder

A request was put out on my thread in the Clubhouse for a certain angle. I took pics and posted them. But I guess to keep things even, I'll post them here too.
The request was to see the beast from an underside angle. Thanks.


Thursday, June 28, 2018

The Marauder Part 2

With the repositioning and puttying done, it's time to paint. Looking at screen shots, the animal is mostly gray and more gray. Too boring - so I decided I'd put a little patterning on it.  
But first I painted the mouth - again adding a little color. The mouth was washed with  some purple, added highlights of flesh color to the high points, and then washed it in Army Painter skin wash to even it all out. The teeth were painted in pale gray, and still looked a little dark so I gave it some gray white to brighten it. I clear coated the mouth with Satin and then glued in the mandible- 
You can see a little of the mottling on the legs - a black wash over a gray basecoat. The creases were sculpted a little heavy handed in some places. I didn't want to accentuate those, but the dark wash went into some of the other larger creases. 

Turning to the wings, I base coasted the bottom skin parts with flesh, and then did the vein squiggles with purple. In the film you see their guts a sort of green blue when exposed, so why not purple under the skin? ;)  When dry I added a mist coat of gray to put the "veins" under the skin. 
Its a little hard to see, but I also airbrushed purple stripes to the bottom of the eye stalks.

For the top, I just outlined the bony parts and then did some black wash squiggles - with a brush this time. Squiggles closest to the bones got a second layer, further away got just one. Thanks for looking. 
 

Tuesday, June 26, 2018

The Great Cthulhu

Who? The best answer to this question is found in Lovecraft's tale "The Call of Cthulhu". Cthulhu is a monstrous entity who lies "dead but dreaming" in the city of R'lyeh.
In Lovecraft's story only the physical description of the monster was given; no colors or anything like that. So that part is up to our imagination. 

The kit came in 5 parts and was nicely cast in a cream resin. There were a few bubbles, but no real indications of seam lines. Here he is just resting on a coral or volcanic base as I glued the head on and Aves on the neck. You can see the wings in the background - 
The wings are fairly thin and I had to think of how I was going to build this. Do I just want to build it and never transport it anywhere? No. I decided the answer was to install magnets to  take them on and off for transport and then display. But first I needed to mask the seamline. So out came the Aves and I made a little ridge to disguise the join line -
Then the magnets. You can also see the the body has been connected to the base. The tail was actually part of the base. So the seam to be filled was on the rump - 
Thanks for looking.

Pitch Black Marauder

Pitch Black was  a film that was released in 2000. It's about a commercial transport ship and its crew are marooned on a barren desert planet,  M6-117, full of bloodthirsty creatures that only come out to feast at night. But then, they learn that a month-long eclipse is about to occur.It was the first time I was introduced to the character Riddick. But the star of this post is the animals they discover as the eclipse begins, and these guys come out of their underground hiding spot. In the movie they didn't have a name. The model was called a Marauder, but looking online, they were called a Bioraptors. So you can take your pick.

Being they only came out at night, and an uninhabited planet is very dark, you never really got a good look at these monsters.  Only by getting a look at different screen grabs do you get a full picture of what it looked like.


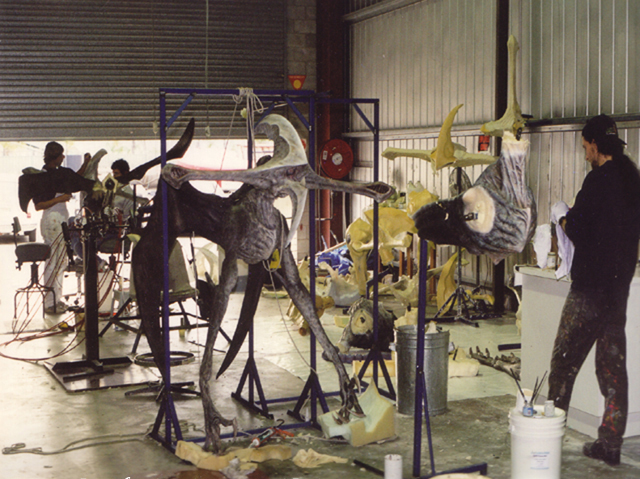
Only way after the fact did you get a look at behind the scenes pics of what it looked like - 


The model kit came in 8 pieces, of a gray resin. There were no bubbles, and some seam lines. But the odd part was that it was modeled almost directly after (from what I can tell)the concept art - 

The odd part being this weird ballerina stance. all the different poses you saw in the movie and they pick this? If it wasn't the only kit that I saw, I would have passed on this version.

But anyway the building begins. Lining the various parts up for pinning, I discovered that no matter which way I turned the head, I couldn't get it to line up with the neck. It was almost as if there was a piece of the neck missing - 
 No worries, with Aves, all problems can be solved. So there was some Aves work on the neck, wings, tail, where the legs  meet the body and then the ankles. what I decided to do was make the monster in flight around one of their "smokestack" exit tubes, so I cut the weird ankle joints and positioned them straight down and slightly backward - 
And with that, it was time to call this session for the day. Thanks for looking.