Showing posts with label aircraft. Show all posts

Saturday, July 22, 2023

Tamiya X-1 Finale

 The finals steps for the construction was to put on the landing gear and doors. Usually I put them on when the instructions say to, and then I always knock them off somewhere along the line. Another was to paint and glue on the cockpit canopy. The final step was to put on the decals. Despite looking rather aged, they went on with no problems. One toward the end did rip, but joined up rather nicely. 

With the number of pitot tubes on the craft I decided to glue the plane onto it's base. For that I took a regular 6"X6" square piece of wood and then cut some styrene grooved with "expansion joints" for detail. With that, I was done. Thanks for looking. 


Sunday, July 16, 2023

Tamiya X-1

 Back to my aviation subjects. This time I'm digging into the historical that isn't a hypothetical or drawing board plane. It's the Bell X-1.  Most people will remember it as a supersonic research project built by Bell Aircraft

The model is 1:72 scale with 2 sprues of gray styrene, one clear, include the making for a see through section of the aircraft, and one sprue of white which will be a base for building the aircraft in flight mode. 


First thing after giving the instructions a once over was to convert all the paint ref. numbers (all Tamiya) to the color names. I decided that I wouldn't make the plane see through so I could eliminate a lot of the planes extra innards... Assembly of the cockpit was first.


The kit comes with a ball bearing to act as a weight, and they have that located in the first cylinder behind the cockpit. I also thought this a good idea to add as I couldn't tell if you could see it or not once the cockpit was installed. (You can't). 


Right after the above image was taken I installed the instrument panel, and then the engine cluster in the read. Only other thing to do was close it up. 

Time to get paint on the X-1. Vallejo is notorious for have pretty weak pigmented yellow and orange colors, so I bought the Tamiya brand. However reading it again it's 8 parts orange, 1 part Tamiya Clear Red. I didn't have Clear Red, but Vallejo has Transparent Red. I thought the result turned out pretty well. 

Next was to install the wings and horizontal stabilizers. All went on fairly easily except one of the horizontal ones the tab seemed in the wrong position. I cut until it might has well been a butt joint. So I added some CA glue to the styrene cement, and gave it support. I left it over night to dry. So that where we'll leave it for now. Check back and thanks for looking. 


Saturday, April 29, 2023

Northrop XP-79B Finale

 For the finale, my main job was to paint the plane and then add the canopy. Websites were saying it was white, the instructions called the color linen. So I decided to split the difference in that I took Ivory, and add one drop of V's Iraqi Sand which is a light beige color.

Next was the canopy. I found that yes indeed, the canopy was split vertically down the middle. So I was just a matter of gluing the 2 halves together.  They are to be butt jointed together, and I had a piece of Tamiya tape at the ready. I had the two pieces and touched it with some Tamiya thin,seeing the glue run around the joint. I then added the tape to make sure they held until the weld was complete. Thinking so, I gently put it down on the tale and let go. Immediately I felt my finger slowly pull away! What?! Yep. Glue came out of the joint and ran to where my finger was, leaving this very nice finger print. Insert multiple cuss words here. 

While I was waiting for the canopy to dry, I created a little tarmac with the plan of gluing the plane to the ground to eliminate the tail sitting or the need for the little post to hold the plane up. 

After the glue was dry I sanded the sanding marathon, first with some 3M sanding sponges from fine to ultra fine. Then I went into the 1000ths grit. After hours with canopy was smooth again, but there was still a cloudy bit to it that wouldn't go away - even after a few dippings of Future. What I ended up doing was mixing Future with V's Smoke and created a window tinting. It ended up mostly making all the work I did to the interior moot, but the cloudy mark was covered up. 

Thanks for looking. 


Wednesday, April 5, 2023

The Northrop XP-79B

 I picked up this kit a while ago, just because it fit my  idea of an odd ball plane. It wasn't mentioned on the box that it was a Northrop design until I started to research. 

The military, toward the end of WW2 felt they needed a plane that could ram enemy planes similar to what Germany was rumored to be designing.  Northrop came up with this design complete with magnesium wings to help the plane survive the hit. 

One was built and on it's first trial the XP-79B made its first flight on September 12, 1945, however, 15 minutes into the flight control was lost for unknown reasons while performing a slow roll. The nose dropped, and the roll continued with the aircraft impacting the ground in a vertical spin. There are two accounts of the end. One that test pilot Harry Crosby attempted to bail out but was struck by the aircraft and died. The other that in the spin, with such forces, he was unable to open the door open to bail out. The problem was identified, and Northrop was ready for prototype #2, but they were told with the war over, there was no longer a need for a Flying Ram. 

RS Models, out of the Czech Republic offers the 1:72 scale kit on one sprue with another smaller sprue for the clear windscreen. Directions were exploded views and as I will find out a little vague on where parts actually go. The decals are well done.


 As part of the design, the pilot was to lie prone to better help him with the g-forces. The model comes top and bottom so part of the cockpit area attaches to the ceiling of the plane, the other part on the floor. A box forms the confines of the cockpit.

A bench for the pilot to lay on is to be painted a leather color, and the steering goes underneath the bench. The first vague part comes here. There's no real indication of how far out the wheel sits. So I made my best guess. The color calls for the interior to be "interior yellow." I never hear of this before and thought they meant the zinc chromate color. I only had the green zinc chromate which bears no resemblance to yellow so I painted it lime green (a color which will be changed in the 11th hour).

The tub with two sets of where instruments went. I painted instruments the best I could only to realize that once the halves are glued together no one will ever see them again.  Across the front part of the cockpit more instruments are on a flattened bar.


This let to the problem with the bar and the steering wheel. With no indication of where it went, I had it in my head that it seemed possible for the pilot to be stretched out with his arms holding the wheel on the "outside" of the instrument bar.  

That was until I found this image - - 


 So a little late but the mystery of where the steering wheel went was solved. This solved another mystery of WHY would they make the windscreen in two halves, split vertically down the middle??  Why when it's like that in real life.

But that will come next time after the glue dries and all the clamps come off the plane. Thanks for looking. 


Thursday, March 16, 2023

The 1:144 Convair KingFish

 This latest kit is another to add to my prototypes/experimental/ or never was planes. It's the Convair KingFish in 1:144 scale from Fantastic Plastic. The kit comes in 29 resin parts, and is patterned and cast by Anigrand Craftwork[1]. Good to see they they are sort of still in business.


In 1957 there was a contest to replace the U2 spy plane. The contest came down to Convair's KingFish and Lockheed's A-12, which would eventually became the SR-71. Giving this little piece of the story away, you know how it ends up.  Work on the KingFish continued for a few more months, but when the money ran out, the project was cancelled. 

With no real cockpit, the work started with the two engine nozzles that were embedded in the fuselage. Since they will be buried deep in there, I got out the silver paint right away.

Next there was a "spacer" mid-fuselage that I had never seen on an Anigrand kit before. It fit in there perfectly, and yet still left enough room for me to add some "Liquid Gravity" on each side as close to the cockpit as I could get.  Nothing was mentioned in the instructions about adding weight, but anytime I do not have a wheel in the tail, I add weights. 


*A is that spacer.

 Then came what seems to be the typical Anigrand landing gear. The cockpit had a lot of room and only one  tiny seat. I would have thought The cockpit windows were small as well, but no, it was wide open. So I did the best I could to add instruments with paint. Oh well. Looking back I should have added more to make it look "busier."


The paint scheme is an overall black. But black leaves me no where to go if I wanted to add some shadows, so out came V's Black Gray. Having a second thought that the jet was never completed, so it never did anything to get weathered. The decision was that except for a few chips (because I couldn't resist) I left it alone.  The decals went over the dark paint with not problems and with a layer of satin poly over the decals I was done... Or maybe at this scale a coat of matte is needed.  Anyway, thanks for looking. 


[1] I've included Anigrand's website for reference. It seems the site has not been updated since 2019, and emails bounce back.


Saturday, February 11, 2023

X-1 at the Cosmosphere

 The Cosmosphere in Hutchinson, KS is a top notch air and space museum. Worth a visit, if you've never been. 


Sunday, February 13, 2022

Douglas Sky Streak part 2

 It's been a while since I had the oomph to get back to the lair, But I got there and did a little more opn the Skystreak. 

My first fully (almost) successful elimination of seam lines on resin I gave a light coat of primer. 

There's a few Euro guys building models on You Tube where they paint a dark primer, and then some white squiggles on top of that which mimics an uneven topcoat spray. So I tried it.


Doing research, I read the color was Insignia Red, the write up also said Tamiya's equivalent was Flat Red. I don't have Tamiya, but Vallejo also has a Flat Red.  After the spray which covered and yet still showed a hint of the squiggle, the color dried... not the right color. So I ended up giving it a mist coat of V's Scarlet (a *tiny* bit more orange). It looked good, but that coat was enough to hide the squiggles. Dang it!!

The next day I came back and added the decals. evidently there is a few versions with both red and white color schemes. Being this is probably one of the oldest kits I have, I wasn't too sure about the decals, so the day before I put some Decal Film over them.  So today I cut them out and added them. Besides coming off the backing paper a little slowly they all came off in one piece. The stars and bars went over a little raised area, and with the film on they were a little thick. Before calling it for the day, I added some setter, to see if they snuggle down. Check back for the result. After that is add the canopy and the wheels and I'll have another done. Thanks for looking.


Wednesday, January 5, 2022

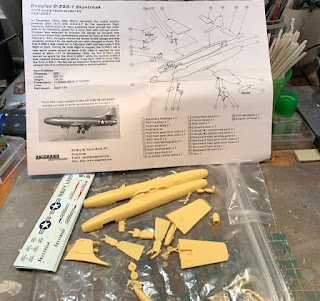
Douglas D-558-1 Skystreak

 The new year starts off with a look back to the NACA days and the aircraft D 558-1 Skystreak built by Douglas. From the website:

The D-558-I "Skystreaks" were among the early transonic research airplanes like the X-1, X-4, X-5, and XF-92A. Three of the single-seat, straight-wing aircraft flew in a joint program involving the National Advisory Committee for Aeronautics (NACA), the Navy-Marine Corps, and the Douglas Aircraft Co. from 1947 to 1953. In the process, the Skystreaks set two world speed records.

This is another very nice albeit old 1:72 resin kit from Anigrand Craftswork.

Not taking any chances of it being a tail sitter I added a lot of the Liquid Gravity beads to most of the open spaces forward of the landing gear.

The cockpit panel was just bare, and there was no decals for one, so I just added my own white dots. I should have looked first as all the instrumentation is black, but no one will be easily able to see it anyway...

The session ends with me closing up the fuselage with probably the best fit I've ever encountered with these smallish resin kit companies. Also on the drill is the seat. I tried something a saw where a tissue is white glued to the seat so it can be manipulated and form folds or creases. In this case it didn't appear to work. I just used one ply from the tissue. I'm thinking the tissue was too thin. Next time I'll try some toilet paper. Who knows- maybe 1:72 is too small to try it?  The final thing in the image is a line of sand color paint. Under the paint is a .5mm tape that will be the seat belts. But that's for next time. Thanks for looking.


Sunday, December 19, 2021

Muroc's X-36

 This kit has to be one of the oldest I won. I bought it at one of the first IPMS  Nationals that I went to.  Muroc Models is based in the Mojave Desert and produces resin kits and decals for display models. Many products cover experimental aircraft from the area.

From a website: 

 The X-36 is a 28-percent scale representation of a theoretical advanced fighter aircraft configuration. The Boeing Phantom Works (formerly McDonnell-Douglas) in St. Louis, MO, built the X-36, in a cooperative agreement with NASA Ames Research Center, Moffett Field, CA. It was designed to fly without the traditional tail surfaces common on most aircraft. Instead, a canard forward of the wing is utilized, in addition to split ailerons and an advanced thrust-vectoring nozzle for directional control. The X-36 is unstable in both the pitch and yaw axes; therefore, an advanced, single-channel digital fly-by-wire control system, developed with some commercially available components, stabilizes the aircraft.

 The kit was very well done, albeit very delicate. 


HA. Just noticed that the image on the box matches the size of the kit. Here it is with the landing gear installed. They wont on effortlessly, but again are delicate. I accidentally snapped the front wheel off without even noticing. Thankfully it didn't roll away and went back on easily.


The paint is one, but I had to be very careful not to make it too thick to fill in the panel lines.


The panel lines are very well done, but oddly there were not lines to indicate the bottom of the cockpit "window."  There is a little pitot tube attached to the instruction page with tape. But it was so small, I didn't see it until way after the fact. Here I attached one with the thinnest stretched sprue I think I ever done. ;)


The decals are on. I did have a little trouble at the start. With their age, I wasn't sure if they would shatter on the kit or not, so I tried two X-36 markings on the bottom. I didn't know until I started sliding the decal that apparently each letter/number was separate. I recovered the "X" and the hyphen, but the 3 got turned in reverse, and when I tried to flip it, it went into a ball that I couldn't undo. It would look dumb just to have the one, so the bottom has not decals. Then could the X-36 with the symbols on the top? I circumvented finding out by putting a coat of decal film over the line. They easily slid off in one piece.


Just about done. The pitot tube is so delicate that I decided I want to glue the craft down to some sort of vignette, hopefully protecting it. I found the image below and decided that was the image to duplicate. Looking through the offering I couldn't find any sort of 1/72 civilians to what I came up with (on Amazon) was 200 architectural figures for less than $10. I'll try to pick out 3 and finish off the scene. But that's next time. Thanks for looking.

The inspiration


Monday, March 8, 2021

RS Models Heinkel 112v3

 As I make it plain, I love the prototype, or never made if off the drawing board type plane models. This one was almost the case. Needing a fast plane this He112v3 lost out to the Bf-109s. Not because it was fast enough, but because they were too expensive. You see, the plane had a jet rocket in the tail. While the German's said no, a few were made for other countries. 

This is a resin kit from RS Models and is in my usual 1:72 scale. 


The one dislike I had for the model was most of the parts were put right on the pour block. You had to be REALLY careful when cutting parts off the block.

Once the cockpit was installed and painted (those tiny resin foot pedals were a bear to keep from losing) the fuselage was glued together.

Then came lots of filling and sanding!

I was so afraid I would break the landing gear before getting it off the block!


Then came the primer, and then more filling and sanding. Then tragedy struck. Despite it being a partial jet plane, it only had a wind screen. (?) Somewhere along the lines it was eaten by the dreaded carpet monster!!  Grrr!!


 I tried using the only other vac canopy I had. Wasn't the right shape, but at least there's something there, and I can say it's finished.  

The decals were ok, but needed a long soak to get off the backing paper. I keep complaining about my camera on the phone but this makes me really want to solve the problem. The instructions call for it to be RLM 02. But the phone had other ideas. Edit: I saw a video by ISM and gave hints on improving pics with your phone. So I retook. Anyway, thanks for looking. 


Saturday, October 10, 2020

Lenticular ReEntry Vehicle (LRV) Finale

 To see the previous entry, go here: http://kevtk.blogspot.com/search?updated-max=2020-08-13T21:59:00-04:00&max-results=7&start=7&by-date=false

 I had nothing but bad luck with the paint job on this model. Yes, it's simply white on top and black on the bottom, but I would paint the bottom the black. Let it dry. Turn it over and paint the white top. Let that dry. And when I went to move on there would be some scratch or nick in the bottom's paint. Re-paint the black and then there would be something wrong with the white paint. I must have at least 1000 layers of each color on this model! Grrr.  So I just left it for nearly 2 months!

When I looked at it again, all looked OK. So I proceeded with decals. Hoping I didn't have the same results as the Nuclear Wing, I started working the decals. These went on like a dream. I guess the model gods were giving me a break after their paint fiasco. There weren't may decals - just 4, and in no time, I was done. Thanks for looking.  


Northrup Nuclear Powered Flying Wing Finale

 To see part 2 look here: http://kevtk.blogspot.com/2020/08/small-updates-nuclear-powered-bomber.html 

 When I left off all I had left was to add the decals, smoke the canopy (so you couldn't see there was nothing inside) and I was done.  Easier said than done. The smoking of the canopy was no problem, but the decals were a nightmare. No matter how much water I flooded over the area, as soon as the decal hit the model, it stuck on, and could not be moved. After ruining one decal that goes along the cockpit, I left well enough alone and didn't bother with any markings on the bottom. 

But all in all it was a very nice model to build.