Showing posts with label Sci-Fi. Star Wars. Show all posts

Friday, March 15, 2019

The Last Jedi's Crystal Fox

Named Vulptex by the creators, this animal jumped right out at me while watching the movie. Then I saw a video on YouTube where one was created with clay. Thinking I could do that, I started out. 
Looking thru the various images, aside from fan art, there wasn't very much. I found one screen grab, and a few images of the robotic fox the SFX guys built. Oddly both animals looked different. I ened up using the one you see on the screen.


First thing I needed was the clay. I picked up FIMO Glitter White figuring this would look good as it'll mimic of the crystals from the planet. Next I had to get a skeleton diagram for the wire armature -
Epoxy was used on the head, chest and hips to attach the wires.

For thosae that haven't worked with polymer clay, the instructions says you shouldn't use on any more than 1/2" of clay without baking. So to keep from baking all the time, clay artists will use aluminum foil to bulk out the figure. So I used the foil to fill in the neck and abdomen areas. Then more clay was added over the foil -

If it was a regular fox, you could add some texture with one of the tools and you's be done. But being we have to add crystals, I textured the model, and then into the toaster oven for it's first bake.

while he was baking I was thinking about exactly how to add the crystals. First thing I thought of was to make them like teeth, bake them and then add them to the skin.  After two failed baking attempts  - both times they burned,  My thoughts were that the individual crystals were just too small and even using less temp that required and a shorter time, it burned. 
I decided to just add the clay crystals to the clay raw and then bake.
for this step I needed Sculpey's Liquid Bakable Clay. It looks like PVA glue and helps the new clay stick to the baked clay. I added another thin layer, and then started rolling and sticking in all the "crystals one by one. After 2 days of doing it on and off, I was done. 


Next I felt he needed some sort of base, So I applied some Vallejo snow effects to a piece of foam, and then pressed his feet into the snow around the base as if they were running all around.  Then according to the movie, there was a layer of red salt under the white top layer, so I painted the footprints a deep red. I also painted his eyes, nose and mouth with black and I was done. Thanks for looking. 


Saturday, February 11, 2017

Something New

I don't know how long ago it was that I first ran across the ships from the Star Wars X-Wing game at a local B&N. So I picked up a few.
Talking on the forums it seems they are more or less about 1/270 scale, which is a bit small small but still a respectable size for the larger ships. 
Soon after, if you look at Shapeways, enterprising guys have created ships not already done in the same 1/270 scale (I have no financial stake in this guy's store, I just like his models). Of course these aren't painted but that's no problem for the average modeler.
Recently I just saw a new ship, The Shadow Caster, which I just had to have. Turns out that this and other new craft are from the Star Wars cartoon Rebels

In real life the colors are a bit bright, but a simple misting of a light gray should tone it down. 

Then I noticed that a similar game appeared called Armada. The ships appear to be all capital ships. They are approximately the same size, so that really changes the scale. But once again, they are highly detailed - 

So if you don't mind the smallish sizes, have a look at these ships whether you play the game, or like me, just like collecting star ships.

Tuesday, August 2, 2016

Finishing the Juggernaut

Having gotten the vehicle toggether, primed and painted the next step was together decals on. Looking through the instructions there's no real indications of where the decals go besides the obvious stipes on the sides and the designs on the front and rear. So okay I'll wing it. Cut get the first decal ready to go on and put on the front of the vehicle and ... whoa ... they are *very* transparent. This isn't going to work. So the decals go inb the garbage and  I get my red paint, and Tamiya tape and I'll just do it free hand. When the striping as done, I thought it looked pretty good - 


Coming to the close here I felt I needed some sort of base to indicate the fighting that was going on. I too some Celluclay onto one of the woodn plaques I got from Michaels and made some uneven terrain. I decided at this point that I would add a few bomb craters, and maybe I would find something to drop into a crater.  When the Celluclay was dry, I primed black as I wanted to go for a scorched earth look. Adding some sand with PVA glue added to the texture-


The middle of the dio was left blank. No point in detail the part that will never been see again... ;)  Now I had to look for something to drop into the largest bomb crater. The model is supposed to be 1:350 scale and it was pretty tough to find something of comparable scale. In the end I figured I just wing it and found a Spider Droid from a miniatures game on eBay -

The droid came in a week, and as I thought it was pretty toy like. But I figured it was going to be blown up in the crater so I could really do a number on it. First thing I cut the antenna from the top of his head, the two back legs  and then cut his nose gun off. I found a replacement gun in the form of a very thing brass tube. Time to get the drill out. I drill out the hole for the nose gun, the left eye, and a large jagged hole to the side of the left. eye. The right eye I shaved down with an Xacto blade. I think to some of my very thin lead wire and created exposed wires that hung out of the hole, and the eye, and from the separated legs. I also took a pliers and bent the nose gun. Yeah he's pretty messed up. I then painted him with various pigments to make it look like he really exploded. I glued the main body into the crater and the legs went nearby - 


All that was left to do was to add black and white pigments to simulate ash, and then some brown pigments for some bare soil and I was done.  Thanks for looking. 


Wednesday, July 13, 2016

JPG's Star Wars Juggernaut

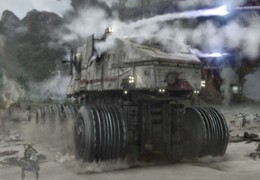
This time around I moved back to the Star Wars  genre to build JPG's Juggernaut. The Juggernaut was seen in a number of the Battles in the prequels - -


The model comes in quite a few parts - many of them being the wheels - 

Each wheel has a few mm of extra resin from the pour, and this needs to come off. I do have a sanding wheel, but the kit wheels small, and I was afraid of sanding the tips of my fingers off, so I still used the sanding wheel, but sanded with the power off. Its a coarse grit and went pretty quickly, but doing all 20 halves made it into a "wax on, wax off" type of situation. I was glad when they were all done. 

But after that, the chassis and the body parts went together almost too easy. All extra parts almost fell in place. What a nicely designed kit.


One little snag was at the end of the main body there were a few series of tiny bubbles, but some Tamiya putty made short work of them - -
Putting the small details on is where I ran into trouble. The problem is the instruction sheet looks like it had been copied 100 times before being copied once more before being put in the kit box. It was too blurry and lacked contrast to where I couldn't see what went where, in which position.  
Now I'm not picking on JPG on this. I gotten quite a few kits from different producers, and many have that "10th generation" copy look.  I would like them to see them put an original in .jpg or .pdf and put it on their site so the modeler could go and print out a super crisp copy.   OK, I'm off my soapbox. 

Once I found a good image I was able to put all the details on - - 

 Then I went to my new way of priming every and painted it all black with the Stynylrez primer - 

Next, came out my Vallejo Silver Gray color. This is a good color to use when you want to paint white. If you use white straight away, then you have no where to go to highlight. I did add White to a few panels here and there - -


I also added Vallejo Jet Exhaust metallic paint to the wheels to give them a slightly different look.
Next up is to gloss, decal and weather the vehicle.
I also have to start thinking about basing it...
Thanks for looking.


Tuesday, May 17, 2016

Rogue 1 Images

There's been a sneak peak at some of the new characters and ships from the new SW movie Rogue 1
If you don't want to know don't click passed the break. ;) 

Saturday, April 30, 2016

Some Classic Ships

In a thread at The Clubhouse, I mentioned the classic star ships I built. So I figured I would post the image here too --
L to R: Friede, Luna, and Rocketship XM

Saturday, February 21, 2015

SS Ion Cannon Finished

Well, the Ion Cannon was so easy being only 4 parts that I'm done. I thought I had taken a pic of the first thing I did which was the cliff face. everything was painted in a light gray primer and then I used Citadels Nuln Oil, Agrax Earthshade and Reikland Flesh washes and covered the cliff. I then put a little extra Nuln Oil into the deepest recesses. 

Monday, February 16, 2015

The Old and The New

With Twisty and Yeti done and me still working on the seams of Armstrong's jet, I decided to head to my "To Do" pile and pic another kit. 
This time I was looking for something simple. I chose Scale Solution's 1:1000 Ion Cannon. You see it during the Battle of Hoth during the beginning of The Empire Strikes Back -