Showing posts with label Citadel. Show all posts

Thursday, June 8, 2017

Zombo and the Hedge Lion - The Not at Wfest Builds

For those in the know, Wonder Fest went off last weekend. Wonder Fest is a scale model show and competition more dedicated to the horror, sci-fi, and fantasy genres. If you'd like to know more check the link or for a better flavor search "Wonder Fest" in YouTube. There will be a ton of video.
One of these years I'll get there, but this time around I have two completed builds and one that's getting ready for paint, MFTW Vampira (will be seen in it's own post), that were done during the WF weekend time frame. Being these were easy builds, I have no WIPs as once I started I just got in a groove and moved along.

The first is Zombo. Zombo was a character that appeared in an episode of the Munsters (1966).  
 
This has been colorized. Cannot find an actual color image.


Eddie, the son, wins a contest to meet Zombo, and appear on the Zombo show. Like many kids, Eddie thought Zombo was real, and when he got to meet the man behind the Zombo - Louis Nye - he was hugely disappointed to where he ruins Zombo. I'm sure the episode is on You Tube. 

The kit is about 6 inches tall, and was gotten from a guy on eBay. As a bonus he also threw in Gran'pa Munster. Nice! But anyway, the kit came in 3 parts - the head/body arms are all one piece and then the two claw hands were separate.

The sculpt was ok. There are parts especially close to the deep folds of the costume where it get a little rough. 

I didn't want to just maks another B&W model. So I took the colored image for the face but did the symbols on his robe and cape in Vallejo Silver and Gold. The robe was done in German Gray, and the cape in Gray Black. His face was done in a Blue Gray. To change things up I made his pants and shoes two colors of brown.
I'll have to come up with a base for him as none came with the figure. As of right now, Zombo is just stuck in a piece of foam primed black.  


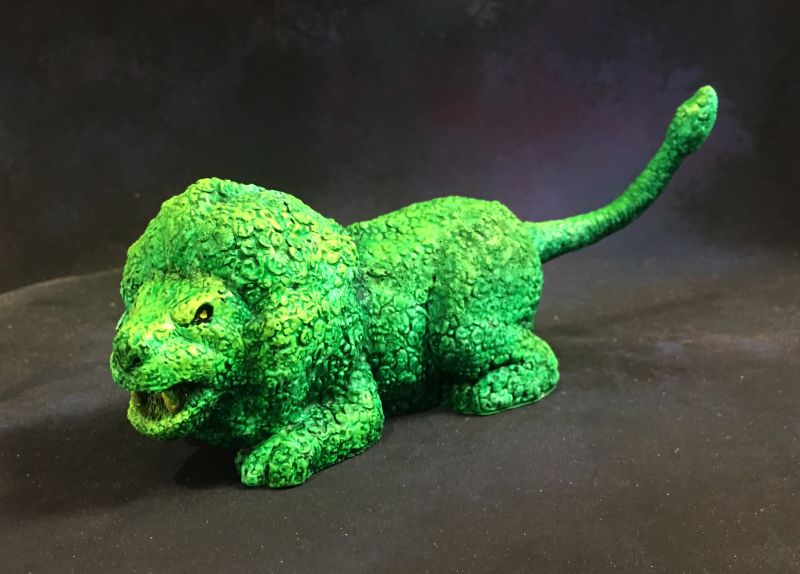
The next build is another simple one. It's the Hedge Lion that appears in the book and made for TV version of The Shining. As you prolly all know the book/TV mini series and movie are very different stories. 


The Lion was obtained from Gillman Prod., when you bought their Jack Torrance with an axe bust. 
The Lion came in two parts - the body and then the tail. I painted a base coat of Vallejo green with lighter green highlights, and the shadows were done in Citadel Green wash. The eyes were painted black, then a dot of white, to lighten the area knowing I was going to end it with yellow. Vallejo yellows are rather weak pigment wise.  Thanks for looking.


Sunday, October 30, 2016

The Carver

Just in time for Halloween, we have The Carver. This is an original kit from the mind of Jean Louis Crinon.
The kit came in 3 pieces - the head/body/base, then the pumpkin, the knife blade is the third. The kit also included a length of wire which you form the hair strands.
This was one of the 4 kits I was doing at the same time and rather than stop to take pics, I just kept going so there are only a few.
While I stuck to how it was painted on Crinon's site, the model reminded me of an old mouldy sock puppet with evil on it's mind from being left for 50 years in the barn.   Oooooh!  ;)

Here's the inspiration IMAGE.

Going after a burlap bag type head, I found an orange brown in the Vallejo paint range. An olive green followed for the shirt. The floor was simply done with a cork brown and then washed over with Citadel's Agrax Earthshade (I love that stuff). The pumpkin was base coated in a Citadel Orange. (I can never remember the name).
Then it's socks were done in Vallejo red and ivory. I also did the nails in the floor and the stitches on it's head with Vallejo Burnt Metal metallic color. I added a Citadel green wash to make the burlap mouldy, and then went over it closer to the button eyes with Nuln Oils to make the buttons stand out. Some Nuln Oil also went into the buttons to highlight the thread.
Finally I put his hair in. One hole was apparent, but the other two had been filled in. So I just used the site's image as a guide and added the others. The strands got painted black. I then highlight the pumpkin, and painted the stem with Black Green, followed by and olive green for the highlight. 
The knife blade was added and painted Vallejo Aluminum metallics.

I weathered up the socks a bit. With a piece of scrubber pad I included some dried blood made of Cavalry Brown to the shirt. Not know how to leave well enuff along I also added a few jabs of the scrubber pad with some red. 
Here's the final result. Thanks for looking.


Friday, October 28, 2016

Sandor Clegane

Who? Many people know him better as The Hound from the HBO series Game of Thrones. This is another kit from Gillman Productions.  He came in two parts - the bust and the base. Once again, it's a very clean kit with one tiny bubble, and seam lines that are extremely thin. 

I don't have many early stage pics on this one because I got back into my bad habit of having multiple kits on the bench at the same time. So I would just go from one to the next to the next and back again.

The first image I have is after getting his face and scar done - 
Looking at this image I thought WOW that looks too raw, and decided to have a look. Well, it seems that over the seasons his scar went from very red and fresh looking to very pale. So anyone painting this kit has a wide leeway of how the scar could look. 
From there I added color to his beard and clothes. I wasn't sure if these clothes came from an actual  scene or made up by the sculptor. Not feeling in the mood to search 6 season worth of wardrobe changes, I mad his shirt gray and jacket brown, and while I was at it I painted in the eyes. Wikipedia says they are brown.

 Next up was to tackle the rock work on the base and the what I think is a wax seal.  The rocks were simple a series of gray washes and dry brushing. The seal started with Citadel's Khorne Red, then highlighted in a few stages with Mephiston Red, Evil Sun Scarlet, and finally ... I forget the name orange. Oops. ;) 
Next, the jacket needed a little something. So I took an orange and made little chevron shapes to each of the brown squares to indicate a highlight. Also, along the bottom of the base is sculpted in grass. So I hit that with a little olive green, and gave it a wash with one of Citadels green washes to darken it down a bit. - 
Here's where I had a minor disaster. Seems to be a recent regular for me that something goes wrong nearly at the last minute. I sprayed some of the Vallejo Matt Clear, and as it was drying, I could see it frosting up. Suddenly Sandor had gray hair!!  Arrggh!  Thankfully a quick coat of Citadels Nuln Oil got rid of the gray. After that I used DullCote over the figure and just glossed his eyes calling this one done. Thanks for looking. 


Saturday, July 30, 2016

Resin Realities Bride of Frankenstein

The Bride was one of these models that while I'm not necessarily into,  the kit "spoke" to me in a way where I had to have it.  I *think* I picked it up a few years ago at either a JerseyFest or a Resintopia show that was in NJ. 
The kit, made by Resin Realities,  was fairly simply being only 2 parts. There were a few seam issues but I started off quickly. In my fervor to begin I didn't notice that there was a pretty prominent seam running down her face. So I cleaned off the paint and started on the seam and reprimed - - 
You can see that at this point she has a regular skin coloring. This would change a few times as I progressed. I found  I had Vallejo's Game Color - Dead Flesh.  Remembering a rare color photo of Karloff's Frankenstein was green. I figured that she should be similarly color, tho not as much.  This paint choice hit the bill. However what I did was to add a little white to it to lighten. Also, knowing that Elsa Lanchester had red hair despite not seeing it in the B&W movie, they used her real hair over an armature to create the Bride's special 'do - I painted her hair with a dark brown and then a lighter brown and then Vallejo's Orange Brown as the red highlight. 

Don't use red. Redheads never have *red* hair!

At this point another kit attracted my attention, and the Bride was put on the shelf for quite a while. 
A few days ago, I decided to clean up all my half done models, so the Bride came back to my desk. Looking at the face and knowing it needed a highlight the color I chose previously left me no where to go but to add straight white as a highlight; which I did. But the white was too stark - -
To fix it, I masked the hair and gown off with paper towel and Silly Putty. I then lightly misted her face in V's Buff. I had noticed when I used it previously that it wasn't a substitute for tan but had a bit of green in it.   However this only made her have a yellow cast. So I added a drop of white and a drop of the Dead Flesh and that worked out ok.

Now it was time to create shadows for her gown. I figured the typical blue and gray were already done, so I took some Citadel's Bugman's Glow, added white and used that. I figured the rosy color would be a little more feminine- -


Having the rosy shadows, and the gray primer, all I needed to do is airbrush different densities of white over the gown to achieve the different highlights and shadows. 
To finish, all that was left was to add the eyes. A quick search of Fritz's Paint Guide told me Elsa had green eyes, and adding them finished off this long project. Thanks for looking.


Monday, July 25, 2016

Dennett's Spleen Stealer


I have been looking at this little bust from John Dennett staring at me for a few weeks now and decided to throw some paint on it. The week before I got my delivery of a few paints from Citadel's red line.  I got Khorne Red (which has a bit of purple in it), Mephiston Red, Evil Sun Scarlet, Troll Slayer Orange. I have seen the last 3 used on a number of mini vids on You Tube. Everyone has been bragging how these paints have a lot of pigment in them and really stand out. It was time to try it. 

I started  by coating the entire model in Mephiston Red - -

and then gave it a coat of Citadel's Nuln Oil - - 


 After the Nulm Oil dried I highlighted the figure, with evil Sun Scarlet, and then another high light of just the topmost features with Troll Slayer Orange - -


I also used my new best friend of paint  - Vallejo's Iraqui Sand for the eyes and teeth. The teeth got a coat of Agrax Earthshade by the gums, and then some off white dry brushed on the tips of teeth.
I looked on the color wheel and saw that blue was opposite the orange-red, so I gave the creature blue eyes. Thinking of something different I made double iris' and pupils. The pupils were simply black dots. Here's the final pics. Thanks for looking. 


Saturday, February 21, 2015

SS Ion Cannon Finished

Well, the Ion Cannon was so easy being only 4 parts that I'm done. I thought I had taken a pic of the first thing I did which was the cliff face. everything was painted in a light gray primer and then I used Citadels Nuln Oil, Agrax Earthshade and Reikland Flesh washes and covered the cliff. I then put a little extra Nuln Oil into the deepest recesses. 

Tuesday, February 10, 2015

Two at a Time

With the days still cold here, I'm getting a lot of time at my model table. I've been letting Twisty dry for a few days,  and then I applied the color to his irises. IMHO John Carroll Lynch has light brown eyes, so that's what I attempted to mimic here - -


Now I just have to build up the courage to apply the white face over his skin and add the black around his eyes.

Next I had a New Ware model of the Mercury Laboratory Atlas. I picked this kit up from a fellow modeler over at Yahoo's Space Modeler Group
In 1959-1960 Mercury was the only launch vehicle approved for the manned space program. In 1960's NASA's budget, one of the proposal was to be a sort of  small temporary space station. This is a model of that proposal - - 


Sorry about these pics. It's tough for me to image white w/o a photo booth. I have directions how to make one on the cheap. Maybe I should build one of those soon? Eh?  ;) 
Anyway, it's mostly painted up. The capsule got the blue black coloring. The instructions called for the two windows to be blue. The escape tower in red, and the engines were done in a dark metallic which I did my using Army Painter Gun Metal, and then giving it a coat of Citadel's Nuln Oil.   The bottom half of the rocket needs to get a coat of a silver or polished aluminum color. Then a gloss coat - then the decals. 
Thanks for looking. 

Wednesday, October 8, 2014

The Hellboy Ornament

Back again, with Hellboy this time. This little sculpt was offered on The Clubhouse last year as an ornament. Being different, of course I had to jump on it right away. And then it sat... 
A few months ago I primed it, and it sat some more. High time to put some paint of it.  I started with a light coat of VMC Cavalry Red, and then when dry I put a coat of brighter Vallejo Game Color (VGC) Gory Red over it. This seemed to bright, co I gave it a wash of Citadel Nuln Oil. Here's where we are at - - 


More later.


Thursday, February 20, 2014

Doak VZ- Session 4a, and a little Warhammer

Okay, back to the build. Once the paint on the canopy was dry I removed all the masking and here it is - -
Not bad IMHO. I'm over in a few spots and there was a little bleed, which I gently scraped off. But all in all I'm happy. At the back of the canopy you'll see the Vallejo primer I brushed on. as long as the brush is dry and you don't keep going over and over the same spot, the primer dries smooth.
A few images shows the Doak with the back canopy part painted in, a few others show it clear. Being that on this model the back part slips into what's supposedly looks like a duct I've decided to paint that part.

While all this was going on my young son decided that he wanted to build something. when he was in his "robot phase" he received a GAMES WORKSHOP Dreadnought for Christmas.  Being that 1/72 is on the miniature size, I watch a number of miniature how-to videos on You Tube. As I said YT has an endless supply of terrific modeling videos. I've watched a number of Dreadnought paint-ups but was shocked at the amount of detail these sculptors put into these little kits. My son did all the building himself, and nearly all the painting. I just did enuff to show him how to use the CITADEL WASHES. These are a fantastic time saver and recommend everyone get a set of these washes. I also showed him how to drybrush. I think his results were excellent. what do you all think?
Finally I have another new tool to offer up. I recently bought a set of "sanding pencils" from my LHS. A set comes with coarse, medium and fine grits, and they make getting in to tight little corners a breeze. Highly recommended. 

Back to the Doak VZ shortly ...

Tuesday, February 11, 2014

Doak VZ Session 3

Back again for another session. Time and I haven't been the best of friends lately so I'm getting just a short while per session. Tonight I installed the seat, control stick and instrument panel. Doh, I never took a pic of this step. I did wash the cockpit in Citadel Green wash. The CITADEL WASHES are a very thin paint, almost like and ink, that fills areas an easily creates shadows and other areas you want darker than the base coat. Citadel has about 7 or 8 different washes in various colors from black thru yellow. I've seen a number of tutorials on YouTube and felt it was definitely worth the $5 per jar for the "set."
Next on the list was to install the canopy. THANKFULLY  it was made of clear resin vs. the vac formed canopy. I don't know what it is about those vac form canopies, but I always get the chills when I start cutting them into shape.The first thing I have to do is give the canopy a bath in Future Floor Polish. Well, at least it was called Future when I bought my two bottles. Now it's called Pledge Floor Care Finish in the US. It has other names in other countries.  Swanny has a a whole page on Future, and you can find it HERE.
So anyway I dipped the canopy, pulled it out and it smoothed any imperfections out with just two dips. Looks great - 
What I did then was I just touched the canopy to a paper towel to draw the extra liquid off, and placed it to dry. what I also got in a habit of doing was to place a cup over it to keep any dust from landing and sticking to it. After it's dry I can then mask off the windows with Tamiya tape and get ready to paint to canopy frames.
Lastly I made another purchase to try a product. This time it's Vallejo Plastic Putty.
I love the paint so I thought I'd try the putty. The tube simply says "Putty for models in lead, resin, Plaster of Paris etc. Non toxic, non flammable. Water cleanup." Not much as far as directions.
First thing you notice is that it goes on like a smooth cream. I tried first to spread the putty along a seam and then with an old, wet, paint brush. Immediately the putty almost dissolves away. The other thing was that it skins over and the outside starts drying equally as fast. So I re-wet the brush and went it and cleaned up the seam. I then reapplied the putty and this time just let it sit. with the thin needle-like applicator there is very little excess so I just left it and will go back for a look when it completely dries - 
Then I will either take a damp (this time) brush to it again, or just sand away. More soon.