Showing posts with label Unicraft. Show all posts

Friday, June 21, 2019

The Henschel P.75

Another model for the Luft '46 shelf. This plane was a 2 prop pusher plane.
 From the site - 


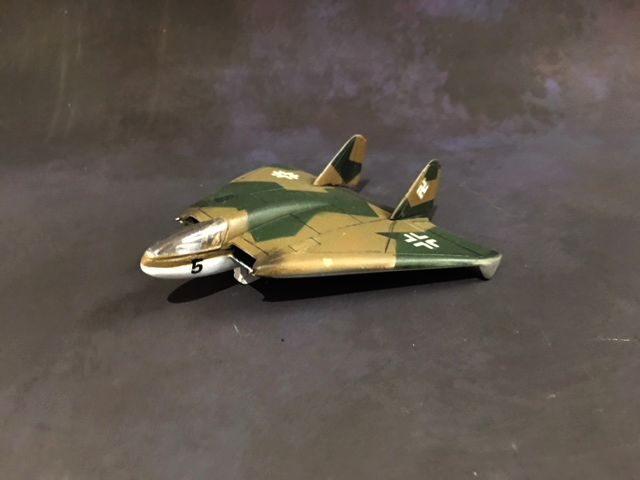
 This 1941 aircraft design was to be a possible successor to the Messerschmidt Bf 110 heavy fighter. Although of a unusual configuration for that time, there were advantages (and disadvantages) to its rear wing/forward canard construction.
  This basic design was realized in several WWII aircraft designs, notably the Kyushu J7W1 Shinden and Curtiss XP-55 Ascender . Although good results were obtained with a model in the wind tunnel, this design was not followed up.


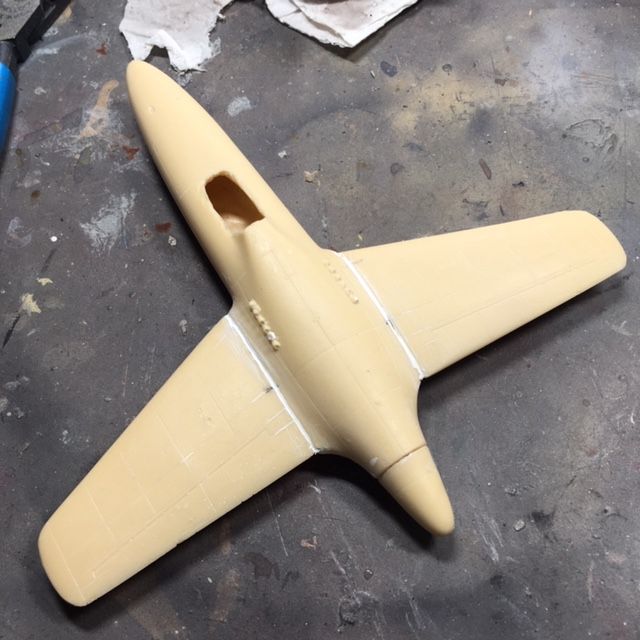
A typical Unicraft kit, it will make a nice model - with a lot of work.  After getting the fuselage halves together, and lining up the wings we see the wings are too long for where they fit on the fuselage.
At this point I noticed that the two curves of the fuselage were different (red arrows). There no way I'm going to take the time to fix that, so I just sanded the wings. 

Everything together, let the filling and sanding begin.

 At this point I was adding the vertical fin on the bottom of the plane. Looking at documentation it looked like there were two props on the plane - couldn't tell by looking at the box art. However the hub showed no spot for the 2 sets of props.  Looking it up, there was indeed two sets, so I had to create a cutout to indicate the 2 parts of the hub.

Looking, I couldn't find the parts for the  front winglets. Checking the image of the box, no winglets. I either lost them right away or the kit didn't come with it. Time to get out my sheet styrene and create my own. I used the full sized image on the instructions as a guide.

I couldn't delay it any longer. It was time to add the propellers. Looking at the kit parts... they are terrible. It looks like the sculptor made his own by laying down the form and then squirting filler into the form. This was no good and I'm not even going to waste time trying to sand them down to shape. By chose is to cannibalize a kit, or just create acetate disks, and pretend the plane is in flight.

In the meantime, I put down some primer over the craft. Thanks for looking. Check back for more.


Tuesday, May 15, 2018

The Luft '46 Finale

I've had both these planes sitting around about 95% done for a week or more. The part that I dread the most - installing the canopy -  was what was left. But I just had to get these things off my workbench. 
     Since the last time the Me. 1092 got painted a simple dot pattern that I saw on one of SAMI's builds. Originally I thought I ruined it as I felt the dots were too dark compared to the background. Then I had a brainstorm and lightly misted the base color over the whole model and the dots were nicely toned down. 
     The other chore was that I had to remake the panel lines. member the old ones were like Grand Canyons all over the model. My plan was to just draw them on with a graphite pencil. A member of my model club told me to just scratch them back in. Big mistake. There are a number of spots that I botched and basically just gave up.  The landing gear and wheels were from a 1/72 scale Me. 262, but the back wheels were way too big. For anyone paying attention if they were raised they would never fit in the wells. :P  Anyway this is what I ended up with - 


The Lippish 13.B went a bit easier. My main problem with this one is that I didn't want all my German plane camo to be the same, and while I forget the numbers now, I basically lighten the lighter color and darkened the dark color.  The problem came when I tried to mix more of the lighter color. I used a flesh to lightened, but could remember which one, I have about 10 flesh colors. It wasn't until I had 4 or 5 false starts that I found the right paint color and finished up around the canopy.  I also stretched some tube sprue and created two guns that fit in either side of the cockpit. 
Here's this one. Thanks for looking, but don't look too close  ;)  - 


Tuesday, April 24, 2018

Me. 1092. I didn't forget. Part 4

We left off with some Tamiya putty on the xtra large panel lines on the plane. 
I left it for a few days and then started wet sanding. Many of the problems appeared to disappear, but after  spraying with Tamiya primer, I still have a ways to go for a smooth fuselage.  Sigh.  
Thanks for looking.


Saturday, April 14, 2018

Me. 1092/3 part 3

Getting the Me. together from the last episode, I took a good look at the panel lines. In some spots they really look like mini Grand Canyons. So I've decided to fill in the ones that really offend, and then take a look at the rest. Here's what we have after filling -

While I was waiting for this to dry, I too a look at the previously Futured canopy. As is with too many canopies, in an effort (I'm guessing) to keep things in scale, they seem to make the details too faint.  I have been using the Tamiya Tape to cover the glass panels, but a member at my modeling club suggested I use Bare Metal Foil as it's thinner and makes the canopy frames easier to see. Which I did, and the frames are *still* barely visible -
After seeing this was the best I was going to get, I put the kit down for a few days. In the meantime I opened up the Lippisch kit. see next. Thanks for looking.

Saturday, March 17, 2018

Me P. 1092/3 part 2

In this session I ordered a cheap-o** Me. 262 from Megahobby to use the landing gear, wheels, decals, and pilot (I can put the pilot I was using back to the Bronco). 
**I say cheap-o becasue it was only $15, but in full disclosure the Airfix kit looks pretty good and I may order another for a 262 build.

So while I'm waiting, I figure the next step is to install the wings. Etched into the fuselage is an outline of there the wings are supposed to go. So lining up the wings I marked it and then took bits of paper clip wire to make attachment points - 

Inserting the wire into the holes, it looked great - - - until I looked at it from the front and one side was no where near even to the other. Somehow the etching was off by at least a mm.

The only thing to do was to turn the holes into slots and adjust the wings so they looked even from the front.  This had to be done with both sets. Looking the the pic below the red line points to the original hole, and how far one side was off from the other. Since I did all the work on one side the front wings had to be raised a similar amount  - 

With that problem solved, I used some Tamiya filler to close the gaps in the wing root, the holes that were showing and then some scratches in the side of the fuselage. 
Now to wait for the landing gear. If it doesn't come soon, I may tackle the canopy...  Thanks for looking.


Friday, March 9, 2018

Messerschmitt Me P.1092/3

One of the genre's that I like but don't get to model often are the experimental planes. They could be USAF or NASA's X-Planes or they could be the Luft '46 planes.  
In aviation, "Luft '46" refers to military aircraft that were under development in Nazi Germany, but failed to enter service (at least in large numbers) before the end of World War 2. This includes projects that were cancelled during the war, and occasionally real postwar aircraft derived from German research, such as the MiG-15. Most "Luft '46" aircraft are of advanced design, usually having swept wings and jet/rocket engines. 

From Luft'46.com:
 With the Messerschmitt Me P.1092/3 design, the design team made more changes to the P.1092. The cockpit was moved to the rear, where it was faired into the single vertical fin. The air intake was now divided into two intakes, located beneath the nose, and fed the single Jumo 004C jet engine. The landing gear remained more or less the same, and with the forward fuselage now unoccupied, a heavier armament of four MK 108 30mm cannon could be concentrated in the nose. This Messerschmitt design bears a resemblance to the later Me P.1106, and the same problems would have surfaced; namely, pilot visibility from the cockpit located so far in the rear. 
The model of the Me.P. is from the Co., Unicraft, out of the Ukraine. Unicraft specializes in exotic subjects such as experimental and concept aircraft, UCAVs and Luft '46. A number of years ago Fantastic Plastic was named as their exclusive distributor for the US and Canada. In a personal note that is no secret, Unicraft kits are not for the beginner as they usually need a little extra work to make them look good. Be forewarned. 
The box art

This kits came in about 12 pieces of a brittle tan color resin. There is a good amount of flash around some of the pieces and what looks like scratches in the resin on others.  Here's an example of some of the parts that need more work than usual. Thankfully the fuselage was in good shape.  This is supposed to be 2 wheel struts and a wheel. It seems that for these parts, the resin seemed to have foamed a bit - 


 The next thing that was immediately noticed was that the air intakes on the fuselage had no backs. When you put the two halves together, you could see right through. If nothing else, this needs to be fixed. I had to think about this.
That I came up with was to glue two sections of a soda straw to cover the the intakes. when the glue dried, the parts over the opening would be cut away and leave me with a curved tube in the fuselage - 
Shown is the length of straw from both sides. The black things are Liquid Gravity pellets that have been glue in the front. This in combination with hollowing out the rear where the pilot was to sit backward and I also drilled out the tail portion, in an effort not to make this a tail sitter.

I left the straws to dry for a day or two and then with a new #11 blade cut the straw away from the opening. Here the straws are cut away and the two halves are glued together- clamps are need as the fuselage halves are slightly warped
I had to add some Aves, to smooth out the front and back of the intakes, and it ended up not too bad. The front wheel well also had no floor, so I also used Aves to creat the floor.
 Taking care of the warped parts, a lot of Tamiya putty was used. The body is still not straight, but I'm hoping that's minimized when the canopy goes on.
While I was waiting for the putty to stiffen up and super glue to harden, I painted the pilot. It's from another kit. As I'm going to have to use a different kit's landing gear (I couldn't make the above one look nice and didn't feel like scratching one) I might as well borrow the pilot too - 
I looked up Nazi pilots and my guy came pretty close. So I matched up the colors as best I could. I know, you probably won't even see him once in the cockpit, under the canopy...
 
To end this session I glued the tail on and of course this too needed a lot of Tamiya putty, and LOTS of sanding. The tail had to be 1mm too narrow all the way around.

Thanks for looking. see if this becomes a silk purse in the next installment.


Thursday, September 5, 2013

Fuselage Points to Ponder

Tonight we have just a small update (I'll be able to make more progress once my son is back to school). ;-)
I've never been good at thinking ahead with models- to think about how will it be displayed- flying or on the tarmac, or details needing to be done now for once finished especially when I'm just starting. For the display, while I would like to show the model with it's landing gear down, being a garage kit the gear is made of resin and I think after a time it will start to eventually sag.  Also being a garage kit, there's next to no chance that there's going to be a metal after market landing gear. I'm also not about to start casting my own metal gear (just yet).  So I think I will make it aloft and look like it's just about to touch down.

So that also solves problem 2. A some of time when a model is built and displayed on it's landing gear it will be a tail sitter. That means that the weight of the plane is heavier toward the back and will sit on it's rear landing gear and it's tail. To compensate for this modelers often glue bb's or other small weight to make the front of the plane heavier so it's sits on just it's gear. 

Not sure what to do I took some time to dremel out some of the extra  resin around the front to accomodate some weights. I also dremeled out the solid tail piece to make the back lighter.  Oh well...

Here are the before and after pics of that work - - 

(click to enlarge) You can also see the number of bubbles in the resin. Thankfully they are all on the inside.


A lot lighter now, soon I'll be figuring out where the balance point is to make a spot for rod to sit. I'll also have to figure out what I'm going to do to make the two air intakes (the holes at the top of the fuselage) and also how to make the rear opening (below the tail) look like it has a jet exhaust.

But next I'll be cleaning all the parts of the mold release and clean up some flashing and pour stubs. Hopefully I won't have any/many air bubbles.


Sunday, September 1, 2013

New Build - Me.P. 1092/3

Newly encouraged from my trip the the Loveland, CO. IPMS Nationals I decided to dive into a new model. For those that don't know or have forgotten (since I haven't been too reliable posting here) My favorite genres to build are real space, sci-fi, and x-planes that lean toward the space or out of the ordinary look. 

 I purchased 4 new kits in CO., but I "found" a kit that I had stashed away from Unicraft.  You can deal directly with Unicraft in the Ukraine, but a terrific garage kit producer is Fantastic Plastic, and they are the authorized reseller of Unicraft kits in the USA and Canada. As some know Unicraft kits are pretty rough and is advertised for the experienced modeler. But as with many garage kits if you want a certain odd-ball subject they may be the only game in town.
My kit for this build is a 1:72 Me.P. 1092/3 - 
The parts are this weird brittle resin, and have a lot of heavy flash that need to be filed/dremeled off. But as I test fit the fuselage parts you can see that even tho it's small, it's rather warped. In this pic you can also see the opening for the cockpit area - illustrating what I mean by being rough.
I could squeeze the parts together and superglue them, but what I did was drop the two parts into "almost" boiling water to soften the parts, I then put them in the bottom of the sink (giving me a flat surface) and pressed them into shape. Once flattened I then turn the cold water on them and the resin re-solidified. Results came out a lot better than the before image.
More soon ...