Showing posts with label Luft '46. Show all posts

Friday, August 7, 2020

Ae 607 and LRV Update

Wow, what a few weeks it's been Between the incoming Tropical storm coming up the east coast and then after the storm had gone by, we THEN had on and off brown and black outs for days. Ugh.  But in between I did make it to the hobby desk. 

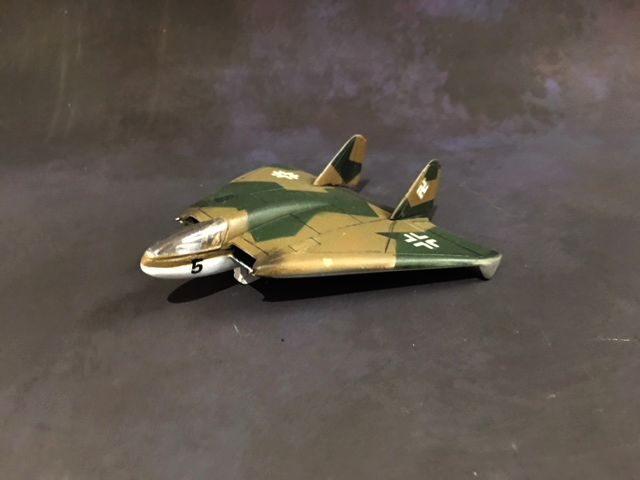
The Ae607 continued to fight me to the very end but I declared victory.  This is the last time I quickly look that the parts fit - paint both halves -  only to find out that when the times comes, they really don't. Turns out the front needed just as much sanding down as did the cockpit area and the rear by the exhaust. 

Once the parts fit and glued down, then it came time to repair the paint job.  I think in the end it became a decent 3ft. model. 


Another one that turned into a fight was the LRV. In the end I had to rip the entire interior out. I was just tied of having to sand away most of it because the fit was perfect - no one will see inside anyway. 

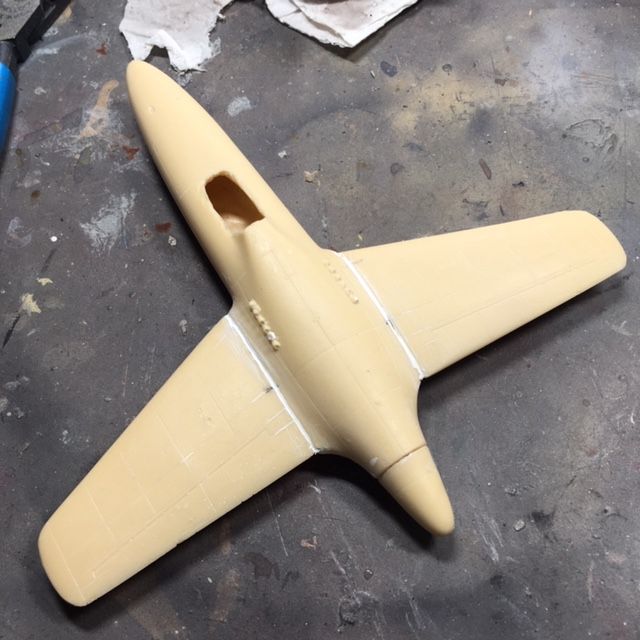
I got the two  halves together after sanding away a bit of where the fuselage meets the wings. Then the slot where the starboard vertical fin goes was about 1/2 the size of the port one (which fit perfectly) and I needed to take a dremel and then some files to it to get the opening to accept the fin. 

The top and the bottom are together but you can see I'm still having problem with the g d white color. I needed to sand out a spot visible in the middle of the top and after 3 or 4 coats it's still visible! I think I'm about to go to the hardware store and get some serious can of white paint!  But at least the fins are on and the small gaps filled in nicely. Check back to see if I get this painted or does it get bounced off the wall.  Thanks for looking.


Wednesday, July 29, 2020

Ae 607 part 2

All big plans to make head way on this kit, until I got stopped dead. But first the good news.  I picked a color pattern using RLM 81 and 82.
I painted the entire topside in a lightened 82. Then it took some silly putty to create the thin lines. I had my first bit of trouble here. I made all the silly putty "islands", and then evened the out the spaces in between with a coffee stirrer. Once I started painting on the 81, I noticed that the paint was moving away from the edges! One coat...two coats... three coats. WTF. Finally it looked not bad. Was it the Silly Putty? I never saw that reaction before.
After the 81 dried I took some RLM 65 and free handed the stripes wither side of the 81. This by the way was the same color I painted the underside.

I sprayed on some V gloss, and then without thinking and letting the gloss dry, I started washing the very well done panel lines with V's dark gray wash - - which immediately made the gloss to start coming up.  I bit the bullet and just wiped off what I could. It's only the one color - I would have been throwing it off the wall if I did that to the topside - and decided to call it a day. 

Somewhere in between those steps I free handed canopy.  Here's a pic of the topside and the canopy. Thanks for looking.


Monday, July 27, 2020

Blohm & Voss Ae 607

After working on the Sam-13, I was in the mood for another prototype vehicle.


The Ae 607 was a jet-powered flying wing design conceived by Blohm & Voss in 1945. As it was conceived only shortly before the end of World War II there is not a great deal of available information on it, and for many years it was not included in the known list of late-war Luftwaffe development projects.

This was another of my

All the parts comes on 2 gray sprues, plus one clear one for the canopy. It's very well detailed.


Like most planes this kit also starts with the  cockpit and the intake and exhaust ports. 

  The cockpit gets installed along with the ports and the landing gear bays. Just to be on the safe side I added some Liquid Gravity pellets.


Finally, a small size cockpit that actually fits in it's intended spot...

Trying the top of the fuselage on for size I noticed one big problem. Gluing everything into the bottom, you noticed a curve in the parts. Only when I tried the top on and things not fitting that I realized, yes the interior is curved, but the top is flat!  A lot of dremeling ensued.  The plastic need to be taken down - a lot, and I went thru in two spots, but thankfully the cockpit tub was thick enough that nothing was seen.

After the dremeling, I took a break and assembled and painted the landing gear and wheels. 

The top goes on and the painting starts next time. Thanks for looking.

Friday, June 21, 2019

The Henschel P.75

Another model for the Luft '46 shelf. This plane was a 2 prop pusher plane.
 From the site - 


 This 1941 aircraft design was to be a possible successor to the Messerschmidt Bf 110 heavy fighter. Although of a unusual configuration for that time, there were advantages (and disadvantages) to its rear wing/forward canard construction.
  This basic design was realized in several WWII aircraft designs, notably the Kyushu J7W1 Shinden and Curtiss XP-55 Ascender . Although good results were obtained with a model in the wind tunnel, this design was not followed up.


A typical Unicraft kit, it will make a nice model - with a lot of work.  After getting the fuselage halves together, and lining up the wings we see the wings are too long for where they fit on the fuselage.
At this point I noticed that the two curves of the fuselage were different (red arrows). There no way I'm going to take the time to fix that, so I just sanded the wings. 

Everything together, let the filling and sanding begin.

 At this point I was adding the vertical fin on the bottom of the plane. Looking at documentation it looked like there were two props on the plane - couldn't tell by looking at the box art. However the hub showed no spot for the 2 sets of props.  Looking it up, there was indeed two sets, so I had to create a cutout to indicate the 2 parts of the hub.

Looking, I couldn't find the parts for the  front winglets. Checking the image of the box, no winglets. I either lost them right away or the kit didn't come with it. Time to get out my sheet styrene and create my own. I used the full sized image on the instructions as a guide.

I couldn't delay it any longer. It was time to add the propellers. Looking at the kit parts... they are terrible. It looks like the sculptor made his own by laying down the form and then squirting filler into the form. This was no good and I'm not even going to waste time trying to sand them down to shape. By chose is to cannibalize a kit, or just create acetate disks, and pretend the plane is in flight.

In the meantime, I put down some primer over the craft. Thanks for looking. Check back for more.


Friday, April 12, 2019

Hutter HU-136 Stubo II

This was a model I've wanted to get out of my stack for a while. The Stubo II is a Fantastic Plastic offering, that comes back in stock every once in a while. 

From the Luft '46 site:
The second design (from the Hutter brothers)  - Stubo 2 (short for Sturzbomber or dive-bomber) - was also to be heavily armored and was similar to the Hütter Hü 136 (Stubo 1). The fuselage was lengthened on the Stubo 2 to accommodate the internal bomb bay which could hold a 1000 kg (2205 lb) bomb load.  

Ultimately, the Air Ministry passed on the unusual proposal, choosing instead to manufacturer the far more conventional Henschel HS 129.

The kit comes in 14 parts including a seat and stick, which you'll never see, and I left out. The canopy is clear but following the directions, the majority of it gets painted.  

 Being cast by Anigrand, you know you are getting a good kit. As usual, the parts went together with minimal effort. 

One thing I noticed with this kit is if the fuselage holes don't match the pins in the wings - swap them, don't clip the pins. They are made to fit only to one side. Cool idea!

A lil seam filling.
  The process continued effortlessly, and a coat of white paint, for the fuselage, and V. Game Color Gory Red, was the shade of red I chose. Then it was time for the decals.  The decals went on just as effortless as the rest of the build.  After a short wait the Micro-Sol went on and suck the decals into all the panel lines perfectly. 
It was here that I noticed that there was no decal for the gun placement. It wasn't sculpted into the fuselage, so I thought it was a decal. Looking closely at the instruction sheet, it says the model was created after the original which didn't have guns.  So if I wanted I could carve wells into the fuselage (THAT wasn't going to happen) or I could create a decals for it.  Umm, didn't the FP guy create decals for his? Why couldn't his design be added to the decals sheet? Even if it added another $1 to the price of the kit, I'd pay it.
Having no ability to create a drawing for a decal, mine will do without.
Hard to see - the skid also went in place with no problems.
Looking back one thing I should have done that I didn't was paint the inside of the canopy. With the white paint on the outside and the light tan resin showing on the inside, the windows almost disappear. I'll have to keep that in mind for the next time.  

While I was waiting for the clear coat covering the decals to dry I went apart creating a base for it. It consists of a square of foam that it coated in DAPs Plastic Wood.  I started out using a spatula, but it seemed to go on faster and smoother with just a wet finger. Being the craft just has one landing skid, I created a mini sawhorse to level the plane for display.

I plan to add some grass around the edge of the vignette, and rather than create a new post, I'll be back and edit this one when that gets done.   All done.

Thanks for looking.


Tuesday, November 6, 2018

Zeppelin Rammer part 3

While I'm still plugging away with my build projects, I've been a little lax on documenting it here. So today I hope to catch up. 
Most of my attention for this build has been directed at the  "victim" B-17  - 

Because of the windows, the interior was painted. When closed up you can't see in...

More damage

Zinc chromate color has been added as an undercoat in prep of the hair spray and salt techniques.

A tube was added to act as a brace for the rod connecting it to the base/

Olive drab color added
 

Monday, October 29, 2018

Zeppelin Rammer part 2

Picking up the Rammer again. I left off with painting the plane RLM 82 on top, black in front and RLM 65 on the bottom.  The painting guide shows that there is a camp pattern on top of the wings. It doesn't mention what color, so I just went ahead and used the RLM 65 - 


Since there is no pilot and I'm thinking of making an "in action" vignette, I darkened the windows with a black wash.  I also added the decals. I thought I had a pic, but no. I'll get one asap. 

Now thinking about how to make it look similar to the box art - 

I figured there has to be a website for just about everything - and there is. I search "B-17 battle damage" and browsed thru images until I came across this one, of The All American  - 
The story behind this was that the gunners shot down a Bf-109. It goes on to say the plane flips upside down (out of control?) and the wing slices thru the fuselage front to back. You can read an account HERE .
This is going to be my inspiration.  

Next step was to look for a 1/72 scale B-17. Obviously since I only need the back 1/3, I wasn't about to pay a lot for it. As if on cue I get Megahobby's email newsletter, and after a short look, I found an Airfix Memphis Belle for $17!  Sold.  Since the Belle was too famous to destroy like that, MegaHobby also had a set of generic B-17 decals. I bought those as well. 

Getting the kit, the first thing to be done is cut away anything I'm not using. I made my cut right behind the ball turret.  Then I took a pencil and drew out where I wanted the damege. Then it was time to take the dremel to the plane.
Having cut out what I wanted, I added back in some of the ribbing - 

More details will be needed, but this is it for now. Thanks for looking.


Tuesday, October 23, 2018

Brengun's Zeppelin Rammer

The second kit for the bench probably has to be the smallest 1:72 scale kit I ever built in the form of Brengun's  Zeppelin Rammer. 
There is a little discrepancy between the info on the box and whats being said on the Luft '46  site. The site says:
This project was first proposed in November 1944. The "Rammer" was to be towed aloft by another fighter (most likely a Bf 109). Once released, the pilot was to ignite the solid-fuel Schmidding rocket, accelerating to 970 km/h (602 mph) and then launching its 14 R4M rockets at the target. A second pass was then made, this time making a ramming attack with its reinforced wings. It was calculated that at the attack speed the aircraft could cut cleanly through the tail section of a B-17 without great loss of speed or stability. After attacking, a gliding landing was to be made on a retractable skid.
Looking in the box, Brengun gives you enough parts to make two Rammers. The back of the box gives you 3 paint schemes, sort of indicating that it saw service. I chose to create the 3rd option - The Trudi -  from late in the war. The second two apparently were named. The middle one is Anna. 


What Brengun lacks in attachment points, it makes up for in detail. The plane has quite an extensive amount of PE for such a small plane. while the Luft '46 page says that it had a rocket motor, the Brengun box says it was a glider, and no rocket motor is included. The plane is also supposed to land on a skid. While there is also no skid included, if you look closely at the panel lines you see this off panel on the bottom. It is the retracted skid. I guess if someone wanted to do micro surgery, that skid could be set up in landing mode.  My eyes aren't good enough for that. 

The cockpit is the first thing that needs to be tackled. For such a small plane it includes a full seat, a stick and a small instrument panel, with 3 indentations for gauges. The insides was painted gray with a dark wash. The seats were highlighted with VMC Red Leather, and then washed with Citadel's Agrax Earthshade. the foot pedals are painted silver according to the directions. Too bad 99% of it won't be seen after the canopy goes on.


Closing up the fuselage and getting rid of the seam line, the only other thing that has to be done is glue the vertical stabilizer to the tail.  The wings are one piece each - 


Putting the remaining part together I should have attached all the PE. But I got carried away and started painting. The scheme I chose was RLM 82 (lightened a bit) and a black nose. The instructions say the underside of the wings are to be RLM 83, which looking it up is also green, but the painting guide on the box shows, that I think it's meant to say RLM 76 or 77. I have 76 and that's what will go on there. Check back for the PE installation and my idea for a little vignette. Thanks for looking.

 
The canopy is only sitting in place in this pic.


Saturday, May 26, 2018

Horten HO VII Finished

This was probably the smoothest going kit I've built in a long time. The plane's landing gear had been painted, so it was just a matter of installing them in the wells, and then to tackle the canopy.

The decals were also a breeze, they came off the backing paper in a few seconds. On the top of the wing there were 2 white stripe decals. I didn't trust the white to be opaque enough over the dark color, so I opted to mask and paint the stripes on. But then when I put the Maltese Crosses on - yep the white was opaque enough.

Usually adding vac form canopies are my nemesis and dread when that part of the build comes along. 
I start all canopies the same way by giving it it's Future dip, and then letting it dry. The dip happened a few days ago, so it was ready to start cutting. The cut went smoothly, and I decided to paint the framework freehand rather than masking. I must say between the paint and fit this is my best one yet.
Thanks for looking.


Wednesday, May 23, 2018

Horten HO VII

While waiting for my I.M. pilot to arrive,  I discovered that I had another Luft '46 plane in the form of Planet Models Horton VII flying wing.
Having built another Planet Models resin kit, they are very nice.

Diving right into it, I assembled the interior. One thing that caught me, and also caught me with the last Planet kit, is there are no specific spots for the seats etc... So gluing the parts in and then trying the cover on, I found I put the 2nd seat too far back. So I had to get the back seat, and stick out and reposition. Hopefully I remember for the next one... ;)

I think I took this pic *before* I had to move the seat. The other thing is that the back seat has it's own instrument console, but it goes on the top part. So you need to see where that fits in as well.


As mentioned there's not a lot of parts and while waiting for some sub assembly to dry I painted the bottom with RLM 65. The wheel wells and the interior will be painted RLM 2 - 

More next time. Thanks for looking.

Tuesday, May 15, 2018

The Luft '46 Finale

I've had both these planes sitting around about 95% done for a week or more. The part that I dread the most - installing the canopy -  was what was left. But I just had to get these things off my workbench. 
     Since the last time the Me. 1092 got painted a simple dot pattern that I saw on one of SAMI's builds. Originally I thought I ruined it as I felt the dots were too dark compared to the background. Then I had a brainstorm and lightly misted the base color over the whole model and the dots were nicely toned down. 
     The other chore was that I had to remake the panel lines. member the old ones were like Grand Canyons all over the model. My plan was to just draw them on with a graphite pencil. A member of my model club told me to just scratch them back in. Big mistake. There are a number of spots that I botched and basically just gave up.  The landing gear and wheels were from a 1/72 scale Me. 262, but the back wheels were way too big. For anyone paying attention if they were raised they would never fit in the wells. :P  Anyway this is what I ended up with - 


The Lippish 13.B went a bit easier. My main problem with this one is that I didn't want all my German plane camo to be the same, and while I forget the numbers now, I basically lighten the lighter color and darkened the dark color.  The problem came when I tried to mix more of the lighter color. I used a flesh to lightened, but could remember which one, I have about 10 flesh colors. It wasn't until I had 4 or 5 false starts that I found the right paint color and finished up around the canopy.  I also stretched some tube sprue and created two guns that fit in either side of the cockpit. 
Here's this one. Thanks for looking, but don't look too close  ;)  - 


Tuesday, April 24, 2018

Me. 1092. I didn't forget. Part 4

We left off with some Tamiya putty on the xtra large panel lines on the plane. 
I left it for a few days and then started wet sanding. Many of the problems appeared to disappear, but after  spraying with Tamiya primer, I still have a ways to go for a smooth fuselage.  Sigh.  
Thanks for looking.


Thursday, April 19, 2018

Lippisch Li.P. 13B part 3

This time around the paint is finished and the decals are on - 


 After the pics were taken I also installed the seat and then formed a stick with stretched sprue.  I took another look the the windscreen. Even though I gave it it's Future bath,  it's a clear resin part and I never removed the little stub. That needed to be sanded off. Then it needed another dip to get rid of the sanding marks. Installation of that next time. Thanks for looking.