Showing posts with label mini. Show all posts

Tuesday, June 3, 2025

Aztec Princess mini

 Aztec princess mini - at least that's what I'm calling her. I've had this mini around my work desk for literally years. The packaging is long gone, and if you know my note taking skills, you know I don't have any... So no idea of the producer or the name of the kit.

She's about 28mm to her eyes, and 34mm to the top of her headdress. So this is actually past my size comfort range. Again being so old, I don't have any early pics of her - if I even took any.

This is the earliest shot from when I decided to finish her off a few weeks ago. 


 Doing a generic search, I came up with a lot of headdresses in the blue, green range. So that's what I did as well. Tho I don't know where an Aztec princess would find or want knee high leather boots...


 The next thing was what am I going to have her stand on?  I couldn't see just a simple 25 or 30mm circular base. Thinking of Apocalypto, I also couldn't make a giant temple, but I could do a small one.

So I got out my hot wire cutter and used a 1"X1" wooden block as a base. I drew bricks on it and a simulated stair. Next I created a background for her and looking up some Aztec designs, I found one that fit, that could be either a dragon head or fish.  Haha  I painted it a tan stone color and I was done. Thanks for looking. 


Wednesday, April 23, 2025

Iroquois Finale

 Go here to see part 1:  

 https://kevtk.blogspot.com/2025/04/iroquois-1755.html

Continuing on with the base, I used some of the grass tufts I had left, and then some of the birch seed "leaves" to busy up for forest floor. Those went on top of some regular soil and chinchilla dust (excellent for small scale realism), and gave it a coat of paint. 


Turning back to the Native, I followed most of the color choices from the box. One thing I needed to change was the war paint. So many examples online contained a lot of red.  But having the red coat, I made up my own design with less red. Next came all the beads and necklaces. And it seemed I got myself so involved in the painting that I never took pics. So here we have the final results. Thanks for looking..


 A larger size.


Saturday, April 12, 2025

Iroquois, 1755

 This kit was given to me as a gift a month or so ago. The maker is Chronos Miniatures.  I'm thinking it depicts an Iroquois who "came across" the uniform of a British soldier. 1755 was a year into the French and Indian War, The Iroquois territory was mainly in upstate NY, so that's where I'm placing this figure.

The first quest that arises is looking at the  box art. This shows the uniform jacket a bright yellow with a red inside lining. Doing a search for British uniforms, all of them, as one would expect, since their called "Red Coats" was that the red on the outside and yellow was the inside.  Now some of their lapels were white, or blue, but since there's yellow on the example, a version of yellow is what I'm going with.


I thought could it be possible that it was a French uniform? But looking all of those were white, gray, or blue coats. I found this image and decided this is what I was going with.


So I started out with a black and white primer on most all the parts. The Indian was given a Cavalry Red primer. 

After that I added the first highlight - 


 While that was drying I started thinking about the base. The provided base was a piece of ground with the stump of a tree. With the piece of wood I found, I got a piece of rigid foam and started to carve. 

With that I was out of time. Check back for the next session.
 

Tuesday, August 27, 2024

Medusa

Always looking to add to my Medusa collection. This time we have one that was sitting in the stash for so long that I no longer remember the producer or any other info. I tried doing a search but - no joy. If anyone recognizes it, please let me know...

 It came in 3 parts - the bust the snakes and the base. It was a nearly flawless casting - a few faint seam lines but nothing really worth noting. 


Started off with adding some flesh tones, and decided her outfit would be red. While that was drying a drybrushed the base and then added some green tint. 


Finally I addressed the elephant in the room and tackled the snakes. I didn't want them all to be the same color. There are so many sculpted in there, that I was afraid it would look like one big blob.  After getting them all colored in, they seemed too bright. So out came the Citadel Agrax Earthshade wash (brown) and dulled them down a bit. I added the black wash to the deepest recesses for that effect. 


Finally, I tidied up a few areas, and added a little more color to the base, and I was done. Thanks for looking.


My obligatory size comparison with soda...;)


Tuesday, July 23, 2024

Cycle of Life part 2

 Continuing on with this vignette the first thing that needed to be tackled was the warpage on the horse's necks - 


From there, the painting could be started. As for Death, I wanted him in the dark and ghostly colors. For Life the bright colors were the plan.


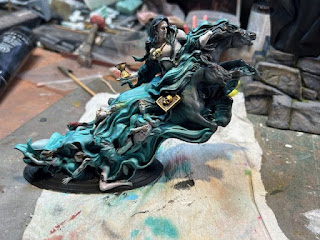
Getting to the ghostly part, I had seen a few times where the Citadel people had used a green/turquoise color effectively as a ghost color. They used Nihilakh Oxide, But I didn't have time to wait for a mail order. So a quick trip to Hobby Lobby led me to 2 colors. All I had to do is choose the best look on the model.


I moderated the green some by desaturating the color with the lightest gray color I had, then added a little white on top to make a highlight. 

Then it was just a matter of attaching the wings, and then adding her figure to Death's base and we were done.  Thanks for looking.


I was really happy with her face, so zoomed in a little.


Monday, July 1, 2024

Ouroboros Cycle of Life

 I came across this kit in my secondary pile of To Do models. On the box it had a date of 2017, so it has to be at least that old. The name of the Co. which produced it was Blood Keep Miniatures.  But it doesn't really matter as when I first re-found the kit I looked it up and it is no longer in operation.  I did see that who I think is the sculptor as an STL of the kit available. You can see his work at ArtStation.


 The kit came in 11 parts of nicely cast resin.  The only problems problems with with the kit are two pieces (cleanly) snapped off the main parts. The other problem was the Death's head and the heads of the two horses were warped. Well, Death's Head was fine the middle horse was slightly off kilter, but the outside horse was off and shows a step in the one image.  


The above part showed the death book which had snapped off, and shows the hand with the hourglass that had to be attached. Thankfully I found an image I could enlarge to see how the parts exactly went together. 


For the "Life" art of the sculpt, another snapped off part ended up being part of her flowing cloak. These images helped me find it. Both arms and the 3 cherubs also had to be super-glued to the main body.


 I had to be careful where the left arm glue on as it also has to rest on top of that hourglass. I was hoping that it wasn't a case of it coming from a 3D design with the tolerances so tight that it would be a nightmare to have everything fit. No. Luckily I also used the gel type superglue that gave me a little extra time to match everything up. 


With that done it was in mostly 2 large sub assemblies with only his scythe, and her wings to add on. But first I have to fix that horses neck. But that's for next time. Thanks for looking and check back.

Tuesday, May 7, 2024

Ode to the Moon

 This was a miniature I picked up spur of the moment - as many of them are, while I was looking thru Blacksmith Miniatures website. Many of the figures are based of the art of Jean-Baptiste Monge as is Ode to the Moon. 

The kit comes in a 12 parts and the scene finishes up at about 70mm. 


 The biggest difficulty is that it is designed where tree roots balance the slanted tree. There are about a half dozen of these "supports and with the detail in the model,it difficult to see where each branch goes, or even where it goes. Luckily I found an image of one already done where the modeler did a number of images creating a 360° view. 


 Once having that, the model went together effortlessly. As you might have guessed the drone part of the bagpipe looked an was VERY fragile, and at some point I lost it. I replaced it with a bit of styrene rod, tho I couldn't replicate the details.  Primer was next. The next thought was if I was going to put this into a vignette, the dead tree took up a lot of space for just a dull object. I decided I would add some twisted wire to form small branches that I could hang leaves from.  You can see them mostly around the owl.

Next was the base colors. Old tree bark is mostly gray, so I added that and then splashes of color here and there to add a bit of color. It also looks like some moss was sculpted in, so that would be even more color.


Moving to the elf/satyr thing - he's not wearing any clothes, so his head and furry legs were painted in a dark brown and then made the mid color a reddish. The skin started off a little darker than my other figures. In the image he has 3 skin layers with a 4th upcoming. 


See more in the next session.


Thursday, January 12, 2023

Law and Order

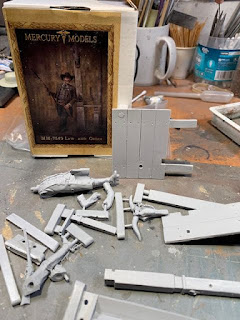
 This kit is a bit of a puzzle. It's been sitting on my bench for so long, I can't find the box, I can't remember who made it or what the name of the kit really is.  

What I do know is that the figure is 75mm of well cast resin, as is the little porch base. 

Edit: Seems I was a little more organized than I thought. I had made a folder for Law and Order images - that IS the kit's name- and forgot all about it. The kit is from Mercury Models


It also seems that in the time it was sitting there, I only took 1 WIP image of it. I started out by finding an assembled image to see how the porch went together.  I figured that these western figures were out under the sun all day and became quite tanned (or leathered). I went to V's skin set of paints and started out with a dark base color. 


Example from online to see how the part fit.


When I was first doing a little research I found the figure painted and decided to base my colors on those colors. I figured any wood would have been dried and weathered, so painted the walkway and railing as if it had been out in the sun for decades. The total height including the base made from a wooden coaster and some Sculpt-a-mold is 150mm. I included a US Quarter with the last image as a size comparison.  Thanks for looking. 


Size comparison

Close-up