Tuesday, December 27, 2016

The Mummy Ardeth Bay

This time around we have another one that was sitting almost finished on my work table for a while. Another Gillman Productions kit, it Boris Karloff as Ardeth Bay from the 1932 film The Mummy.

This was an easy one, only 2 pieces of resin - the bust and the pillar base. There was only one bubble in the pillar base and with the Vallejo Plastic Putty, it was a super simply repair.
This was an excellent likeness of Boris and I start out with  a reference pic of the man.

 As all the photos were B&W I did rely on a few other images of this figure showing a red fez, white shirt and some sort of brown jacket - 

Trying something new I tried using the "fabric" spray for the fez rather than just paint.  Ultimately the fez ended up looking like faux leather rather than fabric. Still, it wasn't bad and did show some texture. 
from there I wanted to have a go at the pillar base. Others who've done this kit just had some sort of single color and then a wash over the hieroglyphics. I wanted to do something else. I googled, and found this image - 
Then used most of the same colors on my pillar - 


To me the coat matched the sand around the pillar a little too much. So I got out some Vallejo Orange Brown and base coated the jacket again. Then adding some darker wash to the creases, and chocolate brown to the laces of the shirt which was painted Ivory.  Then the hieroglyphics looked a little too bright, so I mist coated the base in Vallejo Buff and called it done. Thanks for looking. 


(trying to match the lighting of the famous "glowing eyes" image)


Saturday, December 17, 2016

Krampus, the anti-Santa

Just in time for Christmas, we have Krampus. 

Along the narrow paths of the alpine countries, between snowy forests and silent valleys, on cold nights that come close to the winter solstice, wild and mysterious creatures roam: they are the Krampus. In the time of year when the sun is weak and barely touches the Earth with its rays, they come out of their shelters in the mountains to go to visit lonely Alpine countries ... They sneak quietly in homes or roam the streets between noises of cowbells looking for naughty children, who kidnap closing them in the bottom of a large sack, to take them who knows where ...
Children who will not be rewarded by the gifts of Santa Claus, end up in the clutches of the devils of Yule, the Krampus!
Everything that exists, exists because of its opposite: there isn't force, intelligence, virtue, or property that hasn't an opposite that counterbalances. In the popular tradition of the north-east Italy, Austria, Germany and the Slavic countries, the Krampus is the force opposite to that of Santa Claus: he is the companion of Santa Claus, often depicted with him, the other face of a single power that gives or takes away according to merit.

Our Krampus model comes from Aradia Models, who started out as two brothers from Italy, that have expanded to include a very talented group of artists.  
The model is very well sculpted and is 75mm in size. It came in about 6 pieces, and was very easy to put together. For the initial build and early stages of painting I left off the hand with staff, tail and crow. 


Here he is all primed with a zenithal highlight of white - 


Looking up images of Krampus online, they were about as varied as you could get. Some were like our model, very sleek, while others were like a shaggy dog. All had horns, while some had a staff and other had a handful of branches, to beat the bad children.  Having so many variations gave me the ability to basically do whatever I wanted. Being he was the anti-Santa, I wanted to give him a few attributes of Santa. So I gave him the white beard and the red bag. Unfortunately I see, as soon as I started base coating that the bag was not filled with toys...
I painted him a gray with other gradients of gray to highlight and shadow the figure. The staff was painted a cork brown and then washed details into it with Citadel's Agrax Earthshade. There are jingle bells that are silver, and a bell that is painted a brass color with a silver clapper. The straps on both his feet and staff were done in "festive" green. 

 The next thing to think about was the base. The base that comes with the model is a 40MM (or so) disk with some rocks or the like on it. This won't do. Thinking again about him being the anti-Santa. I thought of him up on a rooftop. and while I was at it I might as well include the obligatory chimney. 

The base started out as a few pieces of foam - 
To this I added some sheet styrene shingles, styrene clapboard sheet to the ends and a resin chimney. All of which was supposed to be in "O" scale. Either the shingles look a little big or the clapboards look a little small, but except for finding a brick and mortar hobby store, I had to go by what I was told online. 


To this I added some Woodland Scenics snow on the roof and chimney. I drilled a hole in the top and super glued Krampus in place.  Then with another drop of superglue on the other foot, and covering all that with more snow, he was done. Thanks for looking. 


Sunday, December 11, 2016

Troll !!!

This guy has been sitting on my shelf for quite some time now. Up and off to my left I have all my smaller "kits." Some, like these minis, are ready for painting others are actually kits. So when I have put something else together and am waiting for it to dry, I grab one of these figures and I paint with whatever I happen to have on my palette. This is one of the Trolls from the board game Blood Rage.

Disclaimer: I was part of the Kickstarter, so I don't know whats in the regular retail box vs all the stuff I got so this Troll may or may not be there. 

Anyway here's my Troll. Once again I am guilty of not seeing obvious seams and not doing anything about them once seen. I'll redouble my efforts next time. 
The base has been done with the new Vallejo Earth Paste, and some Woodland Scenics Snow mixed with glue.  


Friday, December 9, 2016

New Horizons (part 2)

Continuing on with the model I first attached Alice and Ralph - 


Next on the list was to separate the attitude adjustment rockets from the pour plug - 
Once they were all cut, it was time for clean up. Some were a little worse than the others. But with the sanding sponges that came with my latest SAMI magazine (Thanks!) they were all done in about a 1/2 hour. After that I tempted fate and redrilled the openings at the end of the nozzles. They all drilled nicely except I goofed up the last two... :-/ )  The instructions say they were silver so I gave them the old black primer coat before hitting them in Vallejo Metallics Aluminum. 

While I had my little saw out, I cut the base of the kit RTG and transferred it to the Shapeways part - 
The Shapeways part is below
Looking at the picture it seems to me there's an extra part in there. I think the round radiators should be right up against the RTG and not have that section in between. I'll have to double check that.

Finally for this session I primed the RTG in Stynylrez black primer, it's a little thicker and covers in one coat. and I foiled the ring attachment for the launch vehicle (I forget what it's really called). It also doubles as another low gain antenna. That part is yet to be foiled, as you can see it as the little yellow part - 
To finish off this WIP session. I gathered the courage to clip off the extra foil binding I installed and glued the struts onto the HGA - 
 

Thanks for looking.


Tuesday, December 6, 2016

New Horizons (part 1)

This is a relatively new kit from Real Space Models, and depicts the craft that just had it's flyby of Pluto. 
Looking over the parts they are for the most part pretty good. A few bubbles here and there, but nothing to worry about. A little Vallejo Plastic Putty and they were gone. I didn't count the parts but each experiment was it's own part (SWAP and Ralph had 2). The HGA was the main dish, a medium gain antenna. 3 wire supports,  and then the lo gain antenna on the end of 3 more wires were all separate. Then there's the bus. The only little negative I would say would be the pour plus were pretty thick in comparison to the part. The "wings" of SWAP took me nearly an hour to get off the pour plug with breaking it.   

I also picked up a detail kit from Shapeways which included PEPPSI, The HGA receiver, the RTG, and Lo gain antenna.  All of these were more detailed than the kit parts. But the lo gain antenna came with the supports attached. One of them was bent, and I knew sooner or later I would break that off. Took a few sessions but I did. 
But here we start off with the parts - 
This is a pic of me with my hobby saw taking off one of the pour plugs -
Taking my time I got all the parts cleaned and they look great -
(L to R) Alice, Cap for LORRI, LORRI, wings of SWAP, and PEPPSI
The next step was priming all the parts - 
I didn't take a pic, but since 99% of the craft is covered in gold foil, I painted all the parts a bright yellow. This is in case the foil rips. You won't be able to see a rip easily as you would, if I left the parts the gray primer.
After doing my 1:5 scale New Horizons I remembered foiling all the parts, especially the small ones, takes its toll.  I did the bus first, so when I got tired of foiling I could start applying the parts to the vehicle. 
Here we have the louvers and LORRI applied as well as the Student Dust Counter - 
LORRI was my first slow down. The LORRI instrument is approx an inch long. but the socket for it in the bus was only 1/4 inch.  Rather than drill out the bus and possibly ruin the foil, I chopped off the LORRI tube. After that I filled the bottom of it with Aves and painted it black. My plan is to put a few drops of clear resin in it the recreate a lens. Since the cap to LORRI is just butt jointed to the tube, this will go on at the very end.

I wrapped Alice and the edges of Ralph as well as the low gain antenna (very tough), so I turned my attention to the Star Tracker. After its installation, the instruction calls for painting  the top center part white. Done. Check back again for the next and maybe final part.  Thanks for looking


Monday, December 5, 2016

Pterosaur On Nest

This model has been on my table seemingly forever. I picked up this kit during one of Shane Foulkes' "collection selling" sales. I have no info on it. I'm assuming that part of it was already started. The reeds in the background seem to have been glued in place. I'm guessing the 2 eggs may also have been previously installed.  So all that was left for me was to paint up the animal and base.
As with all resin kits, things start off with a soapy wash and a prime with Stynylrez black primer - 
 For whatever reason I always seem to start with the base first and while the reeds reminded me of a marshy area, the rest of the ground seemed to say otherwise, so things were painted up to be high and dry. There are a few moulded in Ginko leaves, but I raided the wife's spice rack, and added a little more texture to the ground work. I also too some basil and stuffed it in and around the eggs -

Now on to the animal. Whether it is a baby as has been suggested or the female looking out for the eggs, both seem to me would not be brightly colored to bring attention to itself. So I painting in mute colors, matching closely with the groundwork. Thanks for looking. 


Thursday, December 1, 2016

Gillman Productions' ManThing

Another kit from Gillman Productions, this time it's ManThing.  He's based on a Marvel Comics character from the early 70's and then was made into a live action movie in in 2005 that went direct to DVD and the Sci-Fi Channel.

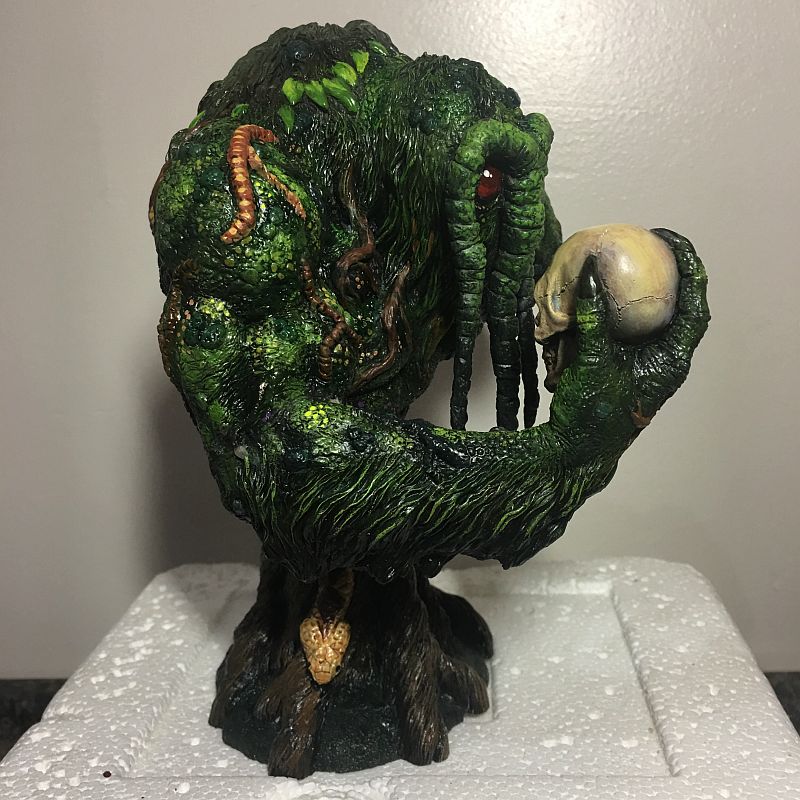
Our ManThing comes in 4 basic parts - the body, the "tentacles around the eyes, the arm holding the skull and the tree base.  There are almost no seam lines, and only 1 or 2 bubbles that was in inconspicuous areas.
His arm as he contemplates a skull.

The join was tight, but just a little Aves to smooth things over.

A little practice making skin impressions with Aves.

More Aves sculpting practice on the nape of the neck.
I connected the body the the tree base, but left off the arm and tentacles for now. He's looking at the skull in the sculpt, and it comes quite close to his face. I didn't want to impede my painting so it was left off for now.  Then I got out numerous bottle of my Vallejo green paints.
Tree trunks are usually gray so I base coated the trunk in black and then dry brush some gray onto the bark. A final wash of a brown joined the colors together. In the back the skull was already base coated in V's Iraqi Sand, and then washed in the same brown.

 A Howard the Duck skull makes a cameo in the back of the base...

His eyes are supposed to be red, so I hit it with some tan first.  After, the eyes were coated with 3 colors of red - Citadel's Khorne Red, Mephiston Red, and then Evil Sun Scarlet. I painted to be jewel like, and added two white highlight dots in each eye.
Individual leaves,  twigs worms, and a snake was added with additional colors. The muscles were highlighted with various other shades of green.  Since he lives in the swamp I coated it in a Satin clear coat to finish it up.  Thanks for looking.