Showing posts with label diorama. Show all posts
Sunday, November 10, 2019
Rolfosteus Finale
Go back to part 2 - http://kevtk.blogspot.com/2019/11/rolfosteus-part-2.html
I had quite the busy afternoon in the studio. I'll keep everything separate to make it easier for me to go back and look up things.
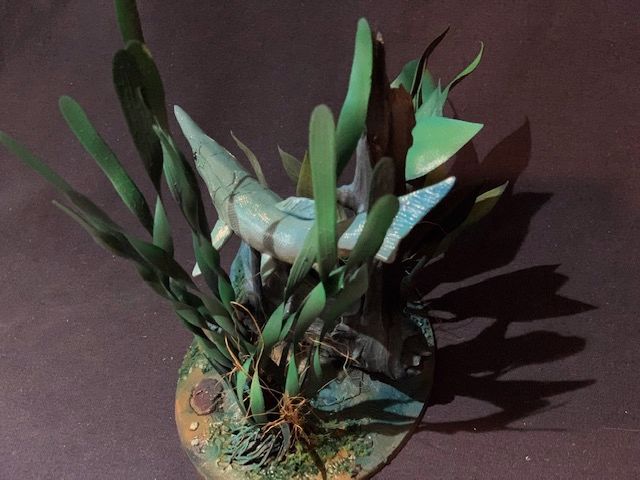
Anyway, the Rolfosteus vignette is finished. Picking up where I left off, the entire vignette except the fish got a primer coat of black, and a series of gray dry brushes on the tree, and then varying green highlights to plants. Different pieces of bark, and pebbles busied up the river bed. The fish was added in and then everything was given a dust coat of turquoise to give the impression of being under water. Thanks for looking.
Monday, November 4, 2019
Rolfosteus Part 2
See part 1 - http://kevtk.blogspot.com/2019/10/rolfosteus-model.html
In this session it was time to create the base for the model. I wanted it a little different than my other prehistoric fish, which were imagine in the sea. I couldn't find any info where they thought it lived but I gave it a river type base. starting out with an mdf base from Green Stuff World I added a mound of the Aves Free Form Foam epoxy for the groundwork. The stuff is very light weight and easy, albeit a little sticky to use. The only downside IMHO is that when it's mixed it smells like a wet dog to me until it dries.
Going to the fish section of a local Pet store I picked up an interesting little piece of wood, and some plants. I cut the plant bases off and stuck them into epoxy and pushed the still soft epoxy around the plastic roots. The fish will be moving thru the tangle between the branch and plant.
Painting comes next. Thanks for looking.
![]() |
Tho I create my dios to be seen from one POV, I felt the need to take a pic of the rear of the diorama. |
Saturday, January 19, 2019
Mountain Giant's Base
Not liking the disk bases for minis I set out to make some sort of a vignette. Taking info from the name, the Mountain Giant should have some sort of mountains.
I dug into my collection of little bits of foam from shipping boxes I found the size I liked, and then cut more to fill in the space for the two hills I have planned. Gluing them with Woodland Scenics Foam Glue, I put everything in place. I realized I needed a smaller rise to offset the hills so I tore pieces off some sheet cork I had and added them to the center.
Once dry I got out some Dap Plastic Wood that I had put away in a drawer to use as the groundwork.
First I started out just using my hands, but this stuff is very sticky, and it's best to use some spatula shaped tools. It also help to keep the tools wet.
From there things progressed very quickly. And you need to be quick. The Plastic Wood dries pretty fast. It was already starting to firm up in 5 minutes.
As you see in the pics as the putty dries it gets lighter in color. Once dried, it's easily sanded.
The Giant was moulded to be stepping off a boulder. To have come continuity I took some landscaping bark chips and made additional boulders. The bark chips make great rocks by painting them black and then subsequent lighter drybrusings of gray. I also painted the ground a dark brown.
From there is was just a matter of spreading some PVA glue around the base, and then with a static grass applicator, put the grass down. For realism, make sure to leave little bare spaces. It's the wilderness after all and not a lawn or golf course. ;)
In the pic the bare spot in the middle is where the Giant will be glued down. More glue and static grass around his feet will complete the base.
Thursday, August 3, 2017
2017 IPMS: Day Trip #1
The Museum is a pretty impressive site upon entering the driveway -
A little closer |
L to R: SM-62 Snark, SLV-1 Blue Scout, PGN-17A Thor, SM-65 Atlas |
As you get closer to the door, looking through the glass, there's a Blackbird to greet you. Stepping through the door you see it -
The building has two main hangars. Here's a sampling. Clicking the pic gives you a larger image. Make sure to hit the back button to come back to see the rest -
B-17G "Flying Fortress" |
Wright R-1820-97 Cyclone, 9-cylinder radial, air-cooled engines, 1,200 horsepower each.* |
F101-B Voodoo |
A-26B Invader |
XF-85 Gremlin |
B-36J Peacemaker |
Pano of B-52 Stratofortress |
A little Closer |
B-47E Stratojet |
F-4 Phantom |
B-58A Hustler |
Martin Marietta Titan II model with a full sized nose cone |
B-57E. "Parent" of this was the Brit Canberra |
RB-45C Tornado (Reconnaissance aircraft) |
B-25N Mitchell |
B-25 Interiors |
F-84 Thunderstreak |
F-86 Sabre |
U2-C "The Saint" |
On to the second hangar...
The X-38 was a prototype for a new crew return vehicle, based on earlier 1960s “lifting-body” designs that would serve as an emergency crew return vehicle for the International Space Station.*
X-38 Crew Return Vehicle |
X-38 Aft view |
Unmanned Apollo test flights were identified by double zeros before their numeric designations. The objectives of the test flights were to evaluate the spacecraft's communication and electronic subsystems, heat shield, and mission support facilities. On February 26, 1966 a Saturn 1B launch vehicle carrying Apollo CSM-009 was launched from Cape Canaveral, Florida. Following a seven minute burn, the second stage instrument unit separated from the spacecraft. The Command Module reached a maximum altitude of 310 miles over the Atlantic Ocean before beginning descent. It is on loan courtesy of the University of Nebraska - Lincoln, and restoration was completed courtesy of Duncan Aviation and Dale Jensen of Lincoln, Nebraska.*
Apollo Command Module (CSM 009) |
The VELA Satellite program began during the 1950s and was designed to monitor compliance with the Nuclear Test Ban Treaty, as well as to provide scientific data on natural sources of space radiation. The various elements were capable of monitoring underground, atmospheric, and exoatmospheric nuclear tests. The last of the advanced VELA satellites was removed from service in 1984.*
KC-95G Stratofreighter |
B-29 Super fortress |
C-47 Skytrain |
Closeup of the cargo door |
T-29A "Flying Classroom" Navigational Trainer |
F-102A Delta Dagger |
A missile (with the one below) hangs over the cafe area. |
ALCM-B Missile |
Looking out front -
B-1A Lancer |
Avro Vulcan B. Mk II |
I think this was a very nice museum. There are some exhibits that are showing some wear and tear, some of the planes need to be dusted/washed, and some need a new paint job. All in all it was a very nice collection and definitely worth a visit. The SAC Museum website has more info and a few more aircraft that I missed. Thanks for looking.
(* - text from the website)
Subscribe to:
Posts (Atom)