 |
| Dragon's V2 (left), Brengun's Hermes(right) |

This is my blog for my scale model building, and sculpting. Other hobby posts could include my fossil collecting, my herps or arachnids. I hope you find it interesting enuff to read. Enjoy.
Wednesday, May 31, 2017
Brengun Hermes (part 1A)
Before I post a finale of the Hermes build, I've been talking with a friend on the Real Space forum. I was lamenting on how small the Hermes was. His reply was that he had a 1/144 that might be smaller. I too have a V2 in 1/144 and I should have made a wager. LOL
Saturday, May 27, 2017
Brengun Hermes A-1
This time around I'm tackling the smallest kit I've done as of now in the 1:144 Brengun Hermes A-1.
From the Encyclopedia Astronautica:

Repeat this step 3 more times and the rocket is completed.

The base was next and it appears to be a trolley type system on rails. It also seems to be much different from the Brengun Hermes kit that was reviewed by the IPMS USA in 2014. I like their trolley much better.
The first wheel I cut off the stem flew to the nether regions. Despite the tiny size they were detailed pretty well. Too well for me to try and copy. So I cut 4 slices off a styrene rod the same size. It doesn't look good. Despite this I painted it up anyway. I'll have to decide if I want to use it or not.
Next time is the painting. I've sort of decided to use the 5th test scheme. All this will happen next time. Thanks for looking.

From the Encyclopedia Astronautica:
The Army Hermes A-1 single stage test rocket was an American version of the German Wasserfall anti-aircraft rocket.The rocket part of the model come in 13 pieces, and the base comes in 6. This shows 2 of the 3 parts that have to be put on each side of the rocket.
Development began in 1946 of an American version of the German Wasserfall rocket. Problems with the rocket engine delayed the first (failed) launch to May. Another failure in September 1950 was followed by a success on 2 February 1951. After two more tests in March and April the program was terminated in 1951, having been rendered irrelevant by more successful development of the Nike Ajax surface-to-air missile.

Repeat this step 3 more times and the rocket is completed.

The base was next and it appears to be a trolley type system on rails. It also seems to be much different from the Brengun Hermes kit that was reviewed by the IPMS USA in 2014. I like their trolley much better.
The first wheel I cut off the stem flew to the nether regions. Despite the tiny size they were detailed pretty well. Too well for me to try and copy. So I cut 4 slices off a styrene rod the same size. It doesn't look good. Despite this I painted it up anyway. I'll have to decide if I want to use it or not.
Next time is the painting. I've sort of decided to use the 5th test scheme. All this will happen next time. Thanks for looking.

Friday, May 26, 2017
Lost Boys David - part 3
Part 1
Part 2
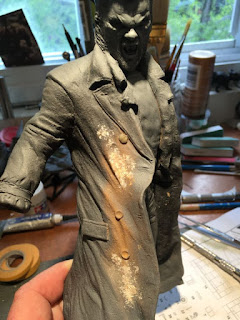
We start off this final session with paint to his leather jacket. As soon as I put the first bit of it down I realized it was the wrong color. But decided lets see what happens - Bob Ross' Happy accidents and all...
 While I'm thinking about it, I turn once again to the base. I add a variety of colors to what looks like 2 broken logs some dirt and rocks. Then decided for whatever reason (?) it needed a little purple on the rocks -


Nope. After a few coats of Citadel's Nuln Oil, I decide the Vallejo Orange Brown base for the leather jacket isn't going to work. So I go back to my old standby V's Leather Brown (Doh).
A coat of Nuln Oil later and it looks like what I want - dark - but not black or gray -

Jumping back to the base, I added some clumps of grass to the dirt areas. Then I get a brainstorm and decided to create the Chinese food carton of worms/noodles. Unless provided, none of my models have title cards. So I decided to try and make one. Since the model is from a movie I decided to somehow try to incorporate into clap board to the title card. I print out a few sizes of the logo, and spray them with a Satin Poly to seal the ink. I pick what I think is the best size, and then start cutting styrene. Nothing super accurate, just so people will recognize what it is. What a pain in the you know what to do the stripes simply with just the Tamiya tape I had on hand. IMHO it turned out ok -
 Looking it over, I think I'm done. As always, I could tinker with it forever, but at some point I have to abandon it. ;) Thanks for looking.


Part 2
We start off this final session with paint to his leather jacket. As soon as I put the first bit of it down I realized it was the wrong color. But decided lets see what happens - Bob Ross' Happy accidents and all...


Nope. After a few coats of Citadel's Nuln Oil, I decide the Vallejo Orange Brown base for the leather jacket isn't going to work. So I go back to my old standby V's Leather Brown (Doh).
A coat of Nuln Oil later and it looks like what I want - dark - but not black or gray -

 |
| A little hard to see but the scratch built earring is in place |
Jumping back to the base, I added some clumps of grass to the dirt areas. Then I get a brainstorm and decided to create the Chinese food carton of worms/noodles. Unless provided, none of my models have title cards. So I decided to try and make one. Since the model is from a movie I decided to somehow try to incorporate into clap board to the title card. I print out a few sizes of the logo, and spray them with a Satin Poly to seal the ink. I pick what I think is the best size, and then start cutting styrene. Nothing super accurate, just so people will recognize what it is. What a pain in the you know what to do the stripes simply with just the Tamiya tape I had on hand. IMHO it turned out ok -


 |
| A little hard to see but I added 0.01 solder to mimic the threads from the missing button |


Thursday, May 25, 2017
Lost Boys David - part 2
Getting into the kit, the first thing I tackled was to add pant legs to cover up the boots. I have no idea how to sculpt fabric, or leather in this case, so I just went for it -

Next was to shave off the extra buttons and the feather earring -
 After a quick priming, it was time to move on to accurizing the coat. I worked on one side by taking the second button off, and converting the top most one to some sort of silver badge. It looks like one of those pins that was popular in the 80s, but with the image peeled off -
 The other side I also took off a button and converted another to a watch body. As mentioned, the medal was wrong, but close enough.
Then in a detail crazy moment, I noticed there was no holes in the button for the thread. Not having a drill bit small enough to drill in 4 holes per button, I managed to get 2 holes per button -
 Then I decided it was time to put a little paint to the face. I started with a mid tone, knowing that it needs to be more pale. Keifer in the movie, with the help of the lighting was very pale. I also started painting his outfit. David looks to be dressed completely in black. But I know whats not the right thing to do. Straight black leaves you no where to go. So his shirt was done in Vallejo's Black Gray. You can't see it yet, but the overcoat will be done in V's German Gray -
 If you look closely at the knee from the above image, you can see it's still very rough. So it was time to get the Tamiya putty and try to level off some of the rough areas -
 This is where we will leave it for today. Thanks for looking.

Next was to shave off the extra buttons and the feather earring -


Then in a detail crazy moment, I noticed there was no holes in the button for the thread. Not having a drill bit small enough to drill in 4 holes per button, I managed to get 2 holes per button -


Tuesday, May 23, 2017
New
The mailman was busy bringing boxes to my house again this week. Also I found a model that had been stashed away, so that will be included in this list -
While I'm not a huge Star Trek fan, I will build the Enterprise, because it was a gift. The NX-Alpha doesn't have a saucer so I don't mind building it. ;) Thanks for looking.
 |
| Paleocraft's Elasmotherium |
 |
| One of the first rocket powered fighters, an eBay grab |
 |
| The just found model |
 |
| Fantastic Plastic's new offering |
 | ||
| Another awesome Star Wars kit. Need I say more? ;) |
Lost Boys David- Part 1
This kit has been in my stash so long, I no longer know who I got it from or anything about it. All that I remember was got got it with a Wolfman kit from someone selling in the Members Swap and Sell on The Clubhouse.
Subsequently I did find out that it was produced in 1996, edit: and sculpted by Shawn Nagle, which answers why it was rather rough.
The kit came in 4 parts - the body, 2 hands, and the base. The resin was a brown/orange color. I don't know whether that was the color of the resin, or just that the resin aged. I've seen some older kits turn that color.

The face sort of looks like Keifer Sutherland - not great, but not terrible. But looking at screen grabs from the movie, I found a number of discrepancies. Firstly as you may be able to make out in the above pic, he's wearing boots. All the screen grabs I've seen, he is wearing boots, but they are under the pants.

So the top edge of the boot will be cut off and shaved down. My rookie sculpting skills will come into play to make the pants extend down to the top of his boots.
Then I got a nice pic of a prop replica of his coat. The model has 4 buttons on each side of the overcoat. Umm, no.
On the prop, the right side had only the 2 bottom buttons, the third one up is missing, and top one is replaced with some sort of metal badge. The left side had the same 2 bottom buttons, then the third button was replaced with a watch that was attached to the coat backward. In place of the top button was a medal. The medal was there, tho not exactly accurate. Close enough. The errant buttons need to be cut off and the other pieces need to be sculpted on.
 There is a leather jacket under the topcoat. The model has it with a zipper. I couldn't find any clear pics to indicate whether it had one or not. The prop replica says no, but I couldn't find any other clear images. I'm not a sculptor and figured I already had too much to do, so I left the zipper.
Finally, David wore two different earrings at different points in the movie. The one he wore the most looked like a few folds of wire with a short length of fabric or leather in the bottom fold (the other was an earring with a tiny knife on the end).
 The model, had what looked like a short length of jewelry with a feather on the end. I thought, could that be a knife? No, it was a feather. So it was cut off.
We'll see this work in part 2. Thanks for looking.
Subsequently I did find out that it was produced in 1996, edit: and sculpted by Shawn Nagle, which answers why it was rather rough.
The kit came in 4 parts - the body, 2 hands, and the base. The resin was a brown/orange color. I don't know whether that was the color of the resin, or just that the resin aged. I've seen some older kits turn that color.

The face sort of looks like Keifer Sutherland - not great, but not terrible. But looking at screen grabs from the movie, I found a number of discrepancies. Firstly as you may be able to make out in the above pic, he's wearing boots. All the screen grabs I've seen, he is wearing boots, but they are under the pants.

So the top edge of the boot will be cut off and shaved down. My rookie sculpting skills will come into play to make the pants extend down to the top of his boots.
Then I got a nice pic of a prop replica of his coat. The model has 4 buttons on each side of the overcoat. Umm, no.
On the prop, the right side had only the 2 bottom buttons, the third one up is missing, and top one is replaced with some sort of metal badge. The left side had the same 2 bottom buttons, then the third button was replaced with a watch that was attached to the coat backward. In place of the top button was a medal. The medal was there, tho not exactly accurate. Close enough. The errant buttons need to be cut off and the other pieces need to be sculpted on.

Finally, David wore two different earrings at different points in the movie. The one he wore the most looked like a few folds of wire with a short length of fabric or leather in the bottom fold (the other was an earring with a tiny knife on the end).

We'll see this work in part 2. Thanks for looking.
Thursday, May 11, 2017
New Aquisitions
This time around I got a few new kits.
With the upcoming release of Guardians of the Galaxy 2, I picked up Fantastic Plastic's version of Star Lord's Milano. The kit is 1:144 and comes in gray resin. There are a few seams and a few uneven spots. There also looks like there are a few tiny bubble clusters at the surface and just under the surface -
 Next up is my delivery from MegaHobby; Bandai's release of the Y-Wing from Star Wars. This is in 1:72 scale -
 I also have planned a diorama here I'll need some ruins with a sort of slimy, mossy look. So I pick up 2 bottles of Vallejo's Environmental paint - Slimy Grime Light and slimy Grime Dark -
 Finally moving over to the Ma.K world I saw the Gefechtsboter "Hammerschlag" from Modern Armies in Miniature (MAIM). It's in 1:35 scale and the model just naturally lends itself to an interesting dio.
Why does it seem that many of the Dystopian future vehicle operators are women? ;)

 Thanks for looking.
With the upcoming release of Guardians of the Galaxy 2, I picked up Fantastic Plastic's version of Star Lord's Milano. The kit is 1:144 and comes in gray resin. There are a few seams and a few uneven spots. There also looks like there are a few tiny bubble clusters at the surface and just under the surface -


Why does it seem that many of the Dystopian future vehicle operators are women? ;)


Tuesday, May 9, 2017
Blohm and Voss P.170 Bomber
Besides my love of sci-fi and horror movies and their models, I also have a fondness for X-Plane group of aircraft. This includes the planes categorized as Luft '46 planes.
But both the x-planes and Luft '46 has to be looking "spacey" for me to build the model. If it just looks like another WW2 plane, well then, I'll let someone else build it.
This time we have the Blohm and Voss (B&V) P.170. B&V were ship builders. But with the approach of WW2 they diversified in aircraft.**
The P.170 is one of the aircraft designed in 1942. Although still rather odd-looking, the BV P.170 had a symmetrical basic structure unlike other Blohm & Voss projects of the time. The fuselage was cylindrical with the central engine located at the front end and the cockpit at the back end. The other two engines were located at both ends of the constant chord wing and their propellers turned in opposite directions. The aircraft was equipped with three powerful BMW 801D engines which were fed by separate 2,000 liter fuel tanks each.
This plane was based on the Nazi propaganda concept for a Schnellbomber, a bomber so fast that it would be far faster than any enemy fighter aircraft threatening it. Therefore, providing it with defensive armament was deemed superfluous. Eventually, owing to other war-related priorities, as well as the new jet possibilities, the BV P.170 did not go into production.
The model came from Planet Models, and is a very nice resin kit -
 The parts are in separate sections of a poly bag and while there is some flash. It's not as bad as some other short run kits. Where the kit falls short is in the instructions, especially showing exact parts locations, etc... I found this out almost right away while locating the radioman/bombardier seat location -
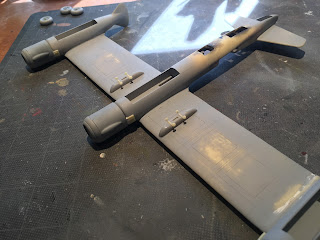
 The top of the canopy area went on and the wings went on with the help of some stringers made from paper clips. While close, there still needed to be some seam filling -
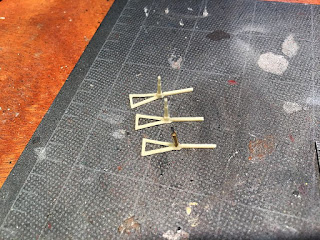
 There are two bombs that come with the kit and the holders are installed. The 3 landing gear are being built and I came across another hard time with the instructions. The diagram shows the support brace and a straight piece, but the parts show a triangular piece. Also one of the spars turns up missing so you can see one is made from tubing and paper clip.
I'm finally getting a handle of the large size of the kit being it's only 1:72 scale. Then I come across the next problem with the instructions when I go to close up the two "doors" at the bottom of the craft. Both pieces seem to be missing! After a bit of cursing, I take a break to give the vac form canopies a dip in Future and notice two additional windows. Those are the pieces - they aren't doors but windows! Problem solved but no where in the instructions does it give you the indication they are windows -

Here we have the wheels and landing gear installed. Since those 2 parts were windows, they are still off as they got their dip. The gaps are filled with tissue while I primed the model -
 Giving the landing gear adequate time to dry and solidify, it's now can rest on it's 4 wheels. You can see the bottom of the engines have also been painted their yellow color (RLM 4). Thankfully Vallejo has RLM colors noted on the bottles, plus on a listing of compatible paints -

 Still being too chicken to tackle the vac form canopies, I went ahead and painted the splinter camo on the top (RLM 81 and 82), and the light blue (RLM76) on the bottom of the plane. Here I've also sprayed a gloss coat in preparation of the decals and weathering -
 I finally broke down and and tackled the canopies. Honestly, they were tough. The framework lines as well as the edges were NOT clearly defined and I ended up doing a lot of cutting and fitting and cutting and fitting.
 In the end, IMHO they turned out ok. It will make a good "3ft. model." It will look ok from 3ft. away. ;) LOL
Next time I'll finish it up with the bottom windows, and light weathering. Being no P.170's were made, I can't see a lot of weathering on them.
Oh yeah, I will also have to paint the canopy frames. Yikes.
Thanks for looking.
(** Plane facts by Luft46.com)
But both the x-planes and Luft '46 has to be looking "spacey" for me to build the model. If it just looks like another WW2 plane, well then, I'll let someone else build it.
This time we have the Blohm and Voss (B&V) P.170. B&V were ship builders. But with the approach of WW2 they diversified in aircraft.**
The P.170 is one of the aircraft designed in 1942. Although still rather odd-looking, the BV P.170 had a symmetrical basic structure unlike other Blohm & Voss projects of the time. The fuselage was cylindrical with the central engine located at the front end and the cockpit at the back end. The other two engines were located at both ends of the constant chord wing and their propellers turned in opposite directions. The aircraft was equipped with three powerful BMW 801D engines which were fed by separate 2,000 liter fuel tanks each.
This plane was based on the Nazi propaganda concept for a Schnellbomber, a bomber so fast that it would be far faster than any enemy fighter aircraft threatening it. Therefore, providing it with defensive armament was deemed superfluous. Eventually, owing to other war-related priorities, as well as the new jet possibilities, the BV P.170 did not go into production.
The model came from Planet Models, and is a very nice resin kit -


I'm finally getting a handle of the large size of the kit being it's only 1:72 scale. Then I come across the next problem with the instructions when I go to close up the two "doors" at the bottom of the craft. Both pieces seem to be missing! After a bit of cursing, I take a break to give the vac form canopies a dip in Future and notice two additional windows. Those are the pieces - they aren't doors but windows! Problem solved but no where in the instructions does it give you the indication they are windows -

Here we have the wheels and landing gear installed. Since those 2 parts were windows, they are still off as they got their dip. The gaps are filled with tissue while I primed the model -


Next time I'll finish it up with the bottom windows, and light weathering. Being no P.170's were made, I can't see a lot of weathering on them.
Oh yeah, I will also have to paint the canopy frames. Yikes.
Thanks for looking.
(** Plane facts by Luft46.com)
Subscribe to:
Posts (Atom)