Showing posts with label Fantasy. Show all posts

Wednesday, May 27, 2026

Alice in Wonderland

 Shock of shocks! ;) I'm building a kit that hasn't sat in my stash for years. ;) This kit was picked up at at my local scale MODEL CLUB meeting a few months ago. Thanks Mike I.  Alice was sculpted by ELLA ARTS. And I've seen STL's over at Cults.

Alice is approx 1/10the scale  and was printed in a way that there was next to no grow lines nor dimples or "pimples". 


 Just jumping right in after cleaning and priming I tackled all the skin tones, and then turn to the blue dress - 


While that was drying I turned my attention to the base. It also gave me the chance to try out the new Army Painter Speed Paints 2.0.  I picked out a few colors and went to town. They went on very nicely, and even went thru the airbrush very well. 

The first pic is a little dark, but the second shows how the scene will look. At one point I put the kit base onto a wooden base - just so the painted surface wouldn't constantly be handled.


While I was at it, I painted up the Cheshire Cat. I just used the same colors as the example. I Also added the details to Alice's portrait. 


Next was to start to put the parts together and while doing that I painted the white articles of clothing - 


The other little thing I did was to add some of my new florescent paint set to the mushrooms and cat's eyes. The UV light really makes them shine!  I decided to leave the little head adornment off. seemed very fragile. 

It was simple to complete all the parts and I was done! Thanks for looking.


Sunday, February 9, 2025

Not Mickey

 Every time I finish the last project for December, and take a break for the Holidays, I always have trouble starting up again. My breakout is to always start out with something simple. I was able to do that with Not Mickey from Escape Hatch Hobbies.  For those that don't recognize it but think it's that other famous mouse, this guy appeared in Hal Roach's 1934 March of the Wooden Soldiers starring Laurel and Hardy.

The back story is that Hal Roach at the time was one the top dog directors in Hollywood. A newbie to the business, Walt Disney, was trying to get his name out when he and Roach spoke. Roach told of his "Soldiers" movie and then asked could he use his little mouse character. Walt said "Yes" but asked that he just not call him Mickey. A colorized version made him look a little more like that other mouse. In the mouse costume was actually a trained monkey, which accounts for all the "odd" movements.


The kit comes in 6 white resin parts - the head, two arms the body, tail and base. 


Assembling the kit not no problem, and painting like the colorized image I was finished in no time. I also added a little static grass to the base. Thanks for looking. 


Here he is on the table at my local model club meeting.


Tuesday, July 23, 2024

Cycle of Life part 2

 Continuing on with this vignette the first thing that needed to be tackled was the warpage on the horse's necks - 


From there, the painting could be started. As for Death, I wanted him in the dark and ghostly colors. For Life the bright colors were the plan.


Getting to the ghostly part, I had seen a few times where the Citadel people had used a green/turquoise color effectively as a ghost color. They used Nihilakh Oxide, But I didn't have time to wait for a mail order. So a quick trip to Hobby Lobby led me to 2 colors. All I had to do is choose the best look on the model.


I moderated the green some by desaturating the color with the lightest gray color I had, then added a little white on top to make a highlight. 

Then it was just a matter of attaching the wings, and then adding her figure to Death's base and we were done.  Thanks for looking.


I was really happy with her face, so zoomed in a little.


Monday, July 1, 2024

Ouroboros Cycle of Life

 I came across this kit in my secondary pile of To Do models. On the box it had a date of 2017, so it has to be at least that old. The name of the Co. which produced it was Blood Keep Miniatures.  But it doesn't really matter as when I first re-found the kit I looked it up and it is no longer in operation.  I did see that who I think is the sculptor as an STL of the kit available. You can see his work at ArtStation.


 The kit came in 11 parts of nicely cast resin.  The only problems problems with with the kit are two pieces (cleanly) snapped off the main parts. The other problem was the Death's head and the heads of the two horses were warped. Well, Death's Head was fine the middle horse was slightly off kilter, but the outside horse was off and shows a step in the one image.  


The above part showed the death book which had snapped off, and shows the hand with the hourglass that had to be attached. Thankfully I found an image I could enlarge to see how the parts exactly went together. 


For the "Life" art of the sculpt, another snapped off part ended up being part of her flowing cloak. These images helped me find it. Both arms and the 3 cherubs also had to be super-glued to the main body.


 I had to be careful where the left arm glue on as it also has to rest on top of that hourglass. I was hoping that it wasn't a case of it coming from a 3D design with the tolerances so tight that it would be a nightmare to have everything fit. No. Luckily I also used the gel type superglue that gave me a little extra time to match everything up. 


With that done it was in mostly 2 large sub assemblies with only his scythe, and her wings to add on. But first I have to fix that horses neck. But that's for next time. Thanks for looking and check back.

Tuesday, May 7, 2024

Ode to the Moon

 This was a miniature I picked up spur of the moment - as many of them are, while I was looking thru Blacksmith Miniatures website. Many of the figures are based of the art of Jean-Baptiste Monge as is Ode to the Moon. 

The kit comes in a 12 parts and the scene finishes up at about 70mm. 


 The biggest difficulty is that it is designed where tree roots balance the slanted tree. There are about a half dozen of these "supports and with the detail in the model,it difficult to see where each branch goes, or even where it goes. Luckily I found an image of one already done where the modeler did a number of images creating a 360° view. 


 Once having that, the model went together effortlessly. As you might have guessed the drone part of the bagpipe looked an was VERY fragile, and at some point I lost it. I replaced it with a bit of styrene rod, tho I couldn't replicate the details.  Primer was next. The next thought was if I was going to put this into a vignette, the dead tree took up a lot of space for just a dull object. I decided I would add some twisted wire to form small branches that I could hang leaves from.  You can see them mostly around the owl.

Next was the base colors. Old tree bark is mostly gray, so I added that and then splashes of color here and there to add a bit of color. It also looks like some moss was sculpted in, so that would be even more color.


Moving to the elf/satyr thing - he's not wearing any clothes, so his head and furry legs were painted in a dark brown and then made the mid color a reddish. The skin started off a little darker than my other figures. In the image he has 3 skin layers with a 4th upcoming. 


See more in the next session.


Saturday, June 6, 2020

Smoking Caterpillar Finale

After a week or two of laziness, I got myself into the studio and finished off the Caterpillar. 
First up was finishing off the highlights on the hookah. Then I re-adjusting the highlights on the caterpillar itself. I thought I finished up by using V's Metal Varnish on the hookah, and V's satin on the Caterpillar. Then I noticed that I didn't do those eye looking things on it's back. So I got out the Gloss Black and finished those.  I was really tempted to make them look like eyes, but I thought that might be *too much.* 
I epoxied it to the base and I was done. Thanks for looking. 


Thursday, May 21, 2020

The Smoking Catepillar

This was a kit that caught my eye for being different, even tho it's featured in a story and an animated movie. ;)  

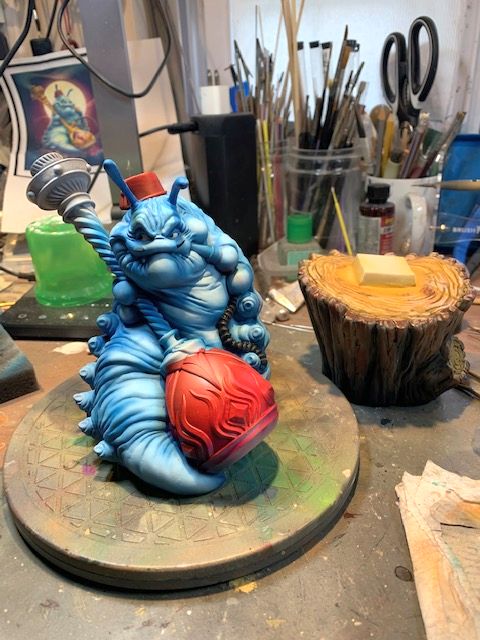
This caterpillar is from Creepy Tables, and comes in two sizes - 22cm and 15cm. I chose the 22cm version. It is a limited edition and I have either 30 or 36 (hard to read the handwriting) out of 200. It's still being offered so I guess there are a few left at the time of this writing.  It comes in 6 pieces of resin, that is very nicely done. FAINT seam lines were seen in one or two places and probably could easily go unnoticed.  
 
Here's what you get

 Here the parts were assembled - tho the caterpillar was just rested on the stump. Will glue them together at the end - and primed. The connection between the top and bottom parts of the hookah needed extra attention.

Following the color image that came with the kit, I started airbrushing the blues on the body.

More messing with the light and dark blues, and filled in the body of the hookah. On the image it's made to look transparent. I'm not able to copy that so I just made 2 levels of a purple red into a red, and then a pale red reflective highlight.  I used the same red colors for his fez.

Wanting to paint the decoration on the hookah gold, I added the gloss black.
The wood stump also got my regular wood treatment of black then gray and dark brown. Going way out on a limb I added a stylized wood grain to the top as practice since it can't be seen, and then on the cut branch on the front of the stump.  Check back for the gold trim, jewels, and the final details. 
Thanks for looking.

Sunday, May 17, 2020

Dune Sandworm

It's almost embarrassing to admit that this is another one that's been in my stash for a long time. I'm guessing that 90% of my stash has been there a long time (blush). 
But anyway this is a nice quick project. Sculpted by Kent Kidwell, it's a one piece kit with lots of details for the size.

 Going from memory I remember a lot of brown dirt in the movie, so I started with a red earth primer. 


I have too many earth tone paints in my collection and wanted the worm to be a little different at least, from the ground. So the colors of both changed a number of times. But it all went along pretty fast - 2 or 3 hours and I was calling this one done. Thanks for looking.