Showing posts with label Mythology. Show all posts

Tuesday, July 23, 2024

Cycle of Life part 2

 Continuing on with this vignette the first thing that needed to be tackled was the warpage on the horse's necks - 


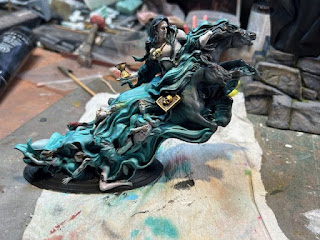
From there, the painting could be started. As for Death, I wanted him in the dark and ghostly colors. For Life the bright colors were the plan.


Getting to the ghostly part, I had seen a few times where the Citadel people had used a green/turquoise color effectively as a ghost color. They used Nihilakh Oxide, But I didn't have time to wait for a mail order. So a quick trip to Hobby Lobby led me to 2 colors. All I had to do is choose the best look on the model.


I moderated the green some by desaturating the color with the lightest gray color I had, then added a little white on top to make a highlight. 

Then it was just a matter of attaching the wings, and then adding her figure to Death's base and we were done.  Thanks for looking.


I was really happy with her face, so zoomed in a little.


Monday, July 1, 2024

Ouroboros Cycle of Life

 I came across this kit in my secondary pile of To Do models. On the box it had a date of 2017, so it has to be at least that old. The name of the Co. which produced it was Blood Keep Miniatures.  But it doesn't really matter as when I first re-found the kit I looked it up and it is no longer in operation.  I did see that who I think is the sculptor as an STL of the kit available. You can see his work at ArtStation.


 The kit came in 11 parts of nicely cast resin.  The only problems problems with with the kit are two pieces (cleanly) snapped off the main parts. The other problem was the Death's head and the heads of the two horses were warped. Well, Death's Head was fine the middle horse was slightly off kilter, but the outside horse was off and shows a step in the one image.  


The above part showed the death book which had snapped off, and shows the hand with the hourglass that had to be attached. Thankfully I found an image I could enlarge to see how the parts exactly went together. 


For the "Life" art of the sculpt, another snapped off part ended up being part of her flowing cloak. These images helped me find it. Both arms and the 3 cherubs also had to be super-glued to the main body.


 I had to be careful where the left arm glue on as it also has to rest on top of that hourglass. I was hoping that it wasn't a case of it coming from a 3D design with the tolerances so tight that it would be a nightmare to have everything fit. No. Luckily I also used the gel type superglue that gave me a little extra time to match everything up. 


With that done it was in mostly 2 large sub assemblies with only his scythe, and her wings to add on. But first I have to fix that horses neck. But that's for next time. Thanks for looking and check back.

Tuesday, May 7, 2024

Ode to the Moon

 This was a miniature I picked up spur of the moment - as many of them are, while I was looking thru Blacksmith Miniatures website. Many of the figures are based of the art of Jean-Baptiste Monge as is Ode to the Moon. 

The kit comes in a 12 parts and the scene finishes up at about 70mm. 


 The biggest difficulty is that it is designed where tree roots balance the slanted tree. There are about a half dozen of these "supports and with the detail in the model,it difficult to see where each branch goes, or even where it goes. Luckily I found an image of one already done where the modeler did a number of images creating a 360° view. 


 Once having that, the model went together effortlessly. As you might have guessed the drone part of the bagpipe looked an was VERY fragile, and at some point I lost it. I replaced it with a bit of styrene rod, tho I couldn't replicate the details.  Primer was next. The next thought was if I was going to put this into a vignette, the dead tree took up a lot of space for just a dull object. I decided I would add some twisted wire to form small branches that I could hang leaves from.  You can see them mostly around the owl.

Next was the base colors. Old tree bark is mostly gray, so I added that and then splashes of color here and there to add a bit of color. It also looks like some moss was sculpted in, so that would be even more color.


Moving to the elf/satyr thing - he's not wearing any clothes, so his head and furry legs were painted in a dark brown and then made the mid color a reddish. The skin started off a little darker than my other figures. In the image he has 3 skin layers with a 4th upcoming. 


See more in the next session.


Thursday, April 9, 2020

Earth Dragon

When I pulled out CMON's Demon of Souls, I also grabbed their Earth Dragon. I don't know if there's anything in the mythology about it, or did someone in the office just make it up. But there was a pic of it in the art book I bought with the game and he appears as a yellow dragon with green "gems' in the skin, as well as a black and gold head. I thought I took a pic of the illustration but I guess not. Anyway here it is in primer - 


This came in multiple parts which were assembled in the factory. No effort was made to fix the seam lines. The other thing was that parts of the dragon are incredibly detailed, while other parts are *very* soft. 

I started off with a base coat of an orange color and the black head, planning on going lighter as I went.

Once I started lightening it, I added gloss black for the gems, as I planned to use the GreenStuff World's metallics line. But unlike other metallics who benefit from the gloss black, these paints don't. So I redid all the gems in white. Then once I added the color they really popped.
I thought I had more WIP shots, but no. So here's the finale done. Thanks for looking.


Friday, June 28, 2019

Atlantis Minis Sphinx

One of the two mythological creatures I got from Atlantis Miniatures (not the same as Atlantis Models)  is the Sphinx.  This is a well done 7 piece gray resin kit. There's no flash, or no bubbles.

Adding paint, the obvious reference is a lion so I used V's Beige, with the German Brown Black for the mane.

Then I added Citadel's Reikland Fleshshade  over the body and their Nuln Oil over the mane. Once that was dry I added bad the Beige but as a drybrush.  The main got a dry brush of V's Beige Brown

The wings got the same treatment of the beige and Reikland Fleshshade. This time the heavy drybrush was with V's Foundation White.  Later on I added a second go round of white to the upper wings and V's Brown Wash to the deepest areas of the wing folds.

The brick piles got a coat of V. Game Color Plague Brown, drybrushed with beige and highlighted with a beige/white mix. The ground work was some simply with V. Tan Primer over some Modpodge which had the Chinchilla dust sprinkled on it. 

I also added a few extra bricks out of the same sized balsa lumber. With that I was done. Thanks for looking.


The usual size comparison pic.

Friday, February 22, 2019

Perseus and Medusa

In an effort to collect Medusa kits whenever possible, I came across this kit at a not so recent JerseyFest (or was it the old Resintopia?). The kit came fro the Morland Studios. The kit comes in 6 parts plus a 60mm round base and the figure is scaled to 32mm.

 Following the card, I tried to copy the image. The small size of kit was a real trial to my abilities.

The sculpted base comes in 2 parts, and they are made to attach together, but sitting on the round base, there was extra room. I decided to fill the black base. In the pic you can see gray Aves to fill the basesplitting the difference between rocks and sea.   I also used V's Plastic putty to fill the seam between the monster/sea and the rocks. 

I made the tip of the snout of the monster shades of gray as if it was turning to rock, again a la the Clash of the Titans remake. Don't know how well that comes across being so little of the monster is seen. 

From there, I concentrated on the TINY details for the figure.

There was no decal for the shield, so I tried my best, Think of the Clash of the Titans remake, and painted on a scorpion. Finally adding some gloss to the scene, and gluing Perseus in place, I was finished. Thanks for looking. 


Size comparison to a Quarter
 

Friday, January 4, 2019

The Kappa Finale

Part 1: https://kevtk.blogspot.com/2018/12/the-kappa.html

With the creature finished I turned my attention to finishing the base. I added colors to the river bed. In hindsight, I should have used more muted colors.

 Added a little greenery to the river bed. I was planning on making the  water clear or mostly clear.
 A closeup of the tree root. Not bad going from a real branch to roots bad from aves.
 Some plastic aquarium plants painted and added to the river bed. I also added some "leaves" to the shrub.
 The finished product. Thanks for looking.


Thursday, December 27, 2018

The Kappa

I saw this kit at one of the Vendors's tables at the IPMS Nats in AZ.  The Kappa comes from Japanese mythology :

Kappa considered to be a type of suijin (water deity) that inhabits the freshwater areas of Japan. According to legend, the Kappa is fond of causing mischief and even harm towards humans. A Kappa’s pranks can manifest in the form of harmless jokes like making noises similar to flatulence or looking up a woman’s kimono. However, some Kappa are more violent and have been known to try to drown livestock, kidnap and eat children, and force themselves upon women.
Although Kappa are generally considered a force to be feared, there are some instances in which the Kappa are considered to be generous – though this most often happens when a Kappa is indebted to a human being. Some of the most common records of friendly Kappa are early Japanese legends that attribute the knowledge of bone setting and medical salves as being taught to man by friendly Kappa.

The kit contains two frets of styrene parts. There are no instructions, but 3 images and corresponding part number to show where they go - 

The build begins. There are no locator pics and in some spots it's a balancing act to keep the parts where they belong until the glue sets.


Felt the need to put some paint on the shell.
Primed in tan and then sponge dabbed in Mahogany.

A little Ivory added the the belly.
 Work started on the hair. There is no "cup" as the myth suggests, just a bald spot. I could have added one, but just didn't. 
While the idea of the tab on the hair fits into the slot on the bald spot looked good on computer, it didn't really work, besides the first one. In the end the tabs were cut off and the hair superglued into place. There was also gaps, and some Aves came to the rescue there. 


Painting 90% complete. The model comes with two round stones in his upturned palm that isn't added yet. I didn't look up the meaning of that. Nothing was mentioned in the summaries, and everything written on the box is in Japanese.


The kit comes with a super simple base of just a log stump or is it just a large rock?  Anyway too simple for me. So I took some foam out of my "foam box" and started  carving a shoreline.  He'll go on one of the stones in the water. 
Check back for completion. Thanks for looking.