Sunday, November 24, 2019

Salamander Finale

This session I added a few more highlight glazes to the leaves, and then gloss coated them to make them look wet.

Turning to the salamander, the same thing was done. I added various intensities of a dark red glaze to give the salamander  some depth.

To finish up I set the salamander in place and then with the UV resin I put a drop of resin in low spots where it was standing, and then once hitting it with the UV light, the resin cured and he was glued in place.  Another one done. ;)
Thanks for looking.


Wednesday, November 20, 2019

Taiwan Lesser Salamander

Huh?  Yep, a salamander.  Not to think I'm all into ghosts and monsters and fantasy figures, I really collect anything that that catches my eye. This kit came from Skink Haunt who was big into  creating animals of Taiwan (it looks like lately he's also moved into creating monsters).  This kit has to be 10+years old by now.  Back then I didn't think I could do it justice with a lifelike skin tone. But I figured I was confident enuff to try it now.

The kit is only 2 parts, the animal and a base. I'm guessing it's a 1:1 scale kit.
The salamander is what it is, not a lot of detail, but well done. The base, on the other hand, is chock full of details. I wondered if he sculpted it, or took real leaves and twigs etc... and molded and cast that. It comes in a plastic bag and gives you this -


The kit only had a few imperfections, most like the remnants of pour spouts. Sanding those down I was reminded that the kit is from Asia, as the smell from the sanding definitely has that petroleum smell of the resin that many of them use.
Once smooth the kit was given a coating of V's NATO Black. This is my new fav as to my eyes, it's not just black, but has a slight green cast to it.
After that I gave the salamander and the leaves a mottled look with two colors of gray - the second a bit lighter than the first.  Following the illustration one leaf was red and the other orange. This is what I followed.  Check back for the next WIP.


Godzilla!

I picked this one off the shelf as I saw it as a fast little build.  Sculpted by Troy McDevitt, is a very nice caricature, with one two bubbles on two of the teeth, and seam lines that were nearly invisible.  The part fit very well and only a little bit of Aves was used along the spines, and where the spines met his tail.  After that it got a coat of Vallejo Air NATO Black as a primer.

 I like the NATO Black because to my eyes it looks like there a little green in it, and models don't just look black. After that it got a drybrush of a mid range gray. while that was drying I got out some Ivory and painted the teeth and eyes. Then some Gray Green for the toe and finger nails. I also mixed some of the Gray Green with the Ivory, and painted his gums.

Liking the new Godzilla I had the idea to have his spines light up in that blue white coloring, so sprayed the edges a wide swath of dark blue.
 Leaving the blue to dry , I went back and gave the teeth a was of Nuln Oil. The eyes also got dots of Gory Red.
 From there I went back to the spines, and gave a smaller edging with a light blue. When that dried, I had an even lighter blue that went in a smaller strip along the spines. To finish it off a added dots of white to tallest spines.  To finish him off, his teeth got a dry brushing of Ivory.  Done, nice and easy.   Thanks for looking.


Monday, November 18, 2019

AHS: Pepper Finale

See part 1 - http://kevtk.blogspot.com/2019/11/ahs-freakshows-pepper.html

Starting with the face this session, I gave the usual black eyes to start and also some Beige Red for a base to the skin.  Some Reikland Fleshshade was added as the shadows and then some more speckled around the face. Then some Beige Red was speckled on top. A mix of that paint with some of Vs Basic Skin tone followed, and then a final of just the Basic Skin tone. Having a look the actress' blue eyes were left and I used Azure for the base color of the irises.

 With that I was done. Thanks for looking.


Saturday, November 16, 2019

The Howling Man

Today's subject is another from MoonDevil Studio. It's the Howling Man, from a 1060 episode of the Twilight Zone.

From IMDB:

Seeking refuge from a storm, a traveler comes upon a bizarre abbey of monks, who have imprisoned a man who begs for his help. When he confronts the head monk, he is told that the man is the Devil, and he must decide whom to believe.

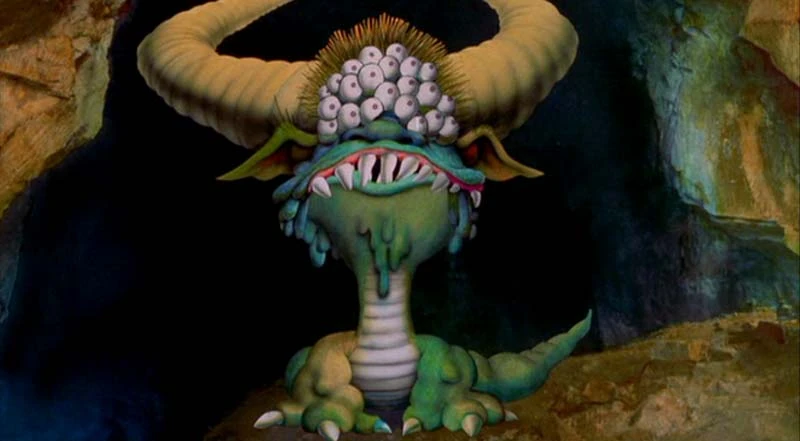
Just looking at the sculpt you get to see how the story ends. 

The kit comes in the usually 2 parts, the bust and the base.  The kit is typically well done and only the slightest seamline is seen across the slicked back hair.


Looking at images of the actor, Robin Hughes, the first obvious thing is that it's all in B&W (Duh, it was 1960, Kev...).


My first idea was to paint it up that way. But it was only a few days after JerseyFest (where I got the model) that someone else posted on the FB GK groups his version which was in B&W. So I decided to go with color.
Next thing to think about was what is the coloring. Looking at the  film still, it looks like the actor has no coloring makeup, and his shirt is black and his cape is alsodark with a light color stripes, and cowl.   I remembered a movie memorabilia auction where Dracula's cape was up for bid. The cape as you would expect was black, but the inside was a salmon color satin!  I decided that my devil will have the same. If it's good enuff for Bela, it's good enuff for the Howling Man... 

But first comes the primer. And then I decided to make him a red devil.


It wqas at this point I decided that I would work on my OSL.  Not show is I started by using my "red" paint set, and started at one end with a dark purple color. This will be my deepest shadow. 
I started with a flesh color which would give me the salmon color, but decided to add some pearlizing additive to make the cowl shone a bit. But the pearl flecks are in a white medium, not clear. This turned the salmon color a little beige.  Hmmm do I want the pearl, or do I want the salmon color. I chose the shine so my cowl became this beige color.
 In retrospect I should have darkened the shadows of the cowl more as I was going, which would enhance the shine. I tried after 90% of it was done, but was afraid of ruining what I had done so far, and chickened out spraying the shadows darker. The cape was black, the shirt was German Gray, and the chain was brass, which IMHO looks more like gold and the gold paint does.

The base was gray which Black Gray in the cracks, and the lettering was the same Scarlet that was the highest highlight of the face.  With that I was calling this done. Thanks for looking.


Wednesday, November 13, 2019

Thurs. Throwdown for 11/7/19

This week's throw down was Bad Ass Pilgrim.
Had to think about this one a bit. Was originally going to have a turkey in the guy's hand. But whats bad ass about that? So I changed it to a giant bloody wolf head.  Thanks for looking.


Sunday, November 10, 2019

Black Beast of Arrrggghhh.

Having enjoyed Monty Python and the Holy Grail for years, I never knew the monster had a name .  Then when I found out, it's odd that the Black Beast isn't even black. LOL


The core of it is just aluminum foil, then covered in a mix of SS and SS Medium. The eyes are a ceramic type bead from MoreZmore.
 Didn't have any WIP but here's the finished figure. Base to come sooner of later. Thanks for looking.


Rolfosteus Finale


Go back to part 2 - http://kevtk.blogspot.com/2019/11/rolfosteus-part-2.html

I had quite the busy afternoon in the studio. I'll keep everything separate to make it easier for me to go back and look up things.
Anyway, the Rolfosteus vignette is finished. Picking up where I left off, the entire vignette except the fish got a primer coat of black, and a series of gray dry brushes on the tree, and then varying green highlights to plants.  Different pieces of bark, and pebbles busied up the river bed. The fish was added in and then everything was given a dust coat of turquoise to give the impression of being under water. Thanks for looking.


Thursday, November 7, 2019

Edna got a base

Part 1:  http://kevtk.blogspot.com/2019/06/edna-mode.html

Having been lost in my table of completed models, I finally found her and gave her a base. It's not great, and will have to work on my basing...


Tuesday, November 5, 2019

Evil Dead II Hand

Another kit from Gillman, the Evil Dead II hand is a mini vignette from a scene in the movie where Ash's possessed hand "runs" around the cabin. In the kit you get the choice of and hand "walking" or one that gives you the finger, along with a section of the wall, and piece of the wooden floor. I chose the walking hand.  You also had the option of getting the Necromicon book.

First thing I did was to lengthen the floor with some foam. My idea was to dremel open the hole in the wall - as is the opening is just recessed, and I needed extra space that would be behind the wall.  With the opening now I needed something to create a back stop. That was easily solved with a piece of sheet styrene painted black.

For the hand, I did the usual squiggle pattern to create a little something under the skin.


With it all painted up, including the book, which was done with a dark brown, and then a highlight of V's Iraqi sand. The edges of the pages were done in V's Old Gold.   with no name on the vignette, I found a printed out a small poster of the movie, crinkled it up, and then glued it where it looks like it's thrown against the wall.  The images are making the hand look a lot redder than it really is. Oh well. Thanks for looking.


Monday, November 4, 2019

Rolfosteus Part 2

 See part 1 - http://kevtk.blogspot.com/2019/10/rolfosteus-model.html

 In this session it was time to create the base for the model. I wanted it a little different than my other prehistoric fish, which were imagine in the sea. I couldn't find any info where they thought it lived but I gave it a river type base. starting out with an mdf base from Green Stuff World I added a mound of the Aves Free Form Foam epoxy for the groundwork. The stuff is very light weight and easy, albeit a little sticky to use. The only downside IMHO is that when it's mixed it smells like a wet dog to me until it dries.

Going to the fish section of a local Pet store I picked up an interesting little piece of wood, and some plants.  I cut the plant bases off and stuck them into epoxy and pushed the still soft epoxy around the plastic roots. The fish will be moving thru the tangle between the branch and plant.

Painting comes next. Thanks for looking.


Tho I create my dios to be seen from one POV, I felt the need to take a pic of the rear of the diorama.

AHS: Freakshow's Pepper

With the table cleared it was time to dive into the pile again for some new kits to work on. This time I pulled out two, both from Gillman Productions. The first is Pepper from the series American Horror Story, and the Freakshow story.


From the website:

Pepper is a microcephalic woman and former performer with Fräulein Elsa's Cabinet of Curiosities who has been committed to Briarcliff Manor. She is a character in American Horror Story portrayed by Naomi Grossman. She appears first in Asylum, and earlier in life in Freak Show.

 We find the kit is similar to Twisty from the same show with a sort of carnival base.  The kit comes in only 3 parts - the head, bust, and base.


Every so often you'll get a cool illustration from Mark Van Tine, the sculptor!

Base colors added. except for the ice cream (at the time I was still researching that). ;) 
(EDIT: chocolate, strawberry, and vanilla) ;) 

First highlight added, and epoxied the bust to the base.  Thanks for looking and check back for the next session.