Showing posts with label Rockets. Show all posts

Thursday, December 12, 2024

Flash Gordon's SkyFlash

 The SkyFlash is the next craft up on Fantastic Plastic's Classic Rocketship series. From Fantastic Plastic's website:

 The "Skyflash" was the hero ship featured in the "Flash Gordon" TV series that aired for one season (39 episodes!) on the short-lived DuMont Network between 1954 and 1955. Like many rocketships of its era, the Skyflash was a single-stage, chemical rocket-powered tail-sitter inspired largely by the German V-2 ballistic missiles of World War II.

Operated by the Galactic Bureau of Investigation in the year 3203, the Skyflash traveled throughout the galaxy, carrying Flash Gordon, Dale Arden and Dr. Zarkov on amazing adventures on the lowest of budgets.


The 1:288 scale model is well done resin cast, and comes in 7 parts. IMHO this has to be one of the quickest and enjoyable builds I done recently.  


The parts went together effortlessly, and the only tricky part was getting the nose cone to sit straight. While waiting for the glue to dry, it was time to think up a simple base for it. I had these 100mm plastic bases from Citadel. I took some 1/2 - 1mm tape to create divisions in the groundwork and then stippled to concrete color on. After pulling off the tape I added a shot of Smoke from the airbrush, and I had the launch area. 

Turning back to the ship I painted it in V's Duraluminum, and then gave it a zenithal shot from the airbrush of V's White Aluminum. And with that I was done.


Friday, November 1, 2024

Willy Ley Orbital Rocket

Late last year at one of my Model Club's Zoom meetings there was mention how expensive kits were when all the aftermarket parts were obtained. someone else wished we could go back and just build a kit without worrying about anything. It was thought up early this year that the Club would have a group build entitled "Build Like An 11 Year Old." Being one of the sponsors of the build I was now on the lookout for a kit that I either built or could have built as a kid in the late '60's - early '70's.  Not long after, I saw in an email blast from CultTVMan, that the Atlantis had the Willy Ley Orbital Rocket available.   According to Scalemates, the original kit was released by Monogram in 1959, and then Atlantis re-popped it in 2024 in the same 1:193 (?) box scale size. 

It arrived at the house not a week after ordering and upon opening the box I was brought back to being a kid again with red, white and blue colors of the plastic. All the flash also brought back memories. 


 The back of the box also had a surprised in that the photos were those of Allen Ury of Fantastic Plastic

Now, how was I going to build like an 11 year old? First thing I thought of was that with the colored plastic, I wouldn't paint it. Remembering back, not having an older brother or dad who built models, I probably wouldn't have known how to fill seams- so I would leave this out too. 

An early problem was that one of the astronauts appeared to be missing. I figured that was fine as what's the chance a little kid would lose a part - pretty good- I thought. So in the main ship I had just one pilot. Bust as you would know it, after the fuselage was glued together, I found the 3rd astronaut on a different sprue covered in flash. Perfect, I thought, as I was prying the fuselage open to get the second pilot into the main vehicle. 

Thinking of the 50s and how the real spacesuits were silver, both pilots were brushed with silver and just a dot of black where their face shields would be. An 11 year old would be aiming, but I just quickly made two dots...


While I had the silver out I also painted the engines with the color.

The rest of the model went together fairly painlessly. With the interior of the second ship more visible and smaller, I smeared around some gray paint in there. I was also at this time I saw where the painting instructions were hiding and discovered that the astronauts were supposed to be in a light green uniform. It was too late for the first two guys, but the 3 pilot was painted with a lime green, a silver helmet, and the black dot.

Now it was time for the decals. I remembered that I wouldn't have know about Micro Set/Micro Sol, so I wouldn't use those either.  Here it was discovered an error on the decal sheet. On the wings of the main ship was two yellow, triangular stripes, one for each wing. I cut them out, dipped them in the water and then realized that they were both for the same side. An 11 year old would have known he couldn't use them, but probably wouldn't have figured that they could be used as stencils and paint the stripes on - at least I wouldn't have thought of it. So I just left them off. After all the decals were on, many stood proudly above the plastic because of all the rivets. So in an effort of trying not to lose them with handling, I gave in and Micro-Sol'd them down ~ -1 point for me. 

With that I glued the two ships together and then to the stand. I came as close as I could to being that 11 year old. My other point loss would be that I wasn't going to search out the Testor's Tube Glue I remember. So I just used the Tamiya Thin that I had. With that, I was done. Thanks for looking. 


Wednesday, May 1, 2019

Valier "Raketenschiff"

Another nice kit from Fantastic Plastic. It is #6 in their line of classic rocket ships.  The craft was the idea of  Max Valier, a fan of the rocket scientist Oberth. From FP's site:

Valier's dream was a rocket-powered suborbital "Raketenschiff" (Rocket Ship) that could fly from Berlin to New York City in one hour. In a series of published articles, he proposed evolving his rocket plane from existing commercial aircraft, adding rocket boosters to augment conventional motors until the craft was 100% rocket powered.

 The kit comes in 16 parts and a set of decals. The instructions are a little sparse this time, with a exploded view of the original CAD (I think) and you need to refer to the box art for decal placement.


As mentioned, the kit almost falls out of the box completed. ;)  Check back for the completed model. Thanks for looking.


Saturday, February 2, 2019

Little Joe II

After doing a number of figures, I figure it's time again for another nice rocket. This one is the 1:144 scale resin kit of Little Joe II by New Ware Models. A number of dealers sell New ware kits, but I've never had a problem buying directly from Tomas in the Czech Republic.

From a website: 
Little Joe II was an American rocket used from 1963–66 for five unmanned tests of the Apollo spacecraft launch escape system (LES), and to verify the performance of the command module parachute recovery system in abort mode. It was named after a similar design from  Project Mercury. Launched from Whit sands Missile Rangein New Mexico, it was the smallest of four launch rockets used in the Apollo Program.
This is another nice kit from New Ware. The main part is the rocket itself, with a number of parts for the engine part, fins, a fret of PE and two pages of decals.It may be hard to tell but there is quite a resin plug at the bottom of the rocket. See below for how I take care of it.

The building starts with 4 main engines and lots of smaller ones sitting on a piece of PE - 

Nearly all of New Ware's parts come with a big block of resin.  I used to use the regular ball type Dremel bits. But I found that it was quite easy to slip with those. Then I found this one that had the flat top. After sawing off the majority of the block, I can then go in with the flat top and grind out the extra material almost right to the part itself.  For a lot of my rockets where it's difficult to get it perfect flat across a one or two inch surface, this flat top will allow me to dig out the center, and I only need to be careful around a cm or so of material where the gluing edge will be. 

 The engines are on, as are the vanes - all quite easy. Below the rocket are the attitude adjustment jets. There was only 1 on each block that was intact. But because I only needed 4 I could canibalize the others to make up complete ones.

 I wasn't looking fwd to folding the tower struts, but this one went quite painlessly.

Here the tower is complete with the engines of the escape rocket applied. I did lose one to the carpet monster, but there were extras. All the pieces are primed and the call out for the attitude adjustment jets said they should be steel color, which is what I did.  Check back for the final assembly, painting and decaling. Thanks for looking.


Saturday, September 2, 2017

Glencoe Retriever rocket

While I'm letting the paint dry on the Sky Flash, I pulled Glencoe Model's Retriever Rocket out of the stash. It's another kit that I had quite a while and taking a break from resin, it'll be good to work in styrene once again. 
The first thing I noticed was that there is a huge flight deck window. Looking thru the parts there is no flight deck ... nothing.  So two things that can be done is to just shade the windows over so you can't see in, or create a flight deck. 
If anyone actually reads this stuff, and if any of those who know me, knows I have to make things WAY difficult for myself. So I am going to create a flight deck.  The box says this kit is 1:72 scale, so the first thing I did was to get one of those tools that lets you figure out curves angles etc... When that came I figured where the back wall of the fight deck was to be. From there I figured out a floor covering every angle that could be seen from the inside. 
Next I bought some 1:72 cockpit seats.  They came from a Ka-27 jet strictly becasue they had four in the package. The I wanted to make it really busy, so I also bought instrument panel PE.
The PE set is actually 1:48 scale. I didn't mind it being big as I wanted the flight deck to look "busy' and this will definitely do that. 

Let's start building - 

Oops, that came busted.
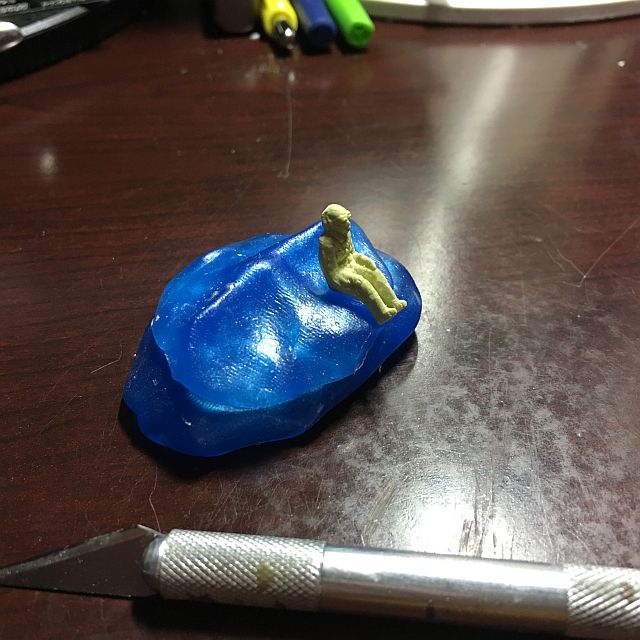
 Turning my attention back to the flight deck, I think I did a review of Blue Stuff. It's looks like squared off lengths of blue hot glue sticks. It softens when it is put into *hot* water, and is used for making copies of parts. I had a 1:72 pilot mold sitting around for a long while. So I got it out and started making pilots. I decided to use 3 seats, so I will need 3 copies.
Here's on pilot done sitting on the Blue Stuff mold with pilot #2 inside "cooking." The pilot is made of Yellow Gray Milliput. You can use any sort of 2 part epoxy. The one caveat is that for whatever reason Aves Apoxie Sculpt will not work. No matter how long you leave it, the copy won't harden. So far Milliput and Greenstuff has worked for me.  For other epoxies - try it out. If it doesn't work it won't ruin the mold, only waste a little time.
Thanks for looking. See everyone next time.


Wednesday, May 31, 2017

Brengun Hermes (part 1A)

Before I post a finale of the Hermes build, I've been talking with a friend on the Real Space forum. I was lamenting on how small the Hermes was. His reply was that he had a 1/144 that might be smaller. I too have a V2 in 1/144 and I should have made a wager. LOL
Dragon's V2 (left), Brengun's Hermes(right)

Saturday, April 30, 2016

Some Classic Ships

In a thread at The Clubhouse, I mentioned the classic star ships I built. So I figured I would post the image here too --
L to R: Friede, Luna, and Rocketship XM

Friday, April 8, 2016

U.S. Moon Ship - Finished

I was able to spend a few hours at the desk and was able to finish up the model.  I got rid of the extra flash around the  astronauts and repainted them. I also added a bit more detail to the base - not that you can see much because the craft sits over most of it. Here's the base and finished Rocket. It was an enjoyable build. Thanks for looking. 


U.S. Moon Ship (part 2)

This time around is 2 sessions combined into one post. I started out to add the decals. They went on very easy but are *very* thick.  For the Star roundels I have to slit the decal to get it to sit down. The checkerboard around the top crew compartment was also a little difficult. In the end I put Micro Sol on the decals about 4 times. Coming back to it a few days later, I see that the decals for the most part have settled down on the model, so I gave it a coat of Satin Clear --
 Next step was the base and the crew. This time around I'm using the supplied base. To make it a little different I smeared some spackle on it, spread it out, and then as it dried using some sculpting tools added the craters -- 
 
These are the tools I used.

 I put the spackle on thin enough so there was no cracks. I primed it all black, then over sprayed it in a dark gray and left it so the black showed in the shadows. Finally, I added a lighter gray where the exhaust would have blown some of the soil away where the Ship landed. I also sprayed the inside of a few craters the lighter colors to simulate newer craters.  I'll show a pic of that next time as I sprayed it all with a DullCote before taking a pic. I didn't want the base to look wet and shiny, so check back for the finale.
For the end of the session, I turned my attention to the crew. The instructions calls for them to be in white, with red backpack (and a few details) and then silver face plate, boots and gloves -- 
 I didn't notice  how bad the flash was until seeing the picture, so I will go in and get rid of it and repaint if needed.
Check back for the finale. Thanks for looking.


Monday, March 28, 2016

U.S. Moon Ship

This model brings back a lot of memories for me. It was probably around 1967 or 68 that I went into DeVita's Dept store (Pete's) and in the toys aisle, found a toy that you had to build before playing with.  It was the US Moon Ship! This kit was put out by Lindbergh in the pre Apollo Era of 1958.
I'm sure I put the thing together in 30 minutes and barely waited for the glue to try before zooming it around the house. 
Move fwd 45 years or so and the Moon ship is available once again. This time released by Round Two, but they kept the old Lindbergh box. Pretty cool! Hopefully I'll build it a little better than when I was 8. ;)
First, I put the main subassemblies together and then primed. Once dry, I went crazy with the preshading - 

I went back to it a few days later and sprayed the entire model white, and put the parts together. The preshading is still there although a little too faint.

Did you see what I did? Ugh. I added the rails without the added "equipment." Then when I went to add the equipment, I realized that the equipment was on the same side of the ship, rather than being opposite each other. UGH. Oh well, It would be too much to try and fix it. So maybe I can't build it better than when I was 8... ;) 
Stop back for the finale. Thanks for looking.

Friday, November 20, 2015

Rocketship XM Finished

This time will be a short post, The only thing that had to be completed was the decal. I ruined two of them but the third time was the charm. 
This time I started with the same image, but instead of just changing the color of the text from gray to an orange color,  I also made the black - blacker. 
After printing I let dry and gave it two coats of Krylon Crystal Clear Gloss allowing 24 hrs drying between each coat. 
I had no problems this time. Here it is - 

The decal looks a little wavy especially on top, but somehow that's an optical illusion. It's perfectly flat.  Thanks for lookin'.

Tuesday, November 10, 2015

While I was waiting - RocketShip XM

As the title says - while I was waiting for the clear coat on the X-19 to dry I was looking thru my stack of kits. Part of a stack started to fall and when I straightened things up I discovered I had two stacks, one in front of another. I looked thru the kits that I haven't seen in a while and rediscovered Fantastic Plastic's Rocketship XM.  This looks to be a super simple build being only 8 parts, plus the base, plus the decal. 

From IMDB's entry on Rocketship XM : Astronauts (Lloyd Bridges, Osa Massen, John Emery, Noah Beery, Jr., and Hugh O'Brien) blast off to explore the moon. Because of craft malfunction and some fuel calculations, they end up landing on Mars. On Mars, evidence of a once powerful civilization is found. The scientists determine that an atomic war destroyed most of the Martians (who surprisingly look like humans). Those that survived reverted to a caveman-like existence. 

On to the kit. As I mentioned a super simple build. It took only a few minutes to rid the side fins of little pour stubs and a tiny amount of flash. Then it was already time to start gluing the parts together - - 

Tuesday, May 12, 2015

Another New Model

As part of my series to my recent purchases, this time I added to my 1/144 launch vehicle collection. This time it's the Brengun Hermes R1.  I picked up this on eBay after going to Hannants and finding out they have a minimum money amount for international sales. I wasn't about to buy something I don't need just t get this model.
I knew the early rockets were pretty much all modeled after the captured V2 rockets, and were small. This model is tiny. But the kit is well thought out and even comes with decals and a piece of PE. I look fwd. to getting  to this model. 


Thanks for looking.