Sunday, October 30, 2016

The Carver

Just in time for Halloween, we have The Carver. This is an original kit from the mind of Jean Louis Crinon.
The kit came in 3 pieces - the head/body/base, then the pumpkin, the knife blade is the third. The kit also included a length of wire which you form the hair strands.
This was one of the 4 kits I was doing at the same time and rather than stop to take pics, I just kept going so there are only a few.
While I stuck to how it was painted on Crinon's site, the model reminded me of an old mouldy sock puppet with evil on it's mind from being left for 50 years in the barn.   Oooooh!  ;)

Here's the inspiration IMAGE.

Going after a burlap bag type head, I found an orange brown in the Vallejo paint range. An olive green followed for the shirt. The floor was simply done with a cork brown and then washed over with Citadel's Agrax Earthshade (I love that stuff). The pumpkin was base coated in a Citadel Orange. (I can never remember the name).
Then it's socks were done in Vallejo red and ivory. I also did the nails in the floor and the stitches on it's head with Vallejo Burnt Metal metallic color. I added a Citadel green wash to make the burlap mouldy, and then went over it closer to the button eyes with Nuln Oils to make the buttons stand out. Some Nuln Oil also went into the buttons to highlight the thread.
Finally I put his hair in. One hole was apparent, but the other two had been filled in. So I just used the site's image as a guide and added the others. The strands got painted black. I then highlight the pumpkin, and painted the stem with Black Green, followed by and olive green for the highlight. 
The knife blade was added and painted Vallejo Aluminum metallics.

I weathered up the socks a bit. With a piece of scrubber pad I included some dried blood made of Cavalry Brown to the shirt. Not know how to leave well enuff along I also added a few jabs of the scrubber pad with some red. 
Here's the final result. Thanks for looking.


Room Update + a New Product

This time around I have an addition to my hobby room. I've been looking for the longest time to increase "space" in the room. I had originally thought I would buy 2 kitchen cabinets to use with a counter top to use as a desk. When I got the cabinets home I realized they were WAY too tall. So I went in a different direction for the work area. But I still had the two cabinets. This week I was able to buy a countertop. I know, whats the big deal. Evidently where I live the straight counter tops go quickly and the ones cut to make an angle remain. But I must have gotten there right after they were put on the floor and had my choice of colors. ;)  Here's my buy:


As you see I did away with the box for photos and have been using the set up you see. Now I have extra flat surface for storage, or if I want to put WIPs, while I move back and forth between projects. Yep, I know. I also need to neaten up if I'm taking all these room pics. ;) 

The new product are the Vallejo Earth Textures. I'm guess it's an acrylic paint with some grit in it to help you create groundwork - 
 I picked up the Brown Earth, Desert Sand, and Dark Earth. I believe there are at least two more including black for hardened lava, and another to replicate snow. I won't have a need for lava, but the snow may come in handy in the future.

I used the Dark Earth for a miniatures project (you'll be seeing soon), just to see how it went on. I tried with a wooden stir stick with little problems, but to get in close to the model a regular paint brush worked very well. I may need to pick up a few cheap-o brushes when I use this stuff next time. 
Thanks for looking. 

Friday, October 28, 2016

Barking Mad

One of the other kits that I had on the work table was "Barking Mad" by the seemingly defunct Mad Dog Resin. I looked and there is no longer a web site for them. If anyone knows of a new site please let me know and I'll update this post. 
Anyway, I've had this kit for quite a while when I was doing more buying than building.  Barking Mad seems to be a cross between The Hulk, and a werewolf. 
The kit comes in 4 parts - the head/body, 2 arms and the base. There were no bubbles and the seam lines were easy to eliminate. There was a bit of a gape between the arms and body, but a thin snake of Aves Apoxie Sculpt took care of the gap.  After the Aves dried, I began my priming.
Most of my werewolves are a brown color, so this time I decided to stick mostly to backs and grays, with a little of Vallejo's Cork Brown for contrast. I started the inside of his mouth (and eyes) with Citadel's Bugman Glow.

While all this was drying I turned my attention to the base, and painted the skulls an off white, the ground a tan color and the actual base part, black. Once dry the base needed a little more. So I spread some PVA glue and added sand. 

Whoo boy those skulls are bright. So I toned them down with a bit of Citadel's Agrax Earthshade.
I added a little red wash to the werewolves eyes, and mouth as if he just had some lunch. ;) I was considering adding some blood to the base, but decided to keep it simple. I super glued the figure to the base and called this one done. Thanks for looking.


Sandor Clegane

Who? Many people know him better as The Hound from the HBO series Game of Thrones. This is another kit from Gillman Productions.  He came in two parts - the bust and the base. Once again, it's a very clean kit with one tiny bubble, and seam lines that are extremely thin. 

I don't have many early stage pics on this one because I got back into my bad habit of having multiple kits on the bench at the same time. So I would just go from one to the next to the next and back again.

The first image I have is after getting his face and scar done - 
Looking at this image I thought WOW that looks too raw, and decided to have a look. Well, it seems that over the seasons his scar went from very red and fresh looking to very pale. So anyone painting this kit has a wide leeway of how the scar could look. 
From there I added color to his beard and clothes. I wasn't sure if these clothes came from an actual  scene or made up by the sculptor. Not feeling in the mood to search 6 season worth of wardrobe changes, I mad his shirt gray and jacket brown, and while I was at it I painted in the eyes. Wikipedia says they are brown.

 Next up was to tackle the rock work on the base and the what I think is a wax seal.  The rocks were simple a series of gray washes and dry brushing. The seal started with Citadel's Khorne Red, then highlighted in a few stages with Mephiston Red, Evil Sun Scarlet, and finally ... I forget the name orange. Oops. ;) 
Next, the jacket needed a little something. So I took an orange and made little chevron shapes to each of the brown squares to indicate a highlight. Also, along the bottom of the base is sculpted in grass. So I hit that with a little olive green, and gave it a wash with one of Citadels green washes to darken it down a bit. - 
Here's where I had a minor disaster. Seems to be a recent regular for me that something goes wrong nearly at the last minute. I sprayed some of the Vallejo Matt Clear, and as it was drying, I could see it frosting up. Suddenly Sandor had gray hair!!  Arrggh!  Thankfully a quick coat of Citadels Nuln Oil got rid of the gray. After that I used DullCote over the figure and just glossed his eyes calling this one done. Thanks for looking. 


Friday, October 21, 2016

Terror Bird Addendum

While building the Terror bird I couldn't remember the sculptor. Thru my post on The Clubhouse, I was informed the sculptor was Mark Van Tine! 
 
You can see his work HERE and you can pick up many of this kits HERE.
Check him out - he's excellent!

Monday, October 10, 2016

New Star Wars ships

Always on the lookout for something new. I ran across a few SW Starships in Barnes and Nobles bookstore of all places. I guess B&N couldn't make it by just selling books. They took out some shelving (in my store at least) and added some strategy games and statues on the ground floor. The top floor now has a toy section that's probably 25-30% of the top floor. "Coincidentally", it's right next to the kids book section.  Just what the parents need when they are trying to get their kids interested in books - TOYS. (eye roll)  

Anyway back down stairs two, of the strategy games they offer is Star Wars "X-Wing" and "Armada." They have a core game, which gives you everything you need to start to play. Then of course you can add to the game by getting the extra ships. I've been looking at the shelves for ships that are interesting to me. I move past the "regular" X-Wings, TIEs, and other canon ships, which I figure I can pick up any time. Instead  I look for the odd ball ships. My latest by are t the Assault Frigate Mk.2 (Armada), and the Mist Hunter (X-Wing). The Mist Hunter for those that don't know is the ship of the bounty hunters Zuckuss and 4-LOM. You can see them at the bounty hunter scene in The Empire Strikes Back. 
Zuckuss and 4-LOM are the two to the far right of the image
Here are the ships -
The Mist Hunter


Monday, October 3, 2016

Finishing Flash Gordon

Ok, all done.  
But picking up from where we left off last it was just a matter of getting his head on his shoulders and then tackling his helmet. Finally the base was done.

I was glad I checked as I was going to put the head on and then put the bubble helmet together and just simply slip it over his head. Nope won't fit. So, the head went on and then the back part of the helmet was fixed onto his shoulders.  There has been talk of what to do with the seam line.  Some have bought an aftermarket helmet. Others simply said they are not going to worry about it. I fell in the not worrying about it category. But what I did was put a black edge on the front part. I had previously taken a little piece of lead wire (from Bass Pro Shops, I think)  and put a dot of PVA glue on the tip. This will mimic a microphone. I then attached the front piece to the back part.
Looks good but there's no real support of the microphone. It just sorta sits there inside the helmet. The blackened edge didn't really show up as I had planned. I needed to do something else.  In the end I too the simple route. I took another length of the solder wire - which is incredibly flexible - and curved it around the outside of the helmet from where the microphone was to where the helmet met the neck ring. A touch of superglue wicked the glue along the length of wire. I then took a file and VERY gently sand the tip so that it looks like it's angling into the helmet. Some black paint finished off the illusion. 
Next I turned my attention to the base. The one that comes with the kit is actually two small bases. One for Flash that has a large crater, and the Martian had a tiny one, with a tiny crater. I didn't like this. But I wanted to include the craters. I cut them off and arranged them on the base -
Those other marks are just where I scored the wood so the Celluclay would lock down. The Celluclay was next -
I made it a little uneven for variation, but had to keep it level enuff for the two figures to stand.  
Once the Celluclay was dry I added some sand around the base - 
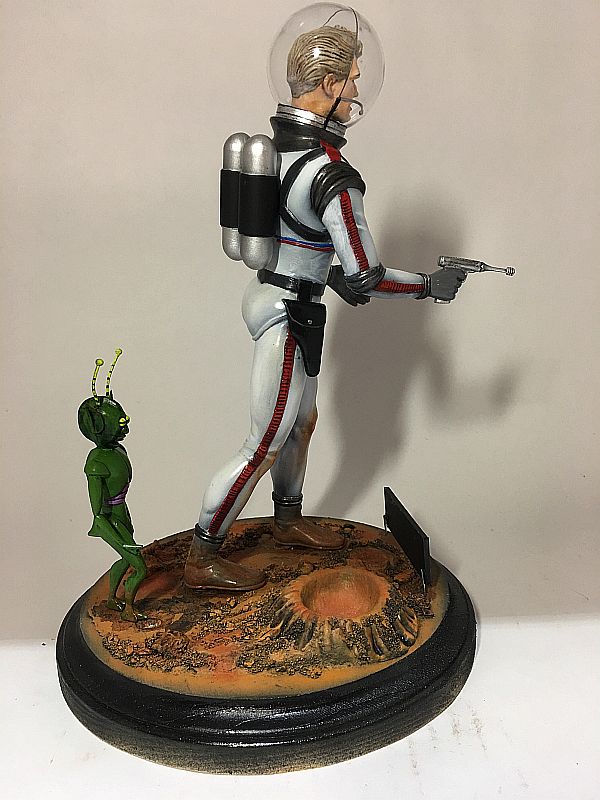
Color was next. As It's Mars I added various orangy browns and oranges. Pics of Mars always show few rocks that look black - so I added them in as well - 

The next was how to get Flash to stand on his base. I didn't thing the wires thru the feet would do it - tho it worked for  the Martian. Since Flash is pretty lightweight except for where I put the Aves in his feet, I ended up getting out some magnets and adding them to both the feet and the base. You can see some circles (magnets) in the base.  Once all the magnet glue was dry I added him to the base. I took the supplied sign, chppoed off the feet, added wirelegs and then after a black primeadded two tone lettering. A coat of satin clear on the sign and the model is finished. Here's my Flash Gordon. Thanks for looking -