Showing posts with label SuperHero. Show all posts

Sunday, November 8, 2020

Earthworm Jim

  After seeing it online, I saw and was intrigued by it . Firstly I never heard of Earthworm Jim, so didn't know of his story. But dang, he looked cool. 

The kit is from Prey Collection Studio.  I'm guess it was 3D designed and printed, and then molded and cast. There are no grow lines to be seen, and the casts are very clean. I'm also guessing that I picked it up in 2018, but it seems the files are still available to print your own.

As part of my goof up, there are no WIP pics. So here's the completed Earthworm Jim. Thanks for looking. 


The reason for this terrible angle is I lost the holster, and sculpted a new one from Aves.


Wednesday, January 16, 2019

Fantastic Four Susuan storm

Right from the start, I must admit I'm not the biggest Fantastic Four fan.  But I thought the plan for the kit where Susan herself could be cast in clear resin was ingenious. The kit was sculpted by Tony Spangler, and molded and casted by Mark Kaelin.
The kit comes in 5 parts - the head and shoulders, the body, a "4" base and a nameplate. 


Looking at the kit the clear head and shoulders casts was an excellent idea. Pulling it off I'm sure was problematic. Giving it a close look small bubbles can be seen inside and there was one under her nose. Now with it clear, it can't be filled. But with a bath of Future, many of the bubbles became invisible or at least less emphasized.

Next up, looking at the colors for Susan's uniform, between the comics, cartoons and now the movies + fan art there are a multitude of colors and styles.  So in the end I chose a simple light blue color and a dark blue stripe.  I also added a steel color and medium blue to the emblem on the chest.
 While all that was drying, I turned my attention to the base. Both were colored in a light Steel color, and then then highlighted in blue.

Masked up for the blue paint. 
I felt something else needed to happen with the seams in the clothing. I have some Gundam Markers and thought I could run some blue into the seam lines... no blue. I wanted to do this, so in the end I used the black pen. They are very easy to use, and fairly simple to clean up if you go outside the lines.   With that I was all done.   Thanks for looking.


Friday, January 11, 2019

McdevittMini-Hulk Finale

See part one here: https://kevtk.blogspot.com/2019/01/mcdevitt-mini-hulk.html

With essentially 2 colors, this guy was an easy one to complete. After the base colors were laid down in the previous session, all that was left was to add highlights and little details.
Starting off with V's Black Green, I added a little flesh color to brighten the color. This was done a total of 3 times. Since the pants aren't a real focus, they were given two highlights.

I added Ivory to the eyes and teeth, and then a highlight of V's Off White to the teeth, and a green pupil to the eyes. To unify all the colors I added Citadel's Green Wash to the skin, and purple to the pants.  With that the model was done.  Thanks for looking. 


A can of Coke for size comparison

Tuesday, January 8, 2019

McDevitt Mini Hulk

This mini kit was a nice surprise from sculptor Troy McDevitt for joining his Patreon Page at a certain level. 
A typically well done figure from Troy is approximately 54mm or so (I'll measure and edit the post later) and shows the Hulk perched on the rock pile.
It comes in two parts and is in a green resin. There is the slightest seam line that's only noticed on the smoother parts of the figure. 

After a primer, it was based coated in a dark green (I like working dark to light), black hair,  deep blue pants which I also added a Citadel Purple wash, and dark gray rocks. You can also see I glued some sand in place in a few spots on the rocks - just to chage things up a bit.

Check back for more...

Monday, October 8, 2018

Spiderman Final

I finally took pics of the finished Spiderman as he hangs on my wall.  It's in a rather empty section of for now. But I was thing of getting some pin striping and make a little web behind him. 

Thanks for looking. 


Wednesday, October 3, 2018

Spiderman part 2

Seems I haven't updated the Spiderman post since June! 
With the 4 colors, and no face it was just a matter of filling in the colors - 


Tuesday, June 26, 2018

Morea's Spiderman

I'm usually not a superhero model builder. But when I saw this model was designed as a wall hanger, I bought it. 
The model came in 3 pieces of cream colored resin. There were a few bubbles on his shoulders. while cleaning them up to add the Aves, one turned out to be rather large - 
Then as I filled those and turned to another little one, it turned out to be another large one. No worries Aves to the rescue - 
Then a dumb thing was done.  I took the wrapped parts out of the shipping box and threw the rest away. Then when I went to look over the parts, it was discovered that two of the fingers snapped off in transit. If I was paying attention, getting them back on would have been a breeze. It wasn't to hard to drill out the stubs, add wire and then more Aves - 


While I still had a lump of quickly hardening Aves on the desk, I glued the leg on and filled the seam - 
That's enough for one day. Check back for more from your friendly neighborhood Spiderman!


Wednesday, April 4, 2018

McDevitt's The Punisher

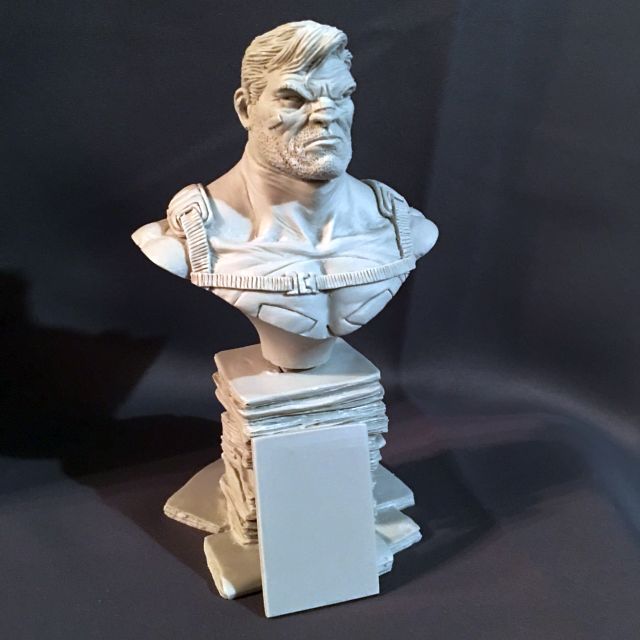
This time around I worked on Troy McDevitt's The Punisher. It is one of his Comics series. Each bust is sitting on a stack of comics having to do with the busts subject. To date Troy has about 10 busts in the series. I recently heard that he has seven more coming out shortly. So if you're a model and/or comix fan, check 'em out. 
The kit comes in three parts - the bust, the stack of comics, and one standing comic book - 

It was very nicely casted with no bubbles and only one fine seam line along the stack of comics.
Things went so smoothly that I only remembered to take a few pics - 
Here the figure is just base coated

Starting to add detail

He had a heavy brow, so he's tilted back to see the eyes
I just kept tweaking the details, until I was happy, then started in on the stack.  In the time it took my to build the model, I had no idea what I did with the decals for the comics. Emailing Troy, he gladly sent me another set. I cut the first one out and had it in the water a number of seconds before I realized that they weren't decals but just cutouts. Doh!! But it made installing them a whole lot easier. I used Tacky Glue, and they went on 1, 2, 3. Once dry I used Army Painter Light Tone to shade the pages of the comics and I was done. Thanks for looking.