While building the Terror bird I couldn't remember the sculptor. Thru my post on The Clubhouse, I was informed the sculptor was Mark Van Tine!
You can see his work HERE and you can pick up many of this kits HERE.
Check him out - he's excellent!

This is my blog for my scale model building, and sculpting. Other hobby posts could include my fossil collecting, my herps or arachnids. I hope you find it interesting enuff to read. Enjoy.
Showing posts with label TerrorBird. Show all posts
Showing posts with label TerrorBird. Show all posts
Friday, October 21, 2016
Tuesday, September 13, 2016
Finishing the Terror Bird
While I'm think about the decals for the X-15D, I decided to finish up the Terror Bird. It's been in a 90% finished for a while now, so it's time to get it done.
For earlier build notes see here:
Part 1
Part 2
I'll pick up the build story with the bird primed -
 While I'm waiting for it to dry I turn my attention to the base and get that primed and put some paint on it -

 Looking closer I decided that I didn't want to molded in grass etc, so those were dremeled off. I then took weeds from the garden, let them dry out and used them on the base -


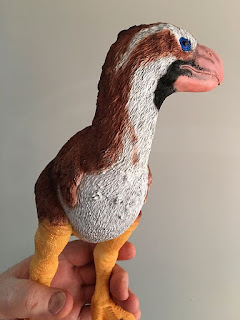
 The bird is dry, and I get some paint on it. I followed an image I had of a different Terror Bird, but the paint scheme will work -
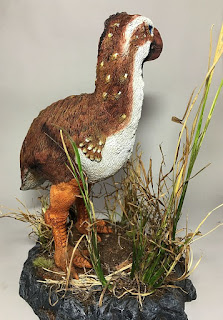
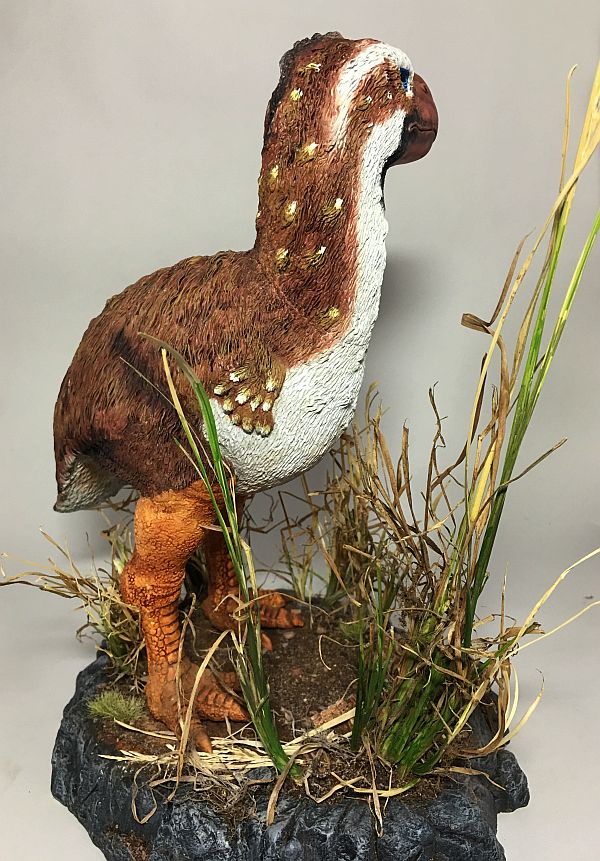
 Putting it all together, I see, the base needs a little more color. So I took some olive green, made it into a wash and hit some of the grass plants. I then added detail to the bird, included some pigments on its feet that put the bird in the environment. Then added screws thru the the bottom of the bas and up thru the feet I was finished. Thanks for looking.


For earlier build notes see here:
Part 1
Part 2
I'll pick up the build story with the bird primed -


Tuesday, April 19, 2016
Terror Bird (part 2)
As I mentioned last time the kit was very easy to clean up. One seam of note was the one down the back of the bird. The seam cleaned up nicely, but what was left seemed too blank to me. It's not that the seam eradicated it, it looked like there was never anything there --
 So I took it upon myself to add some Aves feathers down it's spine. Looks pretty good to me--
 From there, I finished off the seam on the head --

After this it was time to assemble the parts. I saw on a video my modeler extraordinaire, Rafael Robledo Jr, where he used resin to attach parts. I decided to try it. The first thing I did was to dremel little holes for the resin to solidify in -


After this it was time to assemble the parts. I saw on a video my modeler extraordinaire, Rafael Robledo Jr, where he used resin to attach parts. I decided to try it. The first thing I did was to dremel little holes for the resin to solidify in -
Gillman's Terror Bird
This time around on the bench is Gillman's Terror Bird. After the dinosaurs went extinct, it was the Terror Birds that became the top predator in certain areas.
The kit is a nice casting in gray and tan of odorless resin. The kit comes in 8 pieces - the base, two legs, the body and two heads - one with an open mouth and one with it closed. The open mouth option comes with a separate lower jaw. The 8th piece is arock pedestal for whatever head you don't use, it can be mounted on the pedestal. Good idea.
There's no bubbles anywhere and the seam lines are fairly easy to clean up. Once you get the hang of getting the extra resin out of fur or feathers, the kit is cleaned up in 30 minutes.

Paul Gill informed the sculptor, Mark Van Tine, that I was a retired firefighter. So I got a special autograph on the bottom of the base. Very cool!
More later.

Subscribe to:
Posts (Atom)