I've been bad this time around, and have a few more kits to add to the stash. First up is a sort of grail kit. I thought this was long out of production, but found that Cellar Cast still has it available. The kit is Dracula and Lucy from Coppola's film Dracula. Just looking at the box gave an indicationOf how terrific the kit will look -
There are no directions but the kit comes with a number of color images to show you how it goes together. The parts are pretty self intuitive anyway, so the build should be no problem.
I didn't count them out but there are probably 10-12 parts. There are no bubbles, But the resin does have a slight odor to it (tho not 1/2 as bad as some of the SE Asia kits). The are very thin seam lines which should give me no troubles to get rid of. Here are the parts -
Next up isn't a kit but finished pieces from Toby Wayne Studios. I first found this guy on You Tube where he demonstrates his sculpting, painting and other hobby skills. He also has a SITE where you can buy a few of his pieces. Most of them are in the horror or gore genre. I picked up an magnetic alien head - needed for my studio's magnetic white board, and a little guy named Eddie. Also included was a pretty neat note from the sculptor complete with "blood spatter." :)
Yes, I know Eddie looks like something else. :-P And I'm thinking of changing the color of the water to try and make it look - not so much like what it does. Haha
Next are supplies to finish my Krampus mini from HobbyLinc. It's styrene roof material as well as styrene clapboard siding. I also picked up a set of chimneys to complete the look. More on that coming soon -
Finally, to add to my classic monster collection I picked up the Phantom of the Opera from Saul Alvarez on the Figures Group on Facebook. Saul is just the producer, and Mark Van Tine was the sculptor. The kit, once purchased the kit came very quickly, in a well packed box. The kit is the bust (with an excellent likeness) and a few pieces for a wall base.
Looks like I'll have enough work to do to get me thru the winter ... until the next offering comes. ;) Haha Thanks for looking.
This time around I went back to one a NASA's mystery craft. From Fantastic Plastic's site:
The FDL-6C SOMV (Sub Orbital Maneuvering Vehicle)
is one of several designs to emerge from the AFFDL (Air Force
Flight Dynamics Laboratory) during the 1960’s. The FDL concepts
developed to explore the characteristics of spacecraft during
hypersonic re-entry. The FDL-6 shape was one of the shapes
explored by the Lockheed Corporation.
It is rumored that, in the 1970s, the shape was explored again and
the vehicle was sized to 33 feet long to fit in the cargo bay of
the US Space Shuttle. This would allow it to be launched from
orbit for a return flight to the United States. Whether this
actually ever happened or not is not known. The vehicle was to
have an all metal TPS (Thermal Protection System) consisting of
overlapping Columbium (Niobium) and Hastelloy “shingles” as opposed
to the more fragile ceramic tiles seen on the US Space Shuttle.
It would likely have needed some kind of active cooling for the
leading edges and nose similar to that designed for the McDonnell FDL-7.
Having a 'time flies' moment, the kit was released in 2009, and is not currently in FPs catalog of available kits. But I would keep constant vigil of their Store, as retired kits are brought back for limited runs all the time.
The kit is 23 pieces expertly casted by BLAP Models. There was no resin odor, no bubbles, and the pour plugs were very easy to remove.
It looked like a super simple build until I read the part where I had to cut the canopy from the fuselage. Uh oh. I took my time and was pleasantly surprised how it turned out. It was then that I noticed a separate canopy in the bag of parts! Doh, I thought I had to use the cut out part! I used a PE type super thin saw from Hasagawa (I think).
And finally open -
Since the canopy opening is super small I thought it would be a good time to practice hyper painting the cockpit area. After all if I screwed it up almost nothing will be seen.
In the end I think it turned out pretty good. It's a shame it won't be seen.
Here we are where the craft is mostly complete and primed white. I should have mentioned that FP gives you 2 choices for the build. It can either be white in a NASA scheme, or black with a USAF scheme. As you see by the paint - I went for NASA.
Here's a view from the bottom. One thing to note is the build was going along very nicely and I was cleaning of of the small wheels. POP! It flew and was promptly eaten by the carpet monster. Despite tearing the area apart it's still missing. In the end I took a piece a styrene and fashioned another wheel. The other thing you'll notice is that the front had wheels while the rear had skids.
With the white primer most of the painting was done. All I really had to do was paint the bottom and the edges along the top to be black. The thruster rockets were done with Vallejo Metallics Steel. As a little side bar, I think the Vallejo Metallics are every bit as good as Alclad, and the over the top vote for me is that they are acrylics.
I added some MIG black pigment to dirty (and dull) the inside of the thrusters. I also had some Gundam markers and used them for "painting" the attitude adjustment rockets.
The last step was to gloss the top of the ship and then apply the decals. Being it was a "concept craft" there was no weathering. I was still mad about the missing wheel, but I think it turned out ok.
Thanks for looking.
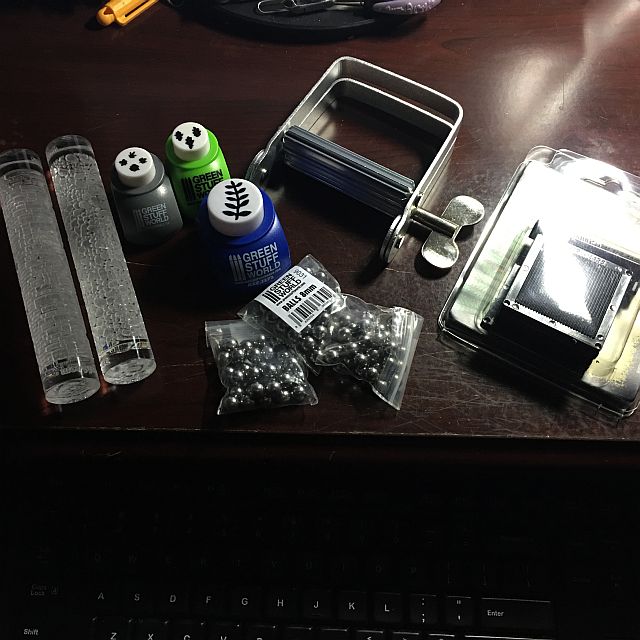
Another box arrived yesterday. This time from GreenStuff World from Spain. It's mostly for miniatures, but as I build in 1:72, It's close enuff for me to pick up a few things.
Left to right the two rollers are for making imprints. One is for imprinting bricks, and the other for cobblestones. Right next to it are 3 stampers that will give me 3 types of leaves. The gray for maple, the green for Oak and the blue gives me a compound leaf. I got the larger compound leaf thinking I can use it fir my dinosaur dios.
The bags contain some stainless BBs for paint bottles. Anyone who uses Vallejo paint know that some of the paint is thicker and harder to mix than others. This will really come in handy.
The roundish looking thing, with the key is a "corrugator" That tool will either give me corrugated tin roofs or when the foil is cut in thin strips will give me the Mediterranean style ceramic tile roof.
Finally, in the package that is reflecting too much light is called a Roll Maker. Taking a small roll of clay and will make hoses for any sci-fi (or not) craft. Turning the top part will also create the effect of tentacles for your latest sci-fi creation.
Thanks for looking.
Having gone a little crazy with a few Fantastic Plastic sale buys (info on these coming soon), I've been taking it a little easy lately. But this one popped up on Facebook from the mind of Moon Devil Studio's, John Dennett.
Here we have Pumpkin Puss. As mentioned it's an original kit that seems to be a cross between a pumpkin, alien and evil monster -
You can see an evil face has emerged from the pumpkin just as he rises up on it's tentacle limbs.
The kit stands about 6 inches tall and is flawlessly cast in odorless orange resin. There are no bubbles, and any seam that was present has been completely removed by John.
Seeming I got the first cast, as written as he autographed the bottom of the base. Nice!
This is a perfect little addition to any Halloween fans. I'm looking fwd to painting it soon.
Just in time for Halloween, we have The Carver. This is an original kit from the mind of Jean Louis Crinon.
The kit came in 3 pieces - the head/body/base, then the pumpkin, the knife blade is the third. The kit also included a length of wire which you form the hair strands.
This was one of the 4 kits I was doing at the same time and rather than stop to take pics, I just kept going so there are only a few.
While I stuck to how it was painted on Crinon's site, the model reminded me of an old mouldy sock puppet with evil on it's mind from being left for 50 years in the barn. Oooooh! ;)
Here's the inspiration IMAGE.
Going after a burlap bag type head, I found an orange brown in the Vallejo paint range. An olive green followed for the shirt. The floor was simply done with a cork brown and then washed over with Citadel's Agrax Earthshade (I love that stuff). The pumpkin was base coated in a Citadel Orange. (I can never remember the name).
Then it's socks were done in Vallejo red and ivory. I also did the nails in the floor and the stitches on it's head with Vallejo Burnt Metal metallic color. I added a Citadel green wash to make the burlap mouldy, and then went over it closer to the button eyes with Nuln Oils to make the buttons stand out. Some Nuln Oil also went into the buttons to highlight the thread.
Finally I put his hair in. One hole was apparent, but the other two had been filled in. So I just used the site's image as a guide and added the others. The strands got painted black. I then highlight the pumpkin, and painted the stem with Black Green, followed by and olive green for the highlight.
The knife blade was added and painted Vallejo Aluminum metallics.
I weathered up the socks a bit. With a piece of scrubber pad I included some dried blood made of Cavalry Brown to the shirt. Not know how to leave well enuff along I also added a few jabs of the scrubber pad with some red.
Here's the final result. Thanks for looking.
This time around I have an addition to my hobby room. I've been looking for the longest time to increase "space" in the room. I had originally thought I would buy 2 kitchen cabinets to use with a counter top to use as a desk. When I got the cabinets home I realized they were WAY too tall. So I went in a different direction for the work area. But I still had the two cabinets. This week I was able to buy a countertop. I know, whats the big deal. Evidently where I live the straight counter tops go quickly and the ones cut to make an angle remain. But I must have gotten there right after they were put on the floor and had my choice of colors. ;) Here's my buy:
As you see I did away with the box for photos and have been using the set up you see. Now I have extra flat surface for storage, or if I want to put WIPs, while I move back and forth between projects. Yep, I know. I also need to neaten up if I'm taking all these room pics. ;)
The new product are the Vallejo Earth Textures. I'm guess it's an acrylic paint with some grit in it to help you create groundwork -
I picked up the Brown Earth, Desert Sand, and Dark Earth. I believe there are at least two more including black for hardened lava, and another to replicate snow. I won't have a need for lava, but the snow may come in handy in the future.
I used the Dark Earth for a miniatures project (you'll be seeing soon), just to see how it went on. I tried with a wooden stir stick with little problems, but to get in close to the model a regular paint brush worked very well. I may need to pick up a few cheap-o brushes when I use this stuff next time.
Thanks for looking.
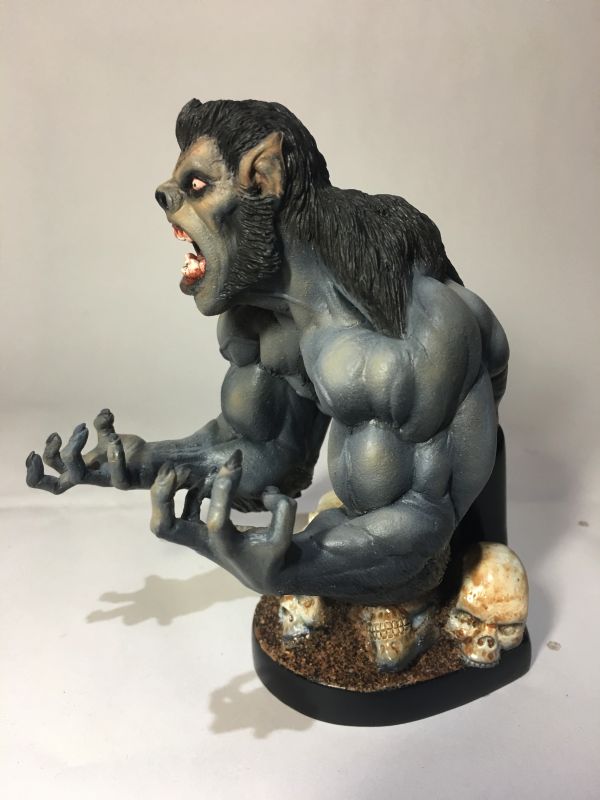
One of the other kits that I had on the work table was "Barking Mad" by the seemingly defunct Mad Dog Resin. I looked and there is no longer a web site for them. If anyone knows of a new site please let me know and I'll update this post.
Anyway, I've had this kit for quite a while when I was doing more buying than building. Barking Mad seems to be a cross between The Hulk, and a werewolf.
The kit comes in 4 parts - the head/body, 2 arms and the base. There were no bubbles and the seam lines were easy to eliminate. There was a bit of a gape between the arms and body, but a thin snake of Aves Apoxie Sculpt took care of the gap. After the Aves dried, I began my priming.
Most of my werewolves are a brown color, so this time I decided to stick mostly to backs and grays, with a little of Vallejo's Cork Brown for contrast. I started the inside of his mouth (and eyes) with Citadel's Bugman Glow.
While all this was drying I turned my attention to the base, and painted the skulls an off white, the ground a tan color and the actual base part, black. Once dry the base needed a little more. So I spread some PVA glue and added sand.
Whoo boy those skulls are bright. So I toned them down with a bit of Citadel's Agrax Earthshade.
I added a little red wash to the werewolves eyes, and mouth as if he just had some lunch. ;) I was considering adding some blood to the base, but decided to keep it simple. I super glued the figure to the base and called this one done. Thanks for looking.