Wednesday, January 14, 2015

F5D Moving Forward

This time around I started working on putting some weights in the front of the plane. Not knowing if this is a tail sitter or not, I played it safe. Here's a few 1/4-20 nuts glued in with PVA glue - - 


While I was waiting I turned my attention to the smaller parts. Ooh boy did they need clean up work. The stick was almost indistinguishable from the parts runners. Thankfully after watching a few miniature painting videos, I "learned" that you can prime with a brush. To me this is A LOT easier than setting up the parts for an airbrush or rattle can for small parts - 


As last thing for tonight,  I did the seams along the wing roots, and the jet intakes. I had recently bought some Tamiya putty after not having a great time with the Vallejo Plastic Putty. I decided to give them both a test. On top of the plane I used the Tamiya Putty, and underneath I used the Vallejo Putty.  My feeling now is the Vallejo is the way to go for very thin seam lines. As you see on the right the Vallejo cleaned up right away with good results. I'll have to wait for the Tamiya Putty to dry and then start sanding tomorrow.


Looks like after I get these seams cleaned up I'll be able to close up the fuselage, install the seat and stick and then work on some of the other parts like reinforce wheel and tail hook. Thanks for looking. 


Monday, January 12, 2015

Armstrong's XF5-D Started

Been a while but I had a few minutes to start the 5D. The larger parts are pretty good but the smaller ones are a little hurting. When I originally ordered this kit from Anigrand, they must have seen the the moulds were shot - took it out of the catalog - and sent me something else... :-/  I managed to find this one on eBay, and it too must have been close to the end of the run. A lot of the smaller details had bubbles but thanks goodness as I mentioned the larger pieces were fine. I washed the kit and then primed the interior. Not knowing if this was a tail sitter I went to put some weights in the nose and behind the cockpit area... only to find out I didn't have any left. I'll be heading out to the fishing supply tomorrow. Ha.  


So the next thing I did to move forward was to glue the wings on. There is a little seam that needs to be filled but it's nothing to what I was expecting. Only when they were both on did I notice a little discrepency. The pins and holes are not lined up correctly and one wings is a mm or 2 off from the other side. Normally I wouldn't have noticed it. But I did. Now, do I take the chance of muffing it by trying to sand off a little bit where it shows or should I leave it. The next pic show where it's off - - 


 LOL,  find out next time what I decided. Thanks for looking. 

Monday, January 5, 2015

New On the Bench

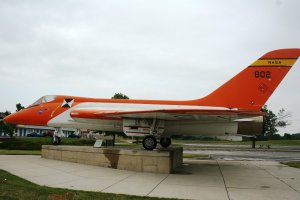
Next up I just got two kits in the mail recently. One is Anigrand's Douglas XF5D-1. I was inspired to do this kit because my friend Rob S. visited the Neil Armstrong Air and Space Museum in Wapakoneta, Ohio (about 1 hr. north of Dayton). I've never been, but Rob generously sent me a number of images of the F5D that Armstrong flew which is also on display out in front of the museum - 
http://vva649.org/gallery/2013/neilarmstrong/A/IMG_0028.JPG .  

and here's the kit - 

I have to note that sadly this kit is no longer part of Anigrand's catalog. Anyone looking for it will probably have to go to eBay or someone like Rare Plane Dectective .  

Next up is a sort of throw back to my kiddy days when Aurora was releasing all those Monster kits. After all the kits were released and then version 2 with parts of the kit in glow-in-the-dark plastic, they released Monster Scenes. These kits would help you create your own "movie sets."  Long story short one of the smaller kits was the Saber Tooth Rabbit!  Thinking about Monty Python's Holy Grail and the killer bunny, I had to have it! 


I may do them concurrently or consecutively. I don't know yet. I'm doing both OOB, so things should go smoothly. 
And don't forget,  I still have MoonDevil studio's Abominable Snowman about 90% done and just waiting for my fake snow to show up. That may be back on the bench too. We'll see. Thanks for looking in. 

Tuesday, December 30, 2014

Sam the Snowman

This time I just finished up Sam the Snowman from 1964's stop motion animation Rudolph the Red Nosed Reindeer. Sam was voiced and closely resembled by the Folk singer, Burl Ives

Sam was in my "To Do" pile for so long I no longer remember where I picked him up. An inscription of "Raven" is carved into the back of the sculpt. 

He was done with Vallejo and Army Painter paints. The toughest part of the research for him was what color was the back of his vest. I knew that most times the back of the vest was a different color than the front, so I knew I shouldn't paint it green. Finally I found a shot of the "puppet" from a 3/4 angle which showed a hint of a teal colored back.


All I have left to do is get him on a base. Thanks for looking. 


Monday, December 22, 2014

Moon Devil's Claude Kringle

I just finished up this little beauty. Moon Devil Studios just quietly released "Claude Kringle," the Werewolf Santa.  
Made to be an ornament and cast in a Christmas-sy minty green resin, it's very well done. I found one bubble in one of the upper fangs was was absolutely no problem to fill. Then it was on to painting. I hope you like - - 


Wednesday, December 3, 2014

Creating a Few Leaves

I was wandering around for some leaves for a diorama and saw a snow flake hole punch in Michaels Crafts. 
noticed that if I cut the "wings" from the center point of the snow flake it looks like an oak leaf. If I cut that in 1/2 it looks like a trident maple leaf. I got home and took some real leaves from the lawn and cut myself some snowflakes. Then I tried it with my kid's construction paper. While the real leaves look best the paper ones aren't that bad especially when they are dusted with a little weather powders. 
I think the 5/8 snowflakes are a little too small for 1:6 scale figures. But they should work for smaller scales.
Obviously if you want a ton of leaves you'd prolly go mad first. But for a few,  I think it fits the bill.  HTH.

Thursday, October 16, 2014

Moondevil Studio's Yeti

Just a quick update. Been working on Yeti's face a bit. I did the inside of the mouth and glossed it all. I also got carried away and did the rest of the face. I then glossed the eyes (not sure it I like em) and  epoxied the face to the body.  Here he is so far - - 


Next, I'll be using the Aves and getting rid of the seam between the face and back of the head. 
More later. Thanks for looking.