This lil bust was another one of those "while I'm waiting for my main build to dry" type builds.
This was gotten from one of the Swap and Sell sections of a website - or was it FB? Having bought it like that I have no idea who sculpted or produced.
Anyway, it's a nice little kit of the lead in the 70's series Columbo. To me the sculpt seems like a sketch type sculpt (a bit rough) so I decided to leave it that way. I found this pic to use as my inspiration -
And put down a base coat -
From there is was just a matter of refining the colors. I did agonize over the 5 o'clock shadow - too much, too little and back again. Finally I was happy, and tackled the next trouble spot - his eyes. We all know that Peter Falk had one glass eye, and at times was a little off. So after all these busts at trying to make the eyes appear to be looking at the same spot. This time I had difficulty making his right eye a little off center w/o making it look goofy. In the end I was happy with it.
As the kit didn't have a name, when I get a proper base, it'll be called "One More Thing" after the famous line the character used to solve the crime.
Thanks for looking.
Sunday, September 30, 2018
Friday, September 28, 2018
Medusa part 2
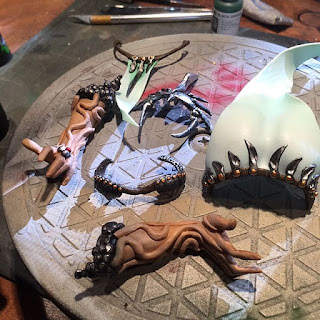
Continuing on with the kit, I first tackled the metal bits of her outfit. The parts were base coated in Gunmetal, and then highlighted in Silver after a wash with Nuln Oil. The rivets were don in a brass to lighten things up, and add more color.
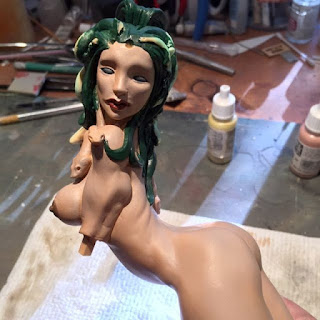
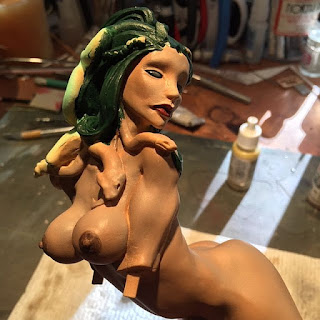
From there I turned back to the figure and added some Barbarian Skin Tone, and then highlighted that by adding V's Iraqi Sand to the B skin tone. Next was green to her hair. The snakes are going to be a different green so they, for the most part, were left alone for now. I always paint the eyes black to start, and the lips were done in a Hull Red. Thanks for looking.
From there I turned back to the figure and added some Barbarian Skin Tone, and then highlighted that by adding V's Iraqi Sand to the B skin tone. Next was green to her hair. The snakes are going to be a different green so they, for the most part, were left alone for now. I always paint the eyes black to start, and the lips were done in a Hull Red. Thanks for looking.
Solar Panel Material?
While picking up a few things at a local Michaels, I found this glittery vinyl in the aisle where they sell Cricut cutters. It came in a few colors but the black drew my attention. Could it be used for solar panels on models?
It's called Siser Heat Transfer HTV. It's made for ironing on clothes, but I can't see why it could be used for gluing to styrene sheets or flat brass PE type stock.
Will report back when I try it.
 |
| Despite looking white, the glitter is silver. |
Will report back when I try it.
Monday, September 24, 2018
Medusa
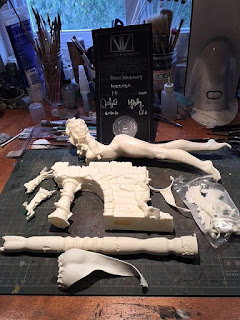
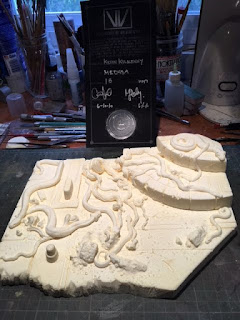
This build is my Pledge for my local IPMS club. To get guys to build at least one model a year, they are asked in April the name of one kit, and pledge that they will finish it by the October meeting. My kit is the old Visceral Visions Medusa. This is sculpted by Marcus DeLeo. Doing a search for Visceral Visions turned up nothing, so I guess they are gone... Too bad, it was a well done kit. The parts plus a certificate of authenticity. Mine was #18 - -
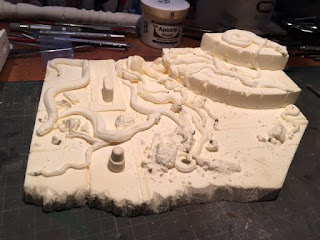
I started out by using some Aves on the larger bubbles and Vallejo putty on the smaller ones. I was also able to scrape off some of the tiniest ones. Once I get it painted I can add sand to the base to help conceal any other ones visible. The gray marks are the Aves repairs ...
... and then my two tone primer job. The arch fits to the base with two large pins, and is a very tight fit. I may just leave it as is, so I can remove it for transporting it around. There is also an arch in the back that also sits on a pin. This one is not as tight so I may get two large magnets to attach it. Again making it easier to transport.
Next, I started in on the smaller parts.
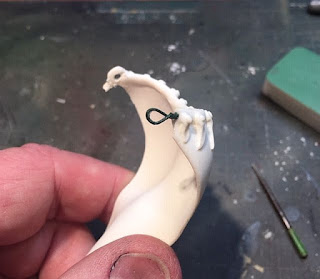
The two yellow arrows indicate where the repairs must be made. On the headdress, I already drilled a hole and inserted a wire. I'm going to have to think about the loop. The snake above the headdress looks to have had a bubble so big it split the snake in half - but it was quickly glued. The join was a little off center and also the glue became brittle, so that was re-broken, and cleaned out. It too was drilled and a wire inserted, the halves glued and Aves applied.
The blue arrow is a part I have no idea where it goes or what it is. Any ideas?
Here Aves was applied to the wire and the spike was added. Once dry, I'll sand the epoxy to it resembles the shape that was originally there. For the loop in the loin cloth, I just created a loop with wire and drilled that into the break point. It was the covered in Aves. That too will be shaped, and a hole drilled out once dry.
Thanks for looking.
The parts are for the most part very well done. There are some pinholes and bubbles in the base, and there are two pieces that have been broken - the center spike on the headdress, and one of the loops on the loin cloth.
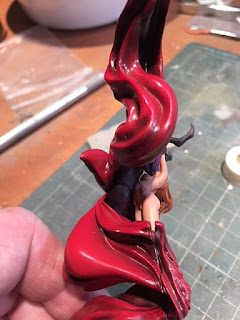
As you may be able to tell, she's not your average Medusa. She's not a snake, tho she does have snakes for her hair. Otherwise she's a very attractive, accurately sculpted pin up kit. Her face from the site -
... and then my two tone primer job. The arch fits to the base with two large pins, and is a very tight fit. I may just leave it as is, so I can remove it for transporting it around. There is also an arch in the back that also sits on a pin. This one is not as tight so I may get two large magnets to attach it. Again making it easier to transport.
Next, I started in on the smaller parts.
The two yellow arrows indicate where the repairs must be made. On the headdress, I already drilled a hole and inserted a wire. I'm going to have to think about the loop. The snake above the headdress looks to have had a bubble so big it split the snake in half - but it was quickly glued. The join was a little off center and also the glue became brittle, so that was re-broken, and cleaned out. It too was drilled and a wire inserted, the halves glued and Aves applied.
The blue arrow is a part I have no idea where it goes or what it is. Any ideas?
Here Aves was applied to the wire and the spike was added. Once dry, I'll sand the epoxy to it resembles the shape that was originally there. For the loop in the loin cloth, I just created a loop with wire and drilled that into the break point. It was the covered in Aves. That too will be shaped, and a hole drilled out once dry.
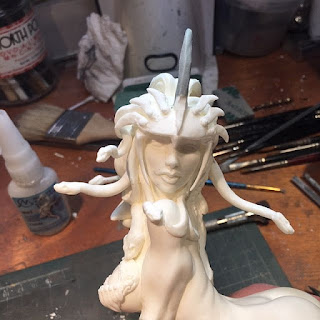 |
| The snakes just to see where each one went. |
Thanks for looking.
Thursday, September 20, 2018
Bad Fairy Finale
She has been sitting on the "in progress" shelf for a short while now and it's time to finish.
The first thing for this session is to take a piece of wood to be used as a base and prime it. This was an orchid mount where the orchid sadly died. The moss there was where it was. I dripped CA all over it to keep it in place and to harden it up. Then I gave the moss a shot of Green and the wood Gray Green.
The first thing for this session is to take a piece of wood to be used as a base and prime it. This was an orchid mount where the orchid sadly died. The moss there was where it was. I dripped CA all over it to keep it in place and to harden it up. Then I gave the moss a shot of Green and the wood Gray Green.
After a few lightening coats to create a highlight the log and moss was done. I added static grass just to give a the wooden base a little something. As an experiment I painted the wood with Agrax Earthshade - 2 coats. I think it came out good.
Then it was just a matter of placing the fairy. I sawed off the fairy's rocky base and then drilled a hole where I CA'd a length of paper clip. A hole was drill into the moss/wood and she was super glued onto the mossy "nest". A little bit of the base I couldn't eliminate showed so pulled a tiny bit of moss from the back and glued it to the rock that showed. Oh, I also painted the rock that same green color.
I think I'm done. Thanks for looking.
Wednesday, September 19, 2018
Scale 75 stands Up Against Recasting
[EN] STATEMENT
Hello everyone:From humility, but with maximum responsibility as part of the model family, SCALE75 wants to start today an awareness campaign against recasters and piracy that our market is suffering. Lately all brands have seen how our creations are being reproduced illegally and without any scruples in a massive way. There are many families, people and brands that struggle hard every day to bring you new and spectacular figures and products.
OUR EXISTENCE IS IN DANGER! It is not a matter of victimization or educating anyone, but it is about making all our followers understand that the illicit practices of the recasters are causing us to be little by little in danger of extinction if we continue to feed them.
From our communication department we have thought to create a small logo or symbol to include in all our products referring to this problem and to try to raise awareness of the need to protect our hobby among all. Be free to include it in those places that you consider appropriate if you agree with this awareness campaign. We attach the pictures in different versions so you can use them in all your publications. Share and help us so that this beautiful hobby is not destroyed by this type of practices that do so much damage to our "small industry". It's a little contribution against illegal piracy.
Thank you very much. "Protect your Hobby”

Paolo E Francesca: I Finally Met My Match
Work continued to the final steps. The shroud swirls around the two figures, and each figure is attached to it at one point. But they they are attached to each other in 3 spots.
My feeling is that because this is designed digitally, tolerances are pretty tight and if things aren't superglued just right, parts won't fit.
What I did was I glue her to her shroud, and then my plan was to glue him to her, and it was just a matter of gluing the two pieces of the shroud together and the part where he meets the shroud should just fall in place. Arrrgghh it doesn't-
I get my Aves out and fill the gap, blending both ends of the shroud together -
Beautiful, but then I notice that I can look in, and see where his butt is supposed to meet the shroud, it's not even close! That won't do, so I gently try to persuade his butt to meet the shroud. SNAP - SNAP-SNAP. All the connection between him and her broke. ARRRGGGHHH again!
BP is going up and once again I was about to fling it against the wall. So it's gets put in a box and I walk away. Maybe I'll revisit it again, maybe I won't...
Aradia 1 - Me - 0
Check back when I'll be doing something else.
Monday, September 17, 2018
Scale Solutions' TIE Predator
Another TIE fighter from the Star Wars world, Wookiepedia says:
The kit comes in 9 parts giving you the choice between a regular TIE front and one that looks like a grill. it is nicely cast gray odorless resin.
I wanted the grill front and after a little cleanup, tried the fit out. It fit so well, that I couldn't get it out. And of course, it's tilted ever so slightly dang it. I tried to spin it a little but was afraid of denting the resin. So it'll stay that way.
The edges of the wings looked a little plain, as did the very back of the ball, so I added a little 1/2 round piece of styrene to the edges.
Assembly came next. The kit comes with 4 pins to attach the two wings. The instructions tells you how to glue them in so the wings will be movable. Mine were a little miscast, so I just glue my wings in the open position, and primed.
The kit doesn't come with a base, so I'll have to figure something out. I also will cut a clear rod to hold it aloft, which means I'll have to drill a hole in the ball. But that's for next time. Check back and thanks for looking.
Considered a successor to the older TIE/IN interceptor, the Predator-class fighter was still highly maneuverable and heavily armed, but unlike most previous TIEs, it was also equipped with hyper-drives and a deflector shield generated through its blade-shaped wings.It's first appearance Was in the first comic from the Legacy series. This TIE Predator is from Australia's Scale Solutions. A number of years ago when Australia was going to be raising the prices for international shipping, Wayne posted that he thinks he was calling it quits figuring all the business he'll be losing. But while looking up info , I see he still has a WEBPAGE for models and the TIE Predator is still in the inventory.
The kit comes in 9 parts giving you the choice between a regular TIE front and one that looks like a grill. it is nicely cast gray odorless resin.
I wanted the grill front and after a little cleanup, tried the fit out. It fit so well, that I couldn't get it out. And of course, it's tilted ever so slightly dang it. I tried to spin it a little but was afraid of denting the resin. So it'll stay that way.
The edges of the wings looked a little plain, as did the very back of the ball, so I added a little 1/2 round piece of styrene to the edges.
Assembly came next. The kit comes with 4 pins to attach the two wings. The instructions tells you how to glue them in so the wings will be movable. Mine were a little miscast, so I just glue my wings in the open position, and primed.
The kit doesn't come with a base, so I'll have to figure something out. I also will cut a clear rod to hold it aloft, which means I'll have to drill a hole in the ball. But that's for next time. Check back and thanks for looking.
Aradia's Paolo E Francesca
This is another mini from Aradia's Dante's Inferno Kickstarter. I just noticed on the packaging, that this was a Kickstarter exclusive. Hmm
In the Divine Comedy:
It looks like this painting may have been the inspiration for the sculpt -
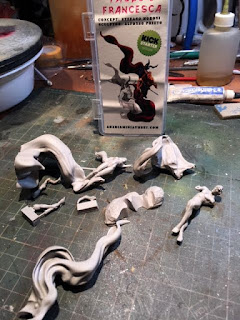
The parts are very well done in a gray resin -
Most of the kit appears to be their shroud. Paolo is a full piece sans horns (don't know why he has horns) Francesca is another piece. One of her arms is separate grasping a horn, the other, also separate, is grabbing the hilt of a sword. Another piece is a very thin (re: too thin) sword. There is also a small rock base to balance the figures on the shroud.
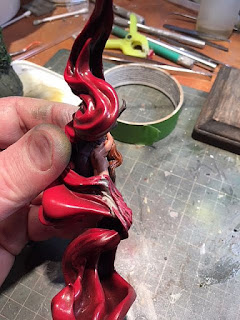
There are no instructions so I mostly followed the illustration on the box. I started by priming the kit in a hull red. Then glued Francesca to her feet/shroud, and base coated her a flesh color. Paolo looks to be a purple in the pic, so that's the way I went -
Then I started refining both figures before calling it a day. Thanks for looking.
In the Divine Comedy:
Dante and Virgil meet Francesca and her adulterous lover Paolo in the second circle of hell, reserved for the lustful. Here, the couple are trapped in an eternal whirlwind, doomed to be forever swept through the air just as they allowed themselves to be swept away by their passions. Dante calls out to the lovers, who are compelled to briefly pause before him, and he speaks with Francesca. She obliquely states a few of the details of her life and her death, and Dante, apparently familiar with her story, correctly identifies her by name. He asks her what led to her and Paolo's damnation, and Francesca's story strikes such a chord within Dante that he faints out of pity.
It looks like this painting may have been the inspiration for the sculpt -
The parts are very well done in a gray resin -
Most of the kit appears to be their shroud. Paolo is a full piece sans horns (don't know why he has horns) Francesca is another piece. One of her arms is separate grasping a horn, the other, also separate, is grabbing the hilt of a sword. Another piece is a very thin (re: too thin) sword. There is also a small rock base to balance the figures on the shroud.
There are no instructions so I mostly followed the illustration on the box. I started by priming the kit in a hull red. Then glued Francesca to her feet/shroud, and base coated her a flesh color. Paolo looks to be a purple in the pic, so that's the way I went -
Then I started refining both figures before calling it a day. Thanks for looking.
 |
| The gap in his stomach is apparently where she fits in. |
 |
| Probably the tiniest eyes I've ever done. They're green to go with the auburn hair. ;) |
Saturday, September 15, 2018
Review and Demo: Blue Stuff
I had this compound for quiet some time now and thought I already did a review until I went looking for it.
It's carried by Green Stuff World (www.greenstuffworld.com )and comes in semi translucent blue bars. It feels like hot glue sticks. I didn't know how much I would need so I bought a few packs. It doesn't go bad, and can be used over and over.
The last time I checked, you can only get it from GreenStuff World in the UK. But shipping is really quick these days.
Blue Stuff works by heating the material. Boil some water then take the pot off the stove or out of the microwave, then put a stick into the water. The compound will be soft in 2 or 3 minutes. Carefully pull it from the very hot water and then start to knead it. From there you can impress something into it. The Blue Stuff cools very quickly and a mold is made.
For my application, 1/72 model kits are notoriously short of pilots. So once I found one, I put the Blue Stuff into very hot water, got it soft and then kneaded it into a pillow shape. I then pressed the pilot into the material trying to have it tight to the pilot's sides about 1/2 way up.
If I was making a one sided mold, that's all I would have to do. But because a pilot needs front and back I made registration holes along the edge. This will allow me, once the mold is complete, to line up both halves without problems.
From there I heated another stick of Blue Stuff and repeated the process making sure, to the best I could, that the Blue Stuff made contact with all parts of the figure. Now just let it cool.
Unlike a regular silicone mold that you see for making resin parts, this does not need a mold release. I just made sure there was a lip on one side to help me separate the parts once cooled.
From there's it's time to make the pilot. I mixed up a little batch of Aves putty and pressed it into one part of the mold leaving enough raised to make contact with the 2nd half of the Blue Stuff. I put the 2nd half on making sure the registration pins lined up. Then gently pressed. You want to press hard enough for the clay or whatever to keep in contact with the mold halves, but not too much that you're bending the mold.
Because it's very hard to "just put enough" clay or whatever into the mold, you *will* have some flash to carve off. I used a sharp Xacto blade. Be careful!
Giving the Aves time to dry I opened the mold and found the Aves still wet! It turns out that I discovered (after talking to the Co.) that whatever is in Aves reacts to whatever is in the Blue Stuff. You will need to use either Miliput or Greenstuff. I've used both with success. As you see in the image the pilot is green, and turned out more or less ok for a first try.
On subsequent tries I found for better detail on the front of the pilot to put him face down into the first half of the mold. This is the part you will see, and who cares if the back of him didn't cast well. Only you will know. ;)
Another plus is that The Stuff is reusable, If you need only one part then just reheat it, and push something else into it. I want to keep my WW2 pilot mold, and have actually made another for a modern jet pilot. So I'm good to go having my plane models "in the air" with out the empty cockpit look.
So try some out. You know you could always use an extra ammo box, jerry can or life preserver.
It's carried by Green Stuff World (www.greenstuffworld.com )and comes in semi translucent blue bars. It feels like hot glue sticks. I didn't know how much I would need so I bought a few packs. It doesn't go bad, and can be used over and over.
The last time I checked, you can only get it from GreenStuff World in the UK. But shipping is really quick these days.
Blue Stuff works by heating the material. Boil some water then take the pot off the stove or out of the microwave, then put a stick into the water. The compound will be soft in 2 or 3 minutes. Carefully pull it from the very hot water and then start to knead it. From there you can impress something into it. The Blue Stuff cools very quickly and a mold is made.
For my application, 1/72 model kits are notoriously short of pilots. So once I found one, I put the Blue Stuff into very hot water, got it soft and then kneaded it into a pillow shape. I then pressed the pilot into the material trying to have it tight to the pilot's sides about 1/2 way up.
| Note registration pins |
If I was making a one sided mold, that's all I would have to do. But because a pilot needs front and back I made registration holes along the edge. This will allow me, once the mold is complete, to line up both halves without problems.
From there I heated another stick of Blue Stuff and repeated the process making sure, to the best I could, that the Blue Stuff made contact with all parts of the figure. Now just let it cool.
Unlike a regular silicone mold that you see for making resin parts, this does not need a mold release. I just made sure there was a lip on one side to help me separate the parts once cooled.
From there's it's time to make the pilot. I mixed up a little batch of Aves putty and pressed it into one part of the mold leaving enough raised to make contact with the 2nd half of the Blue Stuff. I put the 2nd half on making sure the registration pins lined up. Then gently pressed. You want to press hard enough for the clay or whatever to keep in contact with the mold halves, but not too much that you're bending the mold.
Because it's very hard to "just put enough" clay or whatever into the mold, you *will* have some flash to carve off. I used a sharp Xacto blade. Be careful!
Giving the Aves time to dry I opened the mold and found the Aves still wet! It turns out that I discovered (after talking to the Co.) that whatever is in Aves reacts to whatever is in the Blue Stuff. You will need to use either Miliput or Greenstuff. I've used both with success. As you see in the image the pilot is green, and turned out more or less ok for a first try.
On subsequent tries I found for better detail on the front of the pilot to put him face down into the first half of the mold. This is the part you will see, and who cares if the back of him didn't cast well. Only you will know. ;)
Another plus is that The Stuff is reusable, If you need only one part then just reheat it, and push something else into it. I want to keep my WW2 pilot mold, and have actually made another for a modern jet pilot. So I'm good to go having my plane models "in the air" with out the empty cockpit look.
So try some out. You know you could always use an extra ammo box, jerry can or life preserver.
Tuesday, September 11, 2018
Bad Fairy part 2
A super quick post here, as it's a "while I'm waiting" build. I painted her wings with the blue/green Chameleon Colors from Green stuff World. Then added them to the slots in her back.
Next up is fixing up a base for her.
Next up is fixing up a base for her.
Monday, September 10, 2018
AT-99 Scorpion Finale
This session I started out by cleaning up the yellow tips of the rockets, and then went crazy for a few moments and painted green stripes around the yellow.
You'd think at this point, the model would just let me finish, but no. The rockets went on the pylons well enough, but the pylons just wouldn't go on straight. Then it gets to the point where I touched the ca, and then the part sticks to your finger with the tiny molecule of ca more than where it's supposed to go with a full coating of ca. UGH. Eventually they did go on.
Then I rethought the base I was considering. The copter would have been flying. It also meant that I would have to dismantle the rotor rings and replace the static rotors with circles of acetate mimicking spinning. I wasn't about to do that!!!
Finally I remembered that I only put decal film on the decals I was going to use. Coincedently, on the latest Lou Dalmasso show on You Tube, he tests decals on an extra piece of styrene to see what happens if not using Decal Film. So I did the same thing. Nothing bad happened, so I took the extra numbers and added them to the tail, making sure I cut all the extras from around the printed parts. There was also two rescue in the arrow markers that I added near the cockpit.
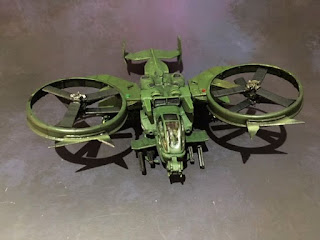
So here we have it done.
Thanks for looking.
Saturday, September 8, 2018
AT-99 Scorpion part 6
Only a small update since the 1/144 Sidewinders came in from eBay. But as it turns out it's one step ahead, one step back. Putting the decals on last time, and after multiple coats of Micro Sol, it's obvious they they are not going to settle in. I guess I put too much of the decal film over the top of them. Dang it!
So I scraped the decals off and will look for generic numbers from my spare decals.
The missiles look great, and the perfect size. As can be seen in the pics, they are from OzMods. The arrow points to one that came with the kit. You can see how distorted it is compared to OzMods'.
There is a very fine bit of flash between the pour stub and the missile on each one plus an attachment point mid missile that needs to be removed. The other connection point is one of the tail fins. Once the stub mid missile is cut, the other breaks away cleanly by just rolling the missile over.
Once cleaned, they were primed and then painted with V's Zinc Chromate. To add a little color I wanted to add yellow to the tips. V's yellow is pretty weak, so first I had to add white. Each one was a quick dip.
Even tho the flash was minimal, because they are so thin, it takes time to cleanup. Leaving them to dry, they will be added next session.
Thanks for looking.
So I scraped the decals off and will look for generic numbers from my spare decals.
The missiles look great, and the perfect size. As can be seen in the pics, they are from OzMods. The arrow points to one that came with the kit. You can see how distorted it is compared to OzMods'.
 |
| Arrow points to the one that came with the kit. |
There is a very fine bit of flash between the pour stub and the missile on each one plus an attachment point mid missile that needs to be removed. The other connection point is one of the tail fins. Once the stub mid missile is cut, the other breaks away cleanly by just rolling the missile over.
Once cleaned, they were primed and then painted with V's Zinc Chromate. To add a little color I wanted to add yellow to the tips. V's yellow is pretty weak, so first I had to add white. Each one was a quick dip.
Even tho the flash was minimal, because they are so thin, it takes time to cleanup. Leaving them to dry, they will be added next session.
Thanks for looking.
Subscribe to:
Posts (Atom)


