Thursday, July 20, 2017

AWIL David

I couldn't just leave poor old Jack on the shelf by himself. So I turned to the kit of David from one of his hallucination scenes. 
Actually, David was released first by Gillman Productions. As far as I know he's still available. He's casted in odorless resin and the only seams you can find are mixed in his hair. About an hour of 'combing" out the seam lines leaves you with a perfect hairdo. ;)  A few bubbles also in the tips of his hair are taken care of with a dot of the Vallejo putty. 

There are many images online that show David in this pose so I printed out a face and also looked up and printed out the sign for The Slaughtered Lamb which is featured on the base.  
From there as usual, I started with a face with a coat of flesh, and the golden brown for a base coat of the wooden sign. The sign also got a layer of Citadel's Agrax Earthshade (have I mentioned I love Citadel's washes) ;) - 


Next, I added two different yellows to the eyes, and a reddish flesh around the eyes. The same color was also used in the mouth.

From memory I knew he had either a white face or was very pale, but while studying the image, there's still quite a bit of red in his face.  It looks as if the make up people put the white face on him and then told him to hold his breath for the shot. To get this effect after misting in white I added both red and then red+blue (purple) pastel dust around the face. I don't have a pic from that step, but as I masked to paint in his pajamas you can see the red tone on his forehead. I also cleaned up his hair with a base coat of Dark brown, then a wash of black, then a highlight of leather brown - 
I gave the bust a rest and turned to the sign on the base. The other sides of the base were stone, so that was painted accordingly - 
When the sign was dry I added dirt and soot and then a green "slime" wash to the sides of the stone -
Surprisingly I had a pastel green paint in my stash so I used that  for David's pajamas. I added a little white for the base coat and then straight from the bottle for the creases and shadows.  I was calling this one done. Thanks for looking.


Jack and David together again.


Sunday, July 9, 2017

Worm Hole Exploration Module

This is a 1/72 scale kit from Black Sun Models (BSM). From the entry - 
1/72 replica of the IASA module that got sucked in to a wormhole, propelling Astronaut John Crichton into a distant part of the universe. Features complete interior, optional hedge drive parts, clear vacuformed canopy and ALPS-printed waterslide decals by JBOT. May be built with gear up or down.
As you may or may not know from the name John Crichton is one of the characters from the TV show Farscape.
The model is in about 16 parts and the resin is bubble free, and a few seam lines are easily cleaned off. 
(from Starship Modeler Store)
  The first thing after it's wash, was to prime in white and start adding the cockpit components - 

There are two side panels that are very well detailed. To "busy" it up, I painted in a lot of buttons - 
There are also side windows according to the box art. I saw, after the fact, that there was black decals for these windows. But I didn't know about them til later, and began cutting out the windows - 
The box art
 
 The cutouts will let the observer have a better look at the side panels. Now's the time to install the side panels, and the optional hedge drive engines, and begin painting. It was stated the the hedge drive engines didn't appear until later in the series. Not a huge fan of the show, I just decided to install them.

The top was to be an off white and the bottom a dark gray color - easy enough except that I forgot about the "off" part and painted it Gloss White. 

Then the problems started.  BSM gives you not one or two vac form canopies, but 4 of them. They were Futured, and when cut out, none of them fit. Being all the same, they were all too small. Even when I installed a 2mm piece of styrene (which also meant I needed to do more filling and repaint) it was still a bit too small. 
Installing the landing gear, I realized that I was given two starboard land gear!  With the frustration fairly high at this point I just installed the wrong gear essentially backwards. The next cheap-o plane model I can get my hands on, I'll cannibalize the gear for this model. 
 
Not the kit's fault but I had planned on using Micro Kristal Klear to fill in those side windows. Nope. The space was too big. I had to cut out clear pieces of plastic and install that. 

Taking a deep breath, I weathered the bottom of the craft. Having already glossed the top I finished the model by adding the decals. 

Despite the problems, the model turns out to be a nice "2 foot model". It looks good from 2 feet away. Will it win any awards? No. But it looks nice next to my other single seater space vehicles. Thanks for looking.


I'm Your Hucklberry

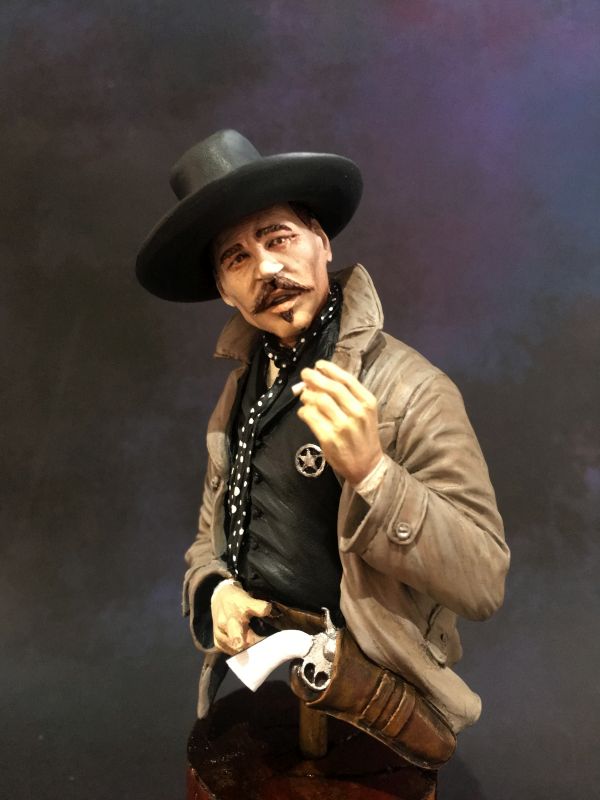
This time I have the legendary Doc Holiday, as portrayed by Val Kilmer in the movie Tombstone. I personally think this is one of the best modern day westerns.
The bust is from CGS Miniatures, and is listed as 1/9 scale. IIRC it came in 5 parts to the figure and a "stone" stand for the base. But I traded that out for a brass rod and a rustic looking wood plinth. There are no bubbles in the resin and any seam lines are fine and hard to find. 

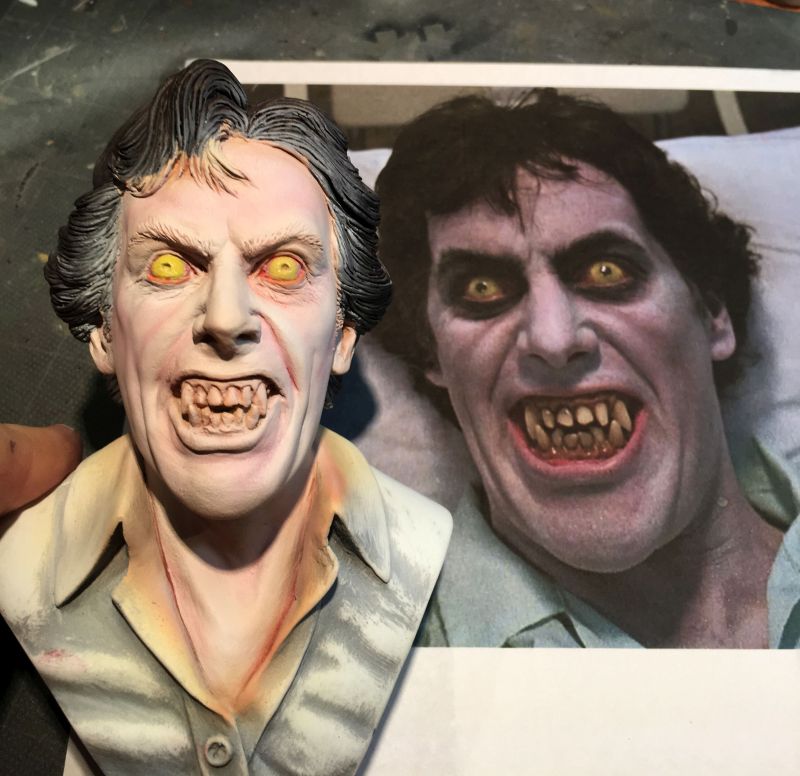
Next was to see what colors Doc was wearing during this scene. Looking at the film, he made quite a few wardrobe changes. But the bust seems to be from the end when he meets up with Ringo for the last time.  I made a little collage to bring to the hobby desk. Seems like the top center image is the exact pose that the sculptor used for the bust.
 As usual I start out with a black primer and then give it zenithal light with white primer. From there I base coated the skin and take a look at where it's at - 
In the film Doc has an illness (TB?) so he never really looks rosy. So I tried to match the skin tone with Vallejo Air "Flesh Tone". From there it was a simple highlight of Pale Flesh on the cheeks, chin, and the bit of jowls that he has.
Then I base coated the rest of the bust. His kerchief, hat and vest were all black in the film, but I didn't want it to be to monotonous, so the hat was done in black and ultimately highlighted in areas.  The vest was done in Black Gray then washed and highlighted. Finally the kerchief was done in German gray and then washed in Citadel's Black.


Then I noticed the duster seemed too light. So I mixed up some darker gray with a light brown (some angles in the movie it looks more brown than gray). But it was never dirty looking so I had to avoid that -


From there all that was left was to add the little details. The silver to the badge, and the the buttons on the duster. The buttons on the vest were shiny black, so a dot of gloss worked there. His gun was also silver with a white handle. There was a line of metal thru the handle so that was done with V's Steel. I added the white dots to the kerchief, and the final bit was adding individual dots of gloss to his face, as thru out the film he was constantly sweating - from the AZ heat, or the fact he was sick - I don't know, maybe both...
Here's the final shots on the rustic plinth, thanks for looking.


Monday, July 3, 2017

Old Death Showcase

This was one of the first minis I did after getting back into miniature figures (I go all the way back to good ol' Ral Partha). 
It was sculpted by Pedro Fernandez Ramos and put out by Enigma Models. I just loved the details on the 30mm figure.
Anyway the figure was completed and put on the shelf on a lump of Aves Apoxie Sculpt until I thought of a base. Needless to say he's still on the lump of Aves. :(  I'll have to come up with something soon. 
Thanks for looking.