I was going to make a base dio for the fox, and started to build the doorway that you see in the film. But taking a 2nd and 3rd look, I was making it under scale by a whole lot. In the end I thought it would look dumb, and scrapped it for a simpler base of the salt encrusted Crait.
I used Vallejo's Snow Effects, and made footprints to reveal the red soil under the salt by pushing the animal's feet into the still wet putty. A deep V Red was used for the soil color. Thanks for looking.
Monday, March 25, 2019
Saturday, March 23, 2019
LLRV
The LLRV (Lunar Landing Research Vehicle) was a Project Apollo era program to build a simulator for the moon landings.
From Astronautix.com :
Having been intimidated with the PE, I was hesitant to start this one. But once started the metal was fairly thick so folding was fairly simple.
The first step I made was also a mistake. It calls for the enclosure of the pilot to be folded. Only until a short time later, when things were all super glued, did I see the text (over the picture obscuring it partially) to fold away from the groove, which is opposite of what I had done. Ok, I guess I'm not using that part. The next few parts went a lot easier.
It wasn't long before the main assembly was built -
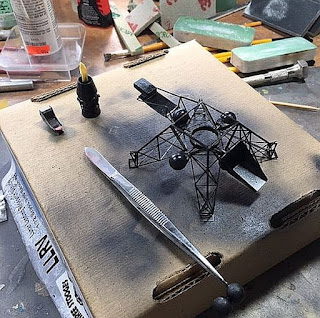
Being that is craft is all metallic, I started off by painting the model a gloss black after adding the spherical tanks. The engine and the pilot seat is off to the side. The pilot is elsewhere drying.
It was here that it was evident the craft looked rather sparse. It was time to do some additional investigating. Looking through the images it seems there was more than one vehicle. It turns out that there was a least four, with four vehicles made for each version.
Being I messed up the enclosure, I couldn't use that one. But so far they all had attitude adjustment jets. scratching them in 1:72 was tough, but I did my best. Here you can see them in the white styrene. There are also two more spherical tanks by the rear one. Those were added using 8mm beads.
Clear images was difficult to find. I could see there was a lot of wiring and plumbing, where they could be made out here and there, but extremely hard to follow any distance.-
I was here that I decided it was time to buy the accompanying CD from Tag Team. I also found a modeler on the ARC forums, that was scratch building one in 1:18 scale!
Be back soon with the next session. Thanks for looking.
From Astronautix.com :
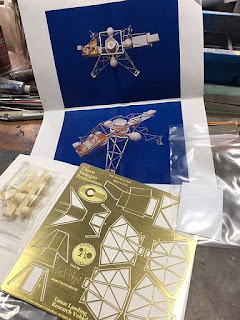
The LLRV could take off and land under its own power, reaching an altitude of about 1,220 meters, hover, and fly horizontally. A fan turbojet engine provided a constant upward push of five-sixths the weight of the vehicle to simulate the one-sixth gravity of the lunar surface.This LLRV is a 1:72 model from 3 Stooges Productions. The kit comes with a fret of photo etch, and a bag of about 10 resin pieces, and detailed instructions. It was sold through Tag Team Hobbies, and went through 2 editions, before I heard it went Out of Production. I guess the kit can be found on eBay, if you keep a look out.
Having been intimidated with the PE, I was hesitant to start this one. But once started the metal was fairly thick so folding was fairly simple.
The first step I made was also a mistake. It calls for the enclosure of the pilot to be folded. Only until a short time later, when things were all super glued, did I see the text (over the picture obscuring it partially) to fold away from the groove, which is opposite of what I had done. Ok, I guess I'm not using that part. The next few parts went a lot easier.
It wasn't long before the main assembly was built -
Being that is craft is all metallic, I started off by painting the model a gloss black after adding the spherical tanks. The engine and the pilot seat is off to the side. The pilot is elsewhere drying.
It was here that it was evident the craft looked rather sparse. It was time to do some additional investigating. Looking through the images it seems there was more than one vehicle. It turns out that there was a least four, with four vehicles made for each version.
Being I messed up the enclosure, I couldn't use that one. But so far they all had attitude adjustment jets. scratching them in 1:72 was tough, but I did my best. Here you can see them in the white styrene. There are also two more spherical tanks by the rear one. Those were added using 8mm beads.
Clear images was difficult to find. I could see there was a lot of wiring and plumbing, where they could be made out here and there, but extremely hard to follow any distance.-
I was here that I decided it was time to buy the accompanying CD from Tag Team. I also found a modeler on the ARC forums, that was scratch building one in 1:18 scale!
Be back soon with the next session. Thanks for looking.
New Lights for the Desk
I've been working at my desk with lights that are bright, but really made to be decorative. After having to dodge around the decorative light plus the one desk light (that is too low) I decided it was time for something new.
I ended up buying two Tao-Tronics LED lights. They have 5 color modes, 5 levels of brightness, plus a USB port to charge the phone. Setting them to daylight, and the highest brightness, they work perfectly. Plus it's cool having the phone charger right there.
I ended up buying two Tao-Tronics LED lights. They have 5 color modes, 5 levels of brightness, plus a USB port to charge the phone. Setting them to daylight, and the highest brightness, they work perfectly. Plus it's cool having the phone charger right there.
Cheetah Woman
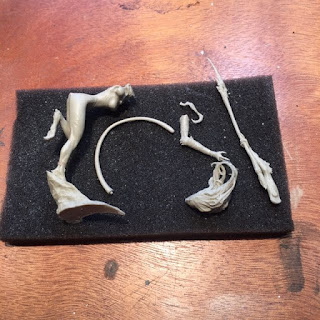
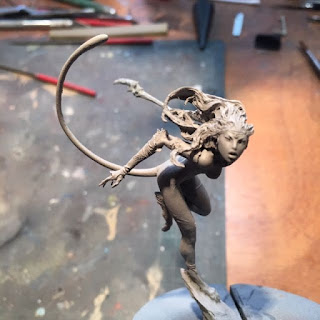
Another mini from the stack. The Cheetah Woman is from Black Sun Miniatures from the UK. It is 65 mm in size, and comes in 6 resin parts. The sculpting is quite good and fit tightly together.
Test fitting the parts the only questionable part is where the head joins the body on the right side. Unless I'm attaching it wrong - and that's entirely possible, there looks to be a gap in the hair. No worries if need be, a little Aves will do the trick.
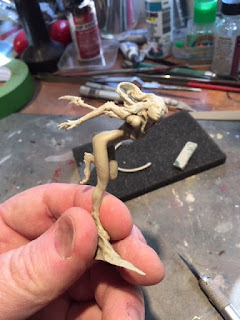
It took no time at all for the model to be all assembled.
Looking up some images for a painting example, the one that kept showing up was this one -
Good enough. The looking it over again, and looking at a pic of a real cheetah, I decided to use the real cheetah color.
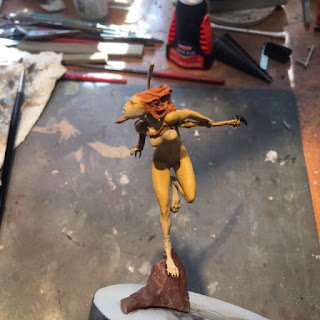
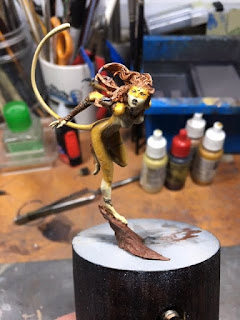
The base coat was added -
And then some details -
Come back and see this one finished up. Thanks for looking.
Monday, March 18, 2019
The Reading Room
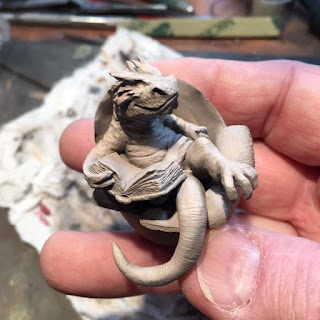
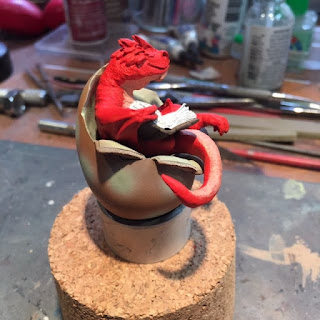
This mini has been in my pile so long, I don't remember where it came from, or even why I bought this. Hmm...
He comes in two parts the dragon and the egg. I scratch built the base and rocks with foam, and extra long static grass for the nest. Thanks for looking.
He comes in two parts the dragon and the egg. I scratch built the base and rocks with foam, and extra long static grass for the nest. Thanks for looking.
Friday, March 15, 2019
The Last Jedi's Crystal Fox
Named Vulptex by the creators, this animal jumped right out at me while watching the movie. Then I saw a video on YouTube where one was created with clay. Thinking I could do that, I started out.
Looking thru the various images, aside from fan art, there wasn't very much. I found one screen grab, and a few images of the robotic fox the SFX guys built. Oddly both animals looked different. I ened up using the one you see on the screen.
First thing I needed was the clay. I picked up FIMO Glitter White figuring this would look good as it'll mimic of the crystals from the planet. Next I had to get a skeleton diagram for the wire armature -
For thosae that haven't worked with polymer clay, the instructions says you shouldn't use on any more than 1/2" of clay without baking. So to keep from baking all the time, clay artists will use aluminum foil to bulk out the figure. So I used the foil to fill in the neck and abdomen areas. Then more clay was added over the foil -
If it was a regular fox, you could add some texture with one of the tools and you's be done. But being we have to add crystals, I textured the model, and then into the toaster oven for it's first bake.
while he was baking I was thinking about exactly how to add the crystals. First thing I thought of was to make them like teeth, bake them and then add them to the skin. After two failed baking attempts - both times they burned, My thoughts were that the individual crystals were just too small and even using less temp that required and a shorter time, it burned.
I decided to just add the clay crystals to the clay raw and then bake.
for this step I needed Sculpey's Liquid Bakable Clay. It looks like PVA glue and helps the new clay stick to the baked clay. I added another thin layer, and then started rolling and sticking in all the "crystals one by one. After 2 days of doing it on and off, I was done.
Next I felt he needed some sort of base, So I applied some Vallejo snow effects to a piece of foam, and then pressed his feet into the snow around the base as if they were running all around. Then according to the movie, there was a layer of red salt under the white top layer, so I painted the footprints a deep red. I also painted his eyes, nose and mouth with black and I was done. Thanks for looking.
Looking thru the various images, aside from fan art, there wasn't very much. I found one screen grab, and a few images of the robotic fox the SFX guys built. Oddly both animals looked different. I ened up using the one you see on the screen.
First thing I needed was the clay. I picked up FIMO Glitter White figuring this would look good as it'll mimic of the crystals from the planet. Next I had to get a skeleton diagram for the wire armature -
 |
| Epoxy was used on the head, chest and hips to attach the wires. |
For thosae that haven't worked with polymer clay, the instructions says you shouldn't use on any more than 1/2" of clay without baking. So to keep from baking all the time, clay artists will use aluminum foil to bulk out the figure. So I used the foil to fill in the neck and abdomen areas. Then more clay was added over the foil -
If it was a regular fox, you could add some texture with one of the tools and you's be done. But being we have to add crystals, I textured the model, and then into the toaster oven for it's first bake.
while he was baking I was thinking about exactly how to add the crystals. First thing I thought of was to make them like teeth, bake them and then add them to the skin. After two failed baking attempts - both times they burned, My thoughts were that the individual crystals were just too small and even using less temp that required and a shorter time, it burned.
I decided to just add the clay crystals to the clay raw and then bake.
for this step I needed Sculpey's Liquid Bakable Clay. It looks like PVA glue and helps the new clay stick to the baked clay. I added another thin layer, and then started rolling and sticking in all the "crystals one by one. After 2 days of doing it on and off, I was done.
Next I felt he needed some sort of base, So I applied some Vallejo snow effects to a piece of foam, and then pressed his feet into the snow around the base as if they were running all around. Then according to the movie, there was a layer of red salt under the white top layer, so I painted the footprints a deep red. I also painted his eyes, nose and mouth with black and I was done. Thanks for looking.
Thursday, March 7, 2019
Close Encounters Mothership
I found this little reissue kit while at Yay Monsters looking for something else. Not many Close encounters kits around, and being small I figured it filled a little niche.
The kit comes in 4 resin parts a length of wire and a length of clear rod -
Being I want the mother-ship metallic, I primed the ship parts in gloss black.
Devils Tower got a black primer and increasingly lighter drybrushing of gray. The ground area got the same treatment with brown.
I added some green turf to imitate the surround trees and then, I felt to make it a little more accurate, I pulled up some trees and added that runway. I also cut a few tiny pieces a square stock and added them as buildings.
The kit gives you a length of wire for all the antenna, but I felt that wire too thick. I happened to have some thin styrene rod, so I used that instead.
Looking at the ship you see zillions of lights all over it including what looks like city lights on certain parts. So I went into zen mode and painted in zillions of dots in blue and white. The dots are way out of scale but - - whadda ya going to do? ;) Thanks for looking.
 |
| A closeup |
 |
| Size comparison |
Tuesday, March 5, 2019
Nosfer-Galactu
This kit was sculpted and cast by Ken Kidwell, and is approx. 1/4 scale. There was no real seam lines, or flash and just a few pinholes to address.
First thing when I have a head with no hair is do the squiggle pattern all over. In this case I had just bought a new airbrush and just couldn't get my little tight lines. Needless to say after this session, I went and ordered the same one I used to have, and when that came, this one went in the bottom drawer.
The next session I added some light skin tone to a white Gray, and added his sickly skin. After that purple, and sepia wash was added to the creases. His eyes were totally filled in with the Game Color Hexed Lichen.
While the head was drying, I tried another experiment. Here I painted gloss black over the costume, and when that was dry I over painted with Vallejo Metallics Chrome. When that dried the next step was shooting some Army Painter Purple Tone and then some Red Tone down the center. Turned out well if I do say so myself.
A few touch ups here and there including trying once again to paint a gem on his suit. Came out just ok...
After that I called it done. Thanks for looking.
Sunday, March 3, 2019
Real Space Vanguard and Explorer 1
I was given this brand new kit, from Rob Schorry, the creator of the models, that was produced by Real Space Models. Sometimes 1/24 scale probes gives you giant vehicles and sometimes, especially the early ones are rather tiny. This is the case with Vanguard and Explorer 1.
Vanguard comes in two resin sphere halves, with 6 pieces of wire. Explorer 1 comes in 3 resin pieces and 4 wires.
Vanguard was first and consisted of sanding down the halves to make them spherical - I supposed I could have given it a little more sanding - but didn't want to ruin it. The two halves were glued together, and then it was ready to paint. I didn't have any gloss black primer, so I used regular black and then a separate coat of gloss. Once that was dry I used the Molotow Chrome paint pen and painted it chrome. The solar cells were left black. When all of that was dry I glued in the 5 wires in, and I was done.
Check back for the explorer 1 build. Thanks for looking.
EDIT (3/5)
Posting this on social media, there were a lot of comments on how small it is. To help visualize, I'm adding this pic -
Subscribe to:
Posts (Atom)


