Tuesday, December 21, 2021

Christmas Carol's Bob Crachit Finale

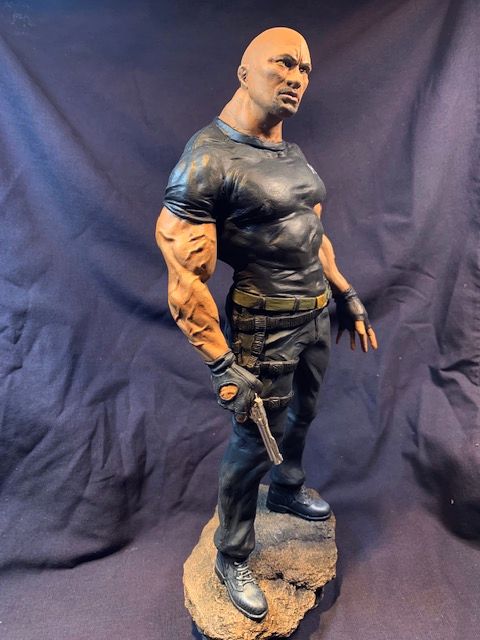
 I started out this session by painting the hair. On TV it shows up very dark. I hit it with the darkest brown I had, Then highlighted it when dry. Ugh. Too light. Then 3 coast of Citadel's Nuln Oil got it back to a decently dark color. 

For the clothes, I had the colors I wanted picked out - White shirt, red tie, green vest with brass button, and black piping, and then a brown jacket. It went along well. for the vest I added a little design in a light green and ten went a little lighter for the 2n'd highlight. The jacket I decided to make a tweed jacket. A dark brown was the base coat. A lighter brown stippled with one of my ruined brushes started the tweed look. Finally, I used V's English Uniform, which is a lighter brown but with a lot of green in it was stippled on and this gave me the tweed color I was used to seeing. Only problem was that it dried a satin. I found a bottle of Anti Shine that The Army Painter put out and it dulled the jacket down quite a bit. 

I'm still trying to get my clear coats straight. When I spray gloss, I want gloss. When I was matte - I want completely flat - not almost satin, not even egg shell. I want flat. Any discoveries will be reported. 

A simple gray stone base was painted with a white cut out and Bob's name in red. To finish it off, A let it snow on the base. Thanks for looking. 


Sunday, December 19, 2021

Christmas Carol's Bob Crachit

 I'm calling it close for this year's Christmas model. It's Bob Crachit from Christmas Carol sculpted by John Dennett's MoonDevil Studio.  A typically nice kit in 1/5 scale. It's 2 parts of purplish resin - the bust and the base.  As with the Scrooge bust from a few years ago, it's based on the 1951 film. 


Since the film was done in B&W, I had to look fro movies posters to see how the characters were imagined. I found two images of Bob - one with a blue tie/scarf, and one with red.  Thinking there's nothing Christmas-sy about blue, I went with the red one. Plus the red tie sort of ties in with Scrooge's red scarf.


As usual I started off with the face. All images show him fair skinned with dark hair so here we go. Besides the red tie, I'm planning for a white shirt, green vest and a brown jacket, with hopefully some texture on it to make it look tweed. We'll see about that. But that's for next time.


Muroc's X-36

 This kit has to be one of the oldest I won. I bought it at one of the first IPMS  Nationals that I went to.  Muroc Models is based in the Mojave Desert and produces resin kits and decals for display models. Many products cover experimental aircraft from the area.

From a website: 

 The X-36 is a 28-percent scale representation of a theoretical advanced fighter aircraft configuration. The Boeing Phantom Works (formerly McDonnell-Douglas) in St. Louis, MO, built the X-36, in a cooperative agreement with NASA Ames Research Center, Moffett Field, CA. It was designed to fly without the traditional tail surfaces common on most aircraft. Instead, a canard forward of the wing is utilized, in addition to split ailerons and an advanced thrust-vectoring nozzle for directional control. The X-36 is unstable in both the pitch and yaw axes; therefore, an advanced, single-channel digital fly-by-wire control system, developed with some commercially available components, stabilizes the aircraft.

 The kit was very well done, albeit very delicate. 


HA. Just noticed that the image on the box matches the size of the kit. Here it is with the landing gear installed. They wont on effortlessly, but again are delicate. I accidentally snapped the front wheel off without even noticing. Thankfully it didn't roll away and went back on easily.


The paint is one, but I had to be very careful not to make it too thick to fill in the panel lines.


The panel lines are very well done, but oddly there were not lines to indicate the bottom of the cockpit "window."  There is a little pitot tube attached to the instruction page with tape. But it was so small, I didn't see it until way after the fact. Here I attached one with the thinnest stretched sprue I think I ever done. ;)


The decals are on. I did have a little trouble at the start. With their age, I wasn't sure if they would shatter on the kit or not, so I tried two X-36 markings on the bottom. I didn't know until I started sliding the decal that apparently each letter/number was separate. I recovered the "X" and the hyphen, but the 3 got turned in reverse, and when I tried to flip it, it went into a ball that I couldn't undo. It would look dumb just to have the one, so the bottom has not decals. Then could the X-36 with the symbols on the top? I circumvented finding out by putting a coat of decal film over the line. They easily slid off in one piece.


Just about done. The pitot tube is so delicate that I decided I want to glue the craft down to some sort of vignette, hopefully protecting it. I found the image below and decided that was the image to duplicate. Looking through the offering I couldn't find any sort of 1/72 civilians to what I came up with (on Amazon) was 200 architectural figures for less than $10. I'll try to pick out 3 and finish off the scene. But that's next time. Thanks for looking.

The inspiration


Wednesday, December 8, 2021

Bossk's Hounds Tooth Finale

 This session I tried my best to finish this ship off.   First step was the mist coating to make the ship look less than a giraffe.  BTW the base came from Starship Modeler. I picked up a few a while back for any "just in cases." ;)

Next step was to gloss the ship and put down the decals. Being they were for a garage kit, I figured the inking would be on one large film, so I cut the decals as close to the design as possible.  They were very thin but pretty strong - else I would have lost the "teeth" decal.

After that came the weathering. I wanted to make it look used but not too busted up. So the panels were more or less lightly stained rusted with 2 different colors.  I hit the entire model with a flat coat, and then gloss in the very large front windows.  With that, I was done. Thanks for looking. 


Upside down


Bossk's Hounds Tooth part 2

 This session the plan was to start the paint work. Lots of little details in the aft section. 

Looking at other images this ship comes in all colors from yellow the brown. I first saw it as a sort of rusty color.  I started out splitting the difference on the colors. 


I had picked up these Aztek Dummy masks from CultTVMan a while ago, and thought they would be the right touch to busy up these large plain panels.

The first go-round I kept the colors fairly similar. After that I went darker and darker. But not to worry a mist coat will sit them down on the ship nicely.


 Check back.

Friday, December 3, 2021

Bossk's Houndstooth


 For those who haven't taken their deep dive into Star Wars, Bossk was the "LizardMan" alongside the other bounty hunters in The Empire Strikes Back. 

From JPG's Facebook pages 

"The Hounds Tooth, or YV-666, is the Bounty Hunter Bossk’s ship. As seen in various video games and comic books, the most popular being Shadows of the Empire.

Scale is 1:144 to compliment the other .JPG Productions ships, The Outrider, and the Moldy Crow. This line of “Underworld ships” will continue with other future additions.

Consisting of 9 resin cast and 3D printed parts, plus stainless steel mounting rods for the wings, the FX-7 measures ~12” (30.5cm) high and ~ 9.5" (24cm) wide wingspan, ~2” (5cm) wide main body."


My first oops was when I tried to saw this pour plug off. I guess I leaned too hard and snapped the end off the ship... Got it glued on fairly well. The filler will do the rest.


Two rods were used to attached the engine area to the fuselage. Only problem there was the fuselage is hollow, and I easily drilled into the open area.

Just had to see it with some color on it.


More soon. Check back and thanks for looking.


Thursday, November 11, 2021

Marlene Dietrich Finale

 I was ready to call this finished the other day. I took pics and when uploading the to my PC there was something missing. I never added in her eyebrows. I went up to my hobby room, and I gotta be honest and say those two thin lines were the scariest paint stokes for me to date. The model show the scantest line where they go, and even when I drew them in with pencil first - it was still nerve wracking. 

Whew she's done, and this completes my BPMS Pledge for 2021. Thanks for looking.  


Galaxy Quest Shuttle Finale

 For the last session, I added some Satin poly over the decals, and then when dry I added a few burn marks to the front of the shuttle. I didn't notice this is the movie, but a visitor was at Goblin Valley State Park, UT when a helicopter delivered the Shuttle, and it definitely shows burn marks on it. 


Here's the dio finished. Thanks for looking. 


Tuesday, November 9, 2021

Galaxy Quest Shuttle part 2

 I took a look at the project, and since it wasn't going to have figures (I still haven't found the ones I wanted), the dio looks a little dumb with all the now wasted space. Time to redo the base. This time I took a 6" diameter base, added a few layers of cork sheets, ripped off some of the foam rocknd glued it to the new one. Looks better.


 Next up was painting the windows. I saw a tutorial about painting windows once and it involved creating a gradient where the darkest color was up top and it got lighter toward the bottom I airbrushed some MIG NASA bluie after a bit of masking, and then added a few drops of the darkest blue I had to the cup, and just shot the upper left corner. It worked out pretty well. 

Then came the decals. They looked pretty poor as they weren't solid. But once down on the craft, they looked fine. 


 It should be able to finish it all up next time. Thanks for looking.

Friday, November 5, 2021

Marlene Dietrich part 2

 Back at the hobby desk, and despite not getting as far as I wanted I did make some progress. I finished the painting on the film cans and attached it to a fairly wide Warhammer round base. I feel it has a little more stability that way. Marlene's body is just sitting there, for now, to see how it looks. 

I took another look at the face, and added another layer with some pale flesh. I also did my black eye base, and started her hair. Just holding the head and hat together to see how it looks.  I should finish it up the next session. Check back and thanks for looking. 


Tuesday, November 2, 2021

Marlene Dietrich

 At the time, with November right around the corner, it was time to tackle my Pledge Project for 2021. The pledge is a group build my local IPMS club (BPMS) runs that in Feb. you pick a model that you want to do, and promise by the November meeting it will be finished. The short answer is that if you get it done, you've at least built one model. But it also gets you extra tickets in our end of the year raffle. Now because of Covid, we haven't gotten together since Mar. of' '20, but thru ZOOM, the meetings (and pledges) continued. 

My choice this year was the 1/4 - 1/5 scale Marlene Dietrich bust. From the Hollywood Legends series, it comes in 5 parts of tan resin and three 3D printed parts (her hand, cigarette, and lapel rose). 

The edges of some of the parts did need a little help. The white is Tamiya putty.

Everything got a coat of primer and then the paining started. Simple red was the base coat for the rose (it will get a highlight), and Vallejo Steel for the film canisters and reel. With out looking at the illustration of the box, I thought the film on the reel would be a brownish color, so I painted it up with Vallejo's Smoke.

 I thought for a second about doing her up in B&W. But quickly thought again, even tho her shirt, tie, and vest were all white, and the jacket was black. The whites were actually 2 different colors. The vest and tie are V's White, and the shirt is Ivory. The jacket is V's German Gray,with Gloss Black lapels. The shadowing on the sleeves were V's Gray Black. Again a little but noticeable difference. The top hat will be the same colors.

The image has her with a fair skin tone. So I used V's Basic Skin Tone this time for the base coat of the face and hands, Then I did some shadowing with V's Rose Red. I highlight will follow - then her hair has to be done. I'm still thinking of colors for that. 

But that will be next time. Check back and thanks for looking.


Thursday, October 28, 2021

Dwayne the Rock Finale.

 Been a few weeks but I'm back with The rock all finished. I readdressed his shirt color and finished any little bits that I felt undone. Added some paint to the rock base and that's about it. I'm not really happy with the eyes - I think they're too big - and may take another stab at it. Thanks for looking.


Friday, October 15, 2021

JPG Galaxy Quest Shuttle

 Just saw Galaxy Quest again on one of the myriad of channel, and thought I have to build a GQ model. GQ is a very funny movie lampooning or honoring Star Trek.  JPG.s model is 1:72 scale and comes in 16 well casted white resin parts. I haven't put the decals on the craft yet, but they look well printed. 


 You see in the image it's sitting on a weird arrangement of foam. At the same time I started building the Shuttle, I was asked by my local IPMS club to do a little slide show on build a diorama or vignette using foam as the base. We'll see more of that.  The scene where they retrieve a beryllium sphere, was filmed entirely in Goblin State Park, UT.  One blogger happened to be at the park when the shuttle was delivered by helicopter.

Never realized the char in the film!

 Running out of time for the demo, I looked up a bunch of images for Goblin Valley and took to some foam with my cheap-o hot wire cutter.

Not being able to locate the figures I was going to use (downside of a huge stash), the direction of the ship in the vignette will change. 

The ship is together. The only problem I had was the rear landing gear has an angle to them. The instructions don't tell how the angle goes, so installing the supplied legs was a *Nope*. Thankfully I had some rod the same size and set them in place. 


That's where we'll leave it for today. Check back, and thanks for looking.