Friday, August 31, 2018

New

Been a while since I posted my new stuff. Besides the pack of missiles for the Avatar build I score a Bandai B Wing - Comic Con exclusive. Now I have to determine if I should keep it or build it... Nah, I'll build it.  I also scored a Shore Trooper from rogue One movie. I liked the look of these guys. This kit was pretty tough to get - 


Next is a kit from sculptor Sean Kyle. It's a 1/4th bust of Bruce Spence, the Gyro Captain from Mad Max 2. Just odd enuff to interest me. Not shown is a propeller - the base is an engine -  and a cigar and the shades on top of his goggles. - 
Here's his pic in B&W just because it looks like it may have been the reference for the sculpt - 

Finally is Wand Wilson - Lady Deadpool. I thought originally that this was just another attempt at R rated models. For a while sculptors were just putting breasts on all sorts of figures, the Creature from the Black Lagoon, Predator, etc... just a way to sell a sexy model. But no, she really exists in the comics. This is what looks like a really nice 3D print...


AT-99 Scorpion part 5

I thought this session I would be done with the copter, and would start on the base/vignette. Nope, not to be. First thing I did was paint the gray stripe a light blue so at least you can see the guy in the cockpit - 

Then having glued the front and back of the canopy to hold it in place, I did the sides today.  Then I puttied and even painted it. But looking at the pic, it's really uneven and need to get in there with more putty. even with the bright blue stripe and a few coats of Future, the vac form canopy isn't that clear...

While I was waiting for the canopy to dry, I did a little more weathering. All of the vehicles in the movie were well looked after, so while I want them to looked used, I didn't want them all beat up.
One other point is I got out the missiles from the 1/72 set, and SOB they are gigantic compared to the missiles in the kit. All I can guess it that they used 1/144 scale missiles. From the looks of them they are sidewinders. So I found 1/144 Sidewinders on ebay.  we'll see, if they don't fit, I guess I WILL have to make my own. But I'll be mad about it.

Thanks for looking. I should really finish up next time.


Monday, August 27, 2018

Freebooter's Bad Fairy

This tiny model I've had seemingly forever. I don't remember her name or even what Co. I bought her from.  She's called Bad Fairy from Freebooter Miniatures. Her card had gotten mixed into an old pile of papers and wasn't found until just now.  


But it became the latest "while I'm waiting" side project.
First is to add the flesh - 


Her tiny eye was added

 Then I added the red hair and clothes. I also painted the ground and dark brown.


The wings are next. I'm going to use Green Stuff world's Chameleon Colors. Check back for that. Thanks for looking.

AT-99 Scorpion part 4

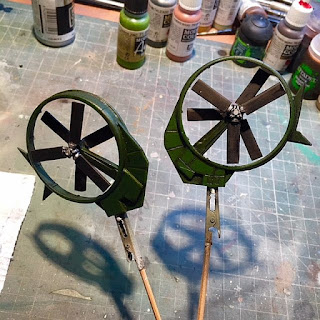
I needed to take a break from cleaning the bad castings and started to paint the few parts that I thought was ready to go. First up was the rotor blades - 

Then moved on the to fuselage - 


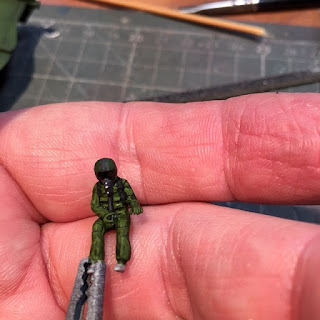
The final for the day is I took one of the pilots from the 1/72 scale pilot and crew set and painted him up. The pilots had just a typical green jumpsuit. The main characters had helmets with no visors, but mine did so I just painted them a gloss black. Thanks for looking. 


Tuesday, August 21, 2018

I'll Never Complain again

I just came across this video that shows a man's life work of scratchbuilding British warships - all carved from matchsticks!
WOW, I'll never complain about crappy resin kits again! ;) 


https://www.youtube.com/watch?v=Z5IT90vZBRo

Monday, August 20, 2018

AT-99 Scorpion part 3

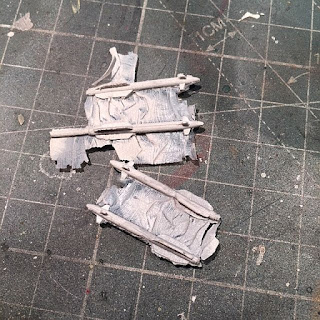
The torment continues. Moving on, I was up to tackling the missiles and their racks.  Once again I had to dig the missiles and racks out of a lot of flash - 

 I cleaned two of them, and noticed that, once again, the mold had slipped or something - the missiles had this wide seam down the side and was also twice as wide as it should have been.  Ok, I'll have to make my own. I cut the tip off one of the missiles and took my trusty 1.2mm rod to make up the length of the missile. With the vanes were equally wonky, I took some flat styrene stock and cut out a rectangle. gluing it to the rod, it became quickly apparent this wasn't going to work. I had 8 missiles to do.   Nope I was going to buy some aftermarket missiles. 
Heading to eBay I quickly found quite a few missile sets. The one I chose was this one - 
 I noticed that while I needed 8 missiles - on the model they were all the same type - none of the aftermarket ones had 8 missiles. This meant that I would have to buy two boxes of them. Am I out of my mind?! I'm not paying an extra $10 for 2 missiles from the second box. So this AT-99 will have 4 of one kind and 4 of another.  There was no way to pay for shipping (it was free) to get them here faster, so I'll have to wait for the 1st week of Sept. - when they arrive - to continue the missile part.

Then I actually caught a break. I was watching the Sunday marathon of military aircraft on the Smithsonian Channel. One show was the story of the Apache helicopter. Then it hit me where the design for the Scorpion came from. It was so obvious, I don't know why I didn't see it right away. It also solved 2 problems I had. On the kit there was these 3 protuberances. I couldn't tell what they were as each of them had a big bubble hole on the side. The instruction images were also useless (more on that later).  But seeing the show helped immensely. They ended up being two transmission gear boxes, and a light - 

Once again I cut the nubs off and for the gearboxes I found a styrene tubes of similar diameter, glued them on and then shaped it as close as I could get it to whats in the picture.  For the light I took a .5mm (?) clear rod and matched it to the size of the nub. I left a little of the nub to act as a seat for the light.  How could I make it a light? what I did was take out a micro drill bit and drilled out a hole as close to center as I could. Inside it looked a little rough, so having just Futured my canopy, I dipped the light into Future and it got rid of all the drill marks. :)   Images showed both a red light and a yellow light.  I took some Vallejo transparent red and a tiny brush and put some red into the hole. I'll install this after the painting and weathering is complete.

Enough for one day. More soon. Thanks for looking. 
 

Thursday, August 16, 2018

AT-99 Scorpion part 2

Work moves slowly with this kit. So slowly that I'm just taking pics at the end of a session to record what was done. This entry is the result of 3 sessions.

In this session I cut off what was a pour plug on the tail. Becasue the kit is rough, I don't want to cut off anything that should remain.  Next was to clean the horizontal tail plane and then the two vertical stabilizers.  what I also did was to again take out the rivet maker for 1/72 and drew rivets all over.


The next day I was back and the next step was to add the forward winglets to the front of the craft. On it are two gatling guns. The flash etc... for the winglets were bad. But looking at the guns, one of them had the mold slip and left a step. Repairing the barrels were just too difficult so I cut them off and added new barrels out of 1.2mm styrene rods. 

After cleaning them up, they looked rather weak so I decided that I would add them later to the craft to avoid them being constantly knocked off.

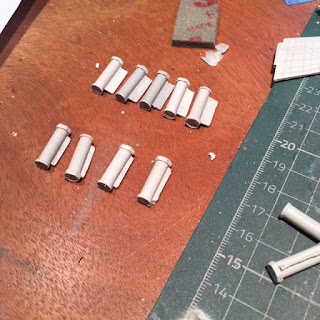
For day 3 I turned to the large wings and also the rocket canisters. There are two different kinds. One set with a long "handle", and one with short ones. I should have 6 long ones, and 4 short. But no matter how I counted, I was one short of the long and one extra on the short. They were so badly cast, that there may have been a long one where and thought it short and cut what I thought was the pour plug ...

But first the wings seemed fairly easy to clean up. After the cleanup I decided to add the rivets. I rolled along nicely until PLOP! I fell in a hole. It was a bubble just under the surface. OK, I'll have to fix that. Then a few minutes later - PLOP again. Another hole! 
I hold the piece up to the light, and there were 3 of them. One, luckily I missed. The other two got the Aves treatment. 


Now came the canisters. Most of them were bad.

The rest of the session was taken up by cleaning these canisters.  Even more time was spent drilling the small holes at the back of the canisters. There's nothing I can do about the little nubs in the front. 
More coming soon. Thanks for looking.


Sunday, August 12, 2018

Avatar's AT-99 Scorpion

These helicopters drew my attention right away while watching Avatar. There was two types, the Scorpion and the Samson.   The Scorpion is shown below. The Samson has a V shaped rear stabilizer.

Fantastic Plastic really got into the movie and produced a number of kits based on the movie. I wanted the one Trudi flew for a vignette, but picked the wrong one. No matter the vignette will continue without Trudi.

At a recent meeting of the BPMS, one of the guys there said that he had this model and it was so difficult that it stopped him dead.  Having the same model, I was interested in seeing what was going on with this kit, so I took it out of the stash. 
 Upon opening it I saw immediately what he was talking about. What a mess! There is flash everywhere - not including the flash that keeps small parts together, which I think is good. But the other stuff. Every part id going to need attention.  Then there are these big blobs where the mold had previously been ripped away, so the next pour fills these voids with resin. One such piece is shown - 
Even the flat pieces have this odd wrinkled look to them - 
This was really disappointing. But having gotten in to garage kits in the mid 90's I am familiar with kits that were basically lumps of resin. Starting with the hull, which had that odd wrinkles what should be smooth parts  there was a lot of shaving, dremeling, and sanding to be done. Then some of the panel lines were incomplete, and bubbles in some of the smaller protuberances.  Additionally of of the boxy pieces that were molded on to the hull were very soft or misshapen. I cut them off and will replace them later on.   This caster, MMI, has some nerve giving these parts to FP as "professional" work. 

After four hours of work I had 4 parts together - 
More soon. Stay tuned.

The Phantom of the Opera

Yet another kit that has been sitting, waiting for paint for a while now.  It's Lon Chaney Sr., as the Phantom of the Opera.  This is a four part kit - the bust and 3 pieces for the base. Silent Screen Icons also included sheets of miniature music to add to the base. 

Diving right in, things start with some research and I found that Lon Chaney Sr. had both brown hair and eyes.  The painting starts. I wanted a monstrous "I live in the sewers" look So I started out with a pale greenish color - 

 Then to make him human, a little flesh color - 

He needed a little more "something", so I added some veins, and then a pale color on top. I also darken around the eyes, and added beige to his teeth - 

 Taking a break from the figure, I put together the walls of the base, and added a sepia wash to the edges of the sheet music - 

All that was left to do was paint his jacket/cape black with a purple wash in the recesses, ivory on his shirt, three shades of re on his tie, and a little gold on his cuff links and cape. Thanks for looking.


The Pin Collection Grows

One of the staples of the convention goodie bag for the registered attendees is that you get a commemorative pin (except for one year where attends got a lanyard). 

Many guys have a wide lanyard to collect their pins, and others have a baseball hat.
What I did was to buy a map of the US, and use it to show off the collection. Anyways, here's the latest entry to the map - 


Saturday, August 11, 2018

A Report from Phoenix

As usual it was a great IPMS USA Nationals show from the Phoenix guys. The hotel was right across the street from the convention center which vastly expanded since the last time (this is my 3 trip to the Phoenix Nats).  To make things even more convenient, there was a train to the light rail, which drops you off less than a block from the hotel - all for less than $5.

There are images all over the 'Net, so you can look here for the gallery -

A copy of the award's Presentation is here - http://svsm.org/gallery/phoenix2018-awards

Going by the numbers, here are the preliminaries:
Contest Entrants: 424.
Models grand total: 3,523.
Models in competition: 2,723.

-Display 800 (including one CA member who had a collection of 700 armor vehicles).
-Jr 70.
-Aircraft 670.
-Military Vehicles 501.
-Ship 143.
-Dio 169.
-Misc 508.
-Auto 257.
-Space Sci-fi 168.
-Figures 237.


I brought two models. I had chose carefully, for fear that the baggage handlers and/or the TSA would damage the models en route. In the end I chose the Huygens lander (as it was to be featured in a seminar), and a one piece dinosaur vignette.  The Huygens didn't score an award, but Fine Scale Modeler photographed it. Maybe we'll see it in print. The dinosaur did snag a 2nd in category 800... Dinosaurs. That was my first Nationals win. ;)

I didn't attend any of the side trips (Pima, and Orbital). There was a lot of  good seminars, but trying to keep wifey happy at the same time, I did miss some that I wanted to see.
  • There was a good one of scratching building a McQuarrie style Y Wing.He covered building the internal support, and a bit on vac forming some parts.
  • Dem Brudders did a cool (and typically humorous) seminar on transporting and displaying your Models. It got me mad (not really) in that some of their techniques were so simple by using cardboard and some foam.
  • There was another seminar show and telling ways of keeping track of your models. From Excel thru Access, he ended up at a software specifically designed for models from Suisoft. This one is pretty comprehensive and includes the ability to add images. I need some tracking ability, so I have to decide to just use Excel or go for the $44 and get Suisoft ...
  • Last but not least, I was part of the Real Space Modelers seminar. I talked about building my Huygens Lander and my partner Rob Schorry. talked about 3D printing parts for real space models. At the end of the talk Rob announced a new kit by Real Space Models (designs by him) of the first US satellites - Explorer 1 and Vanguard in 1/24 scale. They are tiny, but in scale with the rest of what's generally accepted scale for unmanned satellites. The Real Space Modelers seminar also acts as a reunion for the members of the Yahoo group of the same name.
The Vendor room looked a little sparse until it was pointed out that the aisles were extra wide. I read somewhere (prolly on the IPMS USA site) that all the vendors went home happy. It is also a good time to meet up with some old friends.  I did get to meet up with a fellow I meet on SSM, whose alias is AZRhino. Mike had his own little venture now, Rhino's Tools and Models. I got a very nice Ma.K kit from him. His tables also hosted Andy from Andy's Hobby HQ, (You Tube channel and store in Glendale, AZ). A double strike out there, in that I missed the meet and greet, AND visiting his store. He builds mostly armor, but he's entertaining to watch. Look him up.
As usual, Rare Plane Detective was there and amongst his stash for sale was a number of Anigrand, and Fantastic Plastic kits. RPD sells collections and other kits gotten from estates etc... I looked and waited, and of course missed a few Anigrand kits I wanted. But I did manage to snag FP's Caprica's Viper.

The extra curricular around Phoenix was that I did get to see my first haboob. On top of the Hyatt Regency is a restaurant that revolves slowly to give diners a view of the city. At one point *everyone's* emergency alert on their phones went off at the same time declaring a haboob was coming. We revolved into the right spot to catch it coming up from the south -  


There were plenty of places to eat within a few blocks of the hotel, including 4 places in the hotel and 2 in the convention hall. While I didn't get to Alice Cooperstown, I did hit the Hard Rock ...
Was a nice time, and I can't wait for Chattanooga next year.