Showing posts with label Cryptid. Show all posts

Sunday, November 16, 2025

The Mothman

 In a rather surprise move IMHO a manufacturer has come up with a cryptid scale model.  Earlier this year, Pegasus Models has released the Mothman.

It was the year 1966 when a strange creature surfaced in the small town of Point Pleasant, West Virginia. This creature was described as being at least 7 feet tall, with a humanoid body and a wingspan at least 10 feet in length. Its distinguishing feature? Two red glowing eyes that terrified anyone who saw them. For the next year, this strange moth-like creature continued to terrorize the residents of Point Pleasant. Thus, the legend of the Mothman was born.

Though many people are divided on the nature of the Mothman, it has been noted that the creature has never harmed a human being during its encounters. This has caused many believers to think that the Mothman means no harm, but instead tries to warn people of impending danger with its presence. This was later evidenced further with the collapse of the Silver Bridge, as many witnesses claimed to see the Mothman on the bridge just before it fell.

The kit is in1/8th scale and comes in a number of gray plastic sprues. 


Hehe, typical of a short production (?). Attachment points on one side, nothing on the other...


Easy attaching the parts after removing the sprue remnants.


While the parts are drying I turned my attention to the base. Got carried away, and almost completed it... ended up doing a two tone for the lettering, and Spaz Stix super gloss for the water.


Had the idea for painting the wing elements as a sort of metallic color. added silver has the base. 

The eyewitness descriptions have the monster a dark (black) color and that was my intention. We'll see... 


The first layer is V's Gunmetal blue which is a metallic, and I couldn't located by lil collection of Scale 75 metallic colors, so I just added V's Transparent Red to the wing 'eyes.'


Sticking with my ideas of having the creature black U thought a blue for the highlights could convey an idea of you're seeing this guy at night. But that didn't work IMHO. 


There's too much of a difference between the blue creature and the basically brown base. I could have redone the base to make it look darker (bluer), but I wasn't about to restart the whole thing over. The easiest thing would be to paint over the body with black and then highlight in a brown to tie both parts together - which is what I did, and with that I was done. Thanks for looking.




Friday, November 3, 2023

Jersey Devil Finale

 This post is a long time in coming. Not because I haven't been doing anything - just getting off the duff and taking pics.

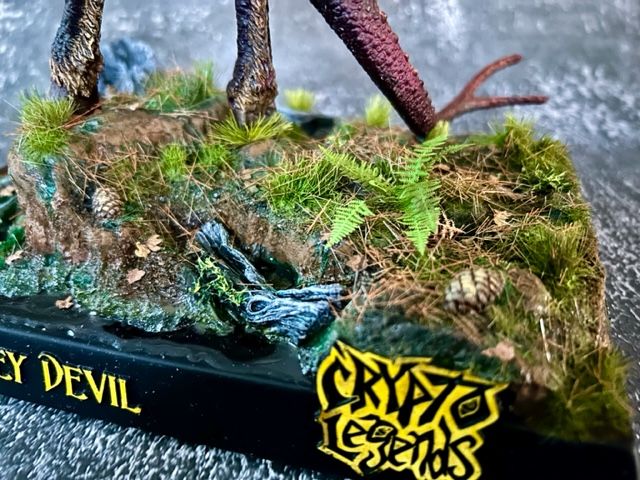
To finish up the wings were epoxied on. Also I noticed that when I put the "pine needles" on I cut them from a disposable paint brush. The brush looked straw color until cut into pieces. Then they looked transparent. Being glued in already, I had to paint each pine needle individually... Ugh! 


 A few things to tidy up and I was done. One thing I did with the base was to paint it all black, and then with an Xacto knife, scrape the paint off the letters. Only took a few minutes. Then the white underneath looked too bare, I got V's yellow ink and colored in the letters. Again only took a few minutes. 

Thanks for looking. 


Friday, September 1, 2023

The Jersey Devil part 2

 Sometimes the figure comes first, sometimes the base. This time it's the base's turn. I added some real dirt, and then attempted to use the static grass applicator to put some patchy grass down. No good. Plugged in and there's no power. I'll have to get a 9 volt and try that. serves me right for buying a cheap one...  


Thankfully I have some pre-done tufts and those worked well. Once dried, I painted all the grass RLM 74 - a dark brown green. Lighter greens will be added  over the top, and the RLM adds a nice shadow effect. Also added were some leaves cut from a real leaf ( they're a bit too small) and some flocking to mimic moss. Finally I added some cut paint brush bristles to make fallen pine needles. They look a bit too translucent - I should have painted them first. :-/  The last step for the base will be to add some realistic water for the swamp portion.


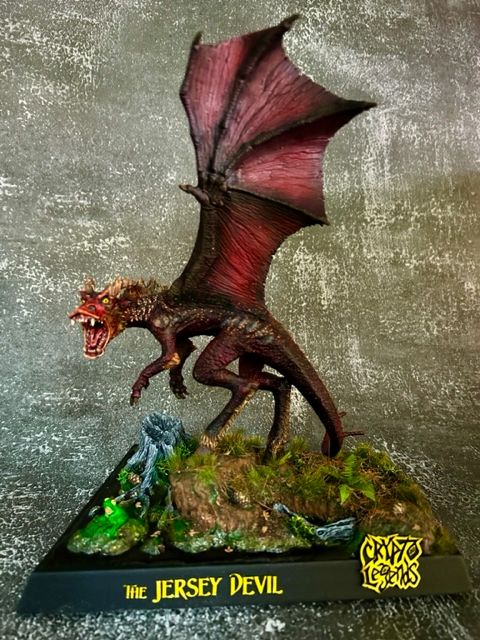
Moving on to the figure and I have it stuck in my head that Devil = Red. So my original idea is a red into a purple color shift. Images have it more or less a horse shape, and many just leave it a brown color. So my idea will probably morph by the time I'm done. But I tried out my Red Purple, including the wings. Check back for the finale. 


Sunday, August 27, 2023

The Jersey Devil

 This kit has been in my stash for a long time. After first seeing it, I had to have it, but once a copy was mine I didn't think I could do it justice, and put it in my pile. The mark on the kit says 2013.  While I consider myself a pretty good novice, I thought I would give it a try.  And the timing was right as my model club (the BPMS), was asking for a kit I would build as part of my pledge. This is where you pledge a model to build in January and by October, you have it finished. 

Back to the kit. This is another from John Dennett's Crypto Legends series. As mentioned the sculpt is outstanding. I don't think anyone has measured the JD, so I have no idea of the scale of the kit. It comes in 10 pieces and a base, made from very clear cream color resin. Here and there you see a hint of a seam line, but a minute or two of scraping and it was gone. 


 With all the parts I figured despite it having tabs, I would pin all the parts. Here's where I ran into something odd. As I drilled into the part it looked like the dust coming out of the hole looked "wet." But when I wiped the drill bit I didn't feel it was wet. Odd.  But something was going on as I was most of the way pinning and gluing the parts the minute epoxy stopped working.  I had heard of stories years ago of kit weeping after they were cure. This was uncured resin coming thru. This situation it didn't come thru until I drilled into it.  switching to regular CA glue solved the problem.


It was time to start priming and thinking of a color scheme...  I drive along side the Pine Barrens on my way to Cape May, so I know whats down there. The sculpt hsd the JD on the edge of a swampy area, so the base is figured out for me. 

Check back for the color scheme of the JD, and thanks for looking. 


Thursday, June 29, 2023

The Chupacabra

 This was a little one piece kit that I picked up from Dellamorte on Etsy some time ago. How he does it is I assume sculpts and casts the figures, gives it a primer and then drybrushes one color onto the details. This guy was painted green for the longest. I thought it was time for a change. 


 His base was a little small so I glued it to a larger wooden oval base and added additional "dirt" and other bits over some watered down PVA. 


 I then added a triad of primers to highlight what I wanted - 


 From there I had no idea what I wanted to do with him. Looking online at some art so hopefully get some ideas from other artists, I found that most of them had their beasts look like black dogs with red eyes. I needed something else.

From there I thought that animals they were finding in real life looked like coyotes with mange. So that was my first go. I would make him hairy in spots and bare skin in others.  I got out my static grass applicator and after putting down some PVA in a hit or miss pattern, I went to town with some 2mm static grass. 


 Now for color. I had his original green color stuck in my head so Looking at the color wheel I decided on blue and green. Other colors would add tiny dots of color. 

I painted up the ground work as usual, and then painted the remnants of it's goat dinner and I was done. Thanks for looking. 


Wednesday, March 10, 2021

Mothman

 This is another kit that was deep in the pile. My favorite Cryptid, Mothman! I'm surprised I waited this long to build it up. 

I picked this up from Jean StJean Studios. It came in 5 parts of gray resin. There were very few noticeable seam lines, and clean up was very quick. 


 Now, the typical description of the monster is a black being with wings, and bright red eyes.

But being that a lot of nice detail was sculpted into the wings, I couldn't just leave the entire thing black. The wings had "eyespots" on the inner and outer wing, so I mimicked the eyes with some of V's Black Red. Toward the top of the "eye" I lightened the red a bit. 


Then there was this crosshatching along both sides of the wings. I gave that some light gray on the outside and a darker gray on the inside. 


From there the body was painted in V's Black Gray, and then highlighted with some Medium Dark gray. The creases got a was of Nuln Oil. But then I didn't want it to be too monotone, and gave the whole thing a misting a Army Painter's Blue tone with the airbrush.

The eyes were painted gloss black, in prep for V's White Aluminum, and then some Transparent Red.

The base is rubble with the creature perched on some of the iron bridge remnants. I have the rubble a few browns and blacks, and the iron was painted steel, with a few different rust colors. I then added dots here and there of the Molotow Chrome for sparkle.  I looked up and found an image for the newspaper for the day the Silver Bridge collapsed. As soon as I get more ink for my printer, :P  I'll print that out an add it to the rubble. 

Thanks for looking.