Saturday, April 16, 2022

Trying Army Painter's Speed Paint

I first saw this product on FB a few months ago. I guessing it is their answer to Citadel's Contrast Paints.  Speed Paint seems to be in between regular acrylic paint and washes. Being thicker than a wash the paint will tint a painting area, while at the same time being thin enough, it will gather into the recesses creating some shadows. The whole trick is to using the speed paint over a matte white primer or some other light color. It was even tried over a light metallic with some interesting positive results. 


When finally released it came as two choices, the Starter pack Comes with 10 paints in dropper bottles, which included a stainless steel mixing ball in the bottle. AP also includes a paint brush. They create their own names for their brushes, so there is no number but to me it looks like a slightly stubby No. 2 brush. But this is what you need. The Speed Paint needs to go on fairly thick.


Alternatively you can get the Mega-pack which contains 23 paints (plus Speed Paint Medium). This set gives you a few choices of red, green, blue and brown, rather than just one choice with the starter set.  It also comes with the same No. 2 brush and mixing ball. I got the Mega set through Amazon, and that seller included a small container of AP foliage - lichen of 3 different colors.  All of this for $99. A bit more expensive than buying regular paint, but it's supposed to take care of 3 different paints - base coat, highlight and shadow.


Picking out my figure, I didn't want to waste the paint (or my time if things went bad) by painting a large figure. So a 32mm figure was the victim. 


I missed the first recommendation that the paints should go on a hard palette and not a wet palette. The reason is to keep the paint from soaking thru the paper into the sponge. But as I use parchment paper, and had no bleed thru. 

I wasn't really concerned with historical accuracy of the Viking. I just wanted to see how many colors I could use and what they looked like. 


I decided to put out one color at a time, and came up with my first Con: I was surprised how most all colors directly out of the bottle is VERY dark. It was hard to tell whether that puddle was brown blue or green. This is where the hard palette or a type with little wells pays off. 


All the colors did what they said they were going to do -kept the highlights bright while darkening the shadows. Any excess puddles can be reabsorbed with the paintbrush. If I put a paint down and didn't like the color, I flooded the area with water and wiped the still wet paint away. I dried the area and then put down the new color.


The 2nd Con occurred when I didn't allow the first coat to fully dry. It is in the how-to that the new coat will reactivate the first one and you will get a mess. You will see this on the front of my Viking. Each paint bottle has a triad shield on it. That's not a design but indicates how dark multiple layer will look.


You can really see how well the base/ highlight/shadows work on the wooden shield though. In the end, I got carried away and added a little silver here and there to the figure.Regular acrylic paint goes over a dried Speed Paint with no problem


I think this is a very good product; especially for the modelers who build armor, or aviation (any model with a figure) and don't really want to take the time to learn to paint figures. The only situation where this may not work out for someone is if the modeler is a real stickler for accuracy. The shad of blue you want may not be the shade of blue they have.  But if you think as long as it's close I'm good, then this is for you.  I'm guessing that if and when the line takes off, they will add more colors. But remember you can always add regular paint too.


Two thumbs up from me, and thanks for looking.


Tuesday, March 22, 2022

Z-95 Finale

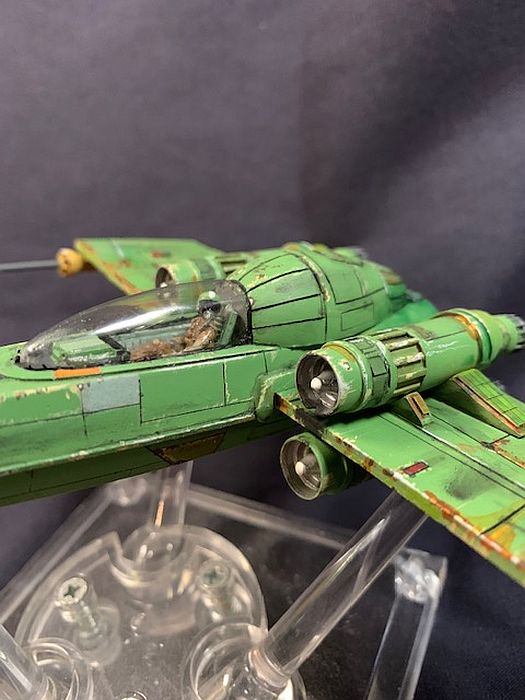
 This final session had me completing the weathering al la Night Shift style, putting the pilot in the seat and securing the canopy. Once again the pilot sat too tall, so I sat him on a coarse sanding sponge and got rid of most of his butt. 

The canopy went on pretty easy with the ledge around the area to aim for.  I found some nondescript decals for the wings and as usual where something has to go wrong - one came off the paper stuck to the model and would not be moved. Rather than scraping it all off I just left it as is.  

The final duty was  to give it all a matte coat. One thing I saw on Jon Bius' channel was to add 'a kiss of tan" to the clear coat. I touched the brush to the Dark Sand dropper bottle and then swirled it in the matte coat in the a/b cup. It barely turned the clear coat a color, but as you can see in the pics it all softly evened out the different colors I used.  With that I was done. Thanks for looking. 


The pilot checking you out

Thursday, March 17, 2022

Z-95 part 2

 This shortened session I went over the parts to see if I was missing anything. The bubble hole in the nose bottom was puttied again, and after some ultra fine sanding, came out terrific.  So it was time to paint. 

When I looked at the decals, it was showing me that once again I was going to have a white ship with the maroon stripes. Uh, no, not this time. Reading the entry in Wookie-pedia I learned that a lot of unaffiliated groups were still using this outdated craft. So I hit Google images and scrolled thru many pages of Z-95s.The one that caught my eye was a green one from the Star Wars Legion game.  Figuring it was also right around St. Patrick's day, what a better choice for a color. I went into my paint rack and brought out a mid tone green from The Army Painter name Goblin Green. Ahh, an added bonus. While I don't name my ships, this one can be part of the Goblin Squadron! ;) 

Another thing I had to think about was what was I going to do about that wide open cockpit? The only answer was a pilot. So I dug into my Pilot and Ground Crew set, and painted one up. While he doesn't look exactly Star Wars, sitting in a Z-95 he can be. 

Tan suit and green helmet. Nice and easy

I thought I would finish it today, but that didn't happen. Check back next session for the finale. Thanks for looking.


Tuesday, March 15, 2022

Z-95 Headhunter

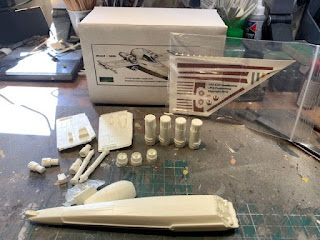
 Another deep dive into my stash brings out JPG Models Z-95 Headhunter. Produced in 1:72 scale in almost 2 dozen parts of white resin and a clear vac canopy. The date on the box is 2010 - - WOW!   Giving the parts a good look, this appears to be another quick build model.


The Z-95 from the website was: 

 An outdated series of starfighter, the Z-95's endurance, adaptability, and large numbers has led to its continued use long after its initial production run had ceased. A multi-purpose starfighter, the Z-95 has spawned countless variants, with individual forces, government, squadrons and owners adding and adapting componentry and systems.

Developed in a cooperative venture between Incom Industries (now the Incom Corporation) and the now-defunct Subpro Corporation, the Z-95 is largely recognized as the premiere starfighter of its era, and the forerunner of the incredibly successful X-wing starfighter.

Most of the kit is perfect, but I have on little ding in one engine, and a different engine part looks like it got gouged some how. No worries I filled the gouged area with Tamiya putty and then when dry, sanded away. 

I had to think a little bit about the guns. It seems I just had to butt joint glue the tips to the mid part and then into the rear. Having those ting butt joints seemed like I was asking for trouble. So in my stash of styrene was a wire rod coated in styrene. Stripping the styrene off part of it it was small enough on one end to fit into the tip and fit equallt well with the styrene part into the rear. 

The was a small hole in the very front of the fuselage(on the bottom). So that also got some putty. While that was drying I glued the dash in place as well as the generator housing behind the cockpit. Toward the end of the session I gave it all a shot of primer, and will give it a once over. But that's for next time. Thanks for looking.


Sunday, March 13, 2022

The Baby Sarlacc

 Always looking for the strange and unusual, I found this model on Etsy from Ravendark Creations. Its a baby Sarlacc. Of course this beast was made famous in the Return of the Jedi.Then later on when Boba is seen escaping it's gut in the tv series. 

There is 2 ways to get your own baby Sarlacc. You can buy just the model of the animal itself, or Ravendark will sell you a kit which includes a 5.5" clay pot, the model and some sand.To make things easy on myself I just ordered the kit. I never thought to take "before" pics. Sorry. It arrived pretty much all built for me with even the Sarlacc already painted. The teeth along the edges look especially well done. It seems that the pot is packed - (I didn't go digging) at least around the model with tin foil. So basically my only job was to pour in the sand around the edge. 

But that was too easy. I took some Vallejo earth Paste and filled in around the edge til it was almost even with the rim of the animal. When that was dry, I put down some matte Mod Podge, and started pouring in the sand. I piled it up here and there and to stick that down, I sprayed the whole thing with alcohol and then a 50/50 diluted glue. This sealed the sand down. Thanks for looking. 

Baby Sarlacc with a can for size comparison.


Monday, March 7, 2022

Astronaut Show

 This was so long ago I don't know when it was. Just remember it was at one of the hotel's by Giants Stadium, NJ.   I had to park them somewhere to use in forums.;)


Col. Aleixi Leonov


Dick Gordon, me, Al Bean Apollo 12

Bean and Gordon


Sunday, March 6, 2022

Project Vanguard Satellite

 Wow have times changed.  I don't remember what I did as a kid, but knowing what I know now about correct assembly, making seam lines vanish, smooth painting etc... this kit drove me crazy, and it fought me all the second half of the build. 

The biggest problem was that there are a lot of labels as decals, and oddly only every 4th or 5th decal didn't disintegrate, but broke into a few chunks. Some I was able to slide into place, others I just couldn't. The worst was the one where it said Meteorite something or other. That one disintegrated, and as can be seen was only left with "Met."  Each label only had one copy, so that was that. But luck enough the whole core assembly goes inside the sphere, and can barely be seen. 

Then there was my superglue. I super glued the core to the bottom of the clear dome, and the core did everything but stick. It left me with a couple of glue marks on the clear part - no fogging so that's a plus.  The worst of my decals was the large title "Project Vanguard." The "P" broke apart as did the "G" in Vanguard. Bad enough that I had to get paint to fill in the letters.  It was enough to take the wind out of my sails. While I had other things I wanted to do, including adding Faux wiring to the core, I just put the top cover on and called it a day.  

Here are two shots of the finished satellite. Thanks for looking