Sunday, June 23, 2019

Throw Down Thursday 6/22/19

This weeks throw down is "My prom date was a teenage bug monster"
Becasue of the title I sorta thought of a 1950s horror movie... Thanks for looking.


Friday, June 21, 2019

The Henschel P.75

Another model for the Luft '46 shelf. This plane was a 2 prop pusher plane.
 From the site - 


 This 1941 aircraft design was to be a possible successor to the Messerschmidt Bf 110 heavy fighter. Although of a unusual configuration for that time, there were advantages (and disadvantages) to its rear wing/forward canard construction.
  This basic design was realized in several WWII aircraft designs, notably the Kyushu J7W1 Shinden and Curtiss XP-55 Ascender . Although good results were obtained with a model in the wind tunnel, this design was not followed up.


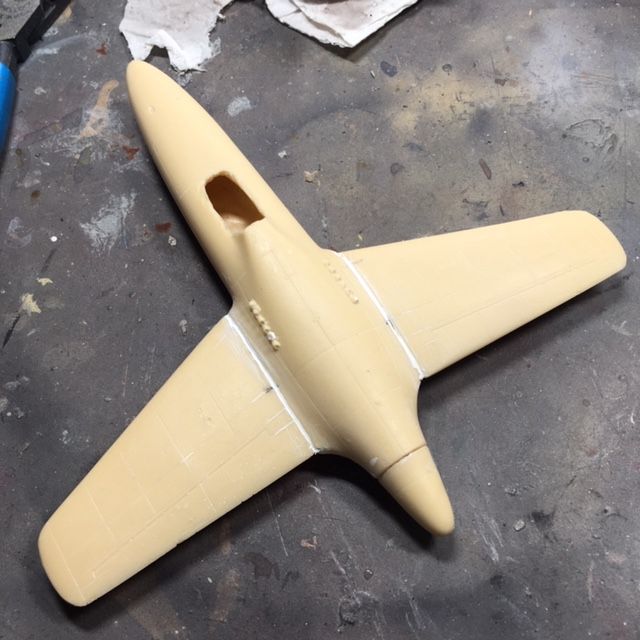
A typical Unicraft kit, it will make a nice model - with a lot of work.  After getting the fuselage halves together, and lining up the wings we see the wings are too long for where they fit on the fuselage.
At this point I noticed that the two curves of the fuselage were different (red arrows). There no way I'm going to take the time to fix that, so I just sanded the wings. 

Everything together, let the filling and sanding begin.

 At this point I was adding the vertical fin on the bottom of the plane. Looking at documentation it looked like there were two props on the plane - couldn't tell by looking at the box art. However the hub showed no spot for the 2 sets of props.  Looking it up, there was indeed two sets, so I had to create a cutout to indicate the 2 parts of the hub.

Looking, I couldn't find the parts for the  front winglets. Checking the image of the box, no winglets. I either lost them right away or the kit didn't come with it. Time to get out my sheet styrene and create my own. I used the full sized image on the instructions as a guide.

I couldn't delay it any longer. It was time to add the propellers. Looking at the kit parts... they are terrible. It looks like the sculptor made his own by laying down the form and then squirting filler into the form. This was no good and I'm not even going to waste time trying to sand them down to shape. By chose is to cannibalize a kit, or just create acetate disks, and pretend the plane is in flight.

In the meantime, I put down some primer over the craft. Thanks for looking. Check back for more.


Edna Mode

No Capes!!
In my effort to improve my sculpting skills, the next figure I chose to do was edna from the movie The Incredibles.  I guess having a kid late in like has me seeing all these cartoon movies that I ordinarily wouldn't have seen. And - - they are good.

Anyway, looking up Edna, the photo that was seen most was one of her flipping the hand -
except for the scales look on the sleeves, it looked pretty simple. At the time I was still using Super Sculpey  (the beige stuff). I decided to do the head separately from the body and once I got the armature done with wire and foil, I started in.
Next I was thinking about how to do the glasses - whether to make wire frames and then just coat in clay, or something else. In the end I saw a video where this sculptor, Ace of Clay, created a "Mad Scientist". In the video he used clear cabochons for the goggles for his scientist. I thought why not do the same. So I buy a pack of various size cabochons and made my glasses. I tried coating the edges with clay, but that didn't work out, so I decided I would make the frames with just paint.

When painting the paint would not stick to the slick surface of the cabochon, but Sharpie ink would. I applied that around and let it dry. THEN the paint would stick to that. The rest of it was just Dark Skin Tone for the flesh, with a little lighter highlight, and then black for the rest of her outfit. To creat a little variation I applied V. Black Gray for the stockings and as highlights for the dress.

The only thing left is to come up with an idea for a base.  Thanks for looking.


Sunday, June 16, 2019

Throw down Thurs for 6/6/19

This week's topic was "Little Troll in the Closet."  Thanks for Looking.


Tuesday, June 11, 2019

Caesar, rise of the Planet of the Apes

This kit is based on the new trilogy of the Planet of the Apes, and  it is an excellent story for how it all began.
This is a simple kit of two parts the bust and the base. It is expertly sculpted by Mark Van Tine and casted by Paul Gill.

It all starts with a black primer.


The base looks like it's brickwork covered in stucco, so that the way I went.


Thanks for looking.


Thursday, June 6, 2019

Zabavka Workshop's Medusa

This project has been an on again, off again on the desk for a while now. The kit comes from Zabravka Workshop. It comes in 6 parts. Looking around for a link to share, I can find none. (?)  So I have no idea how to find them again... sorry. EDIT - I found the link by doing an image search. It's https://zabavkaworkshop.com/Medusa-Gorgon

https://zabavkaworkshop.com/Medusa-Gorgon

The parts are very nicely done in gray resin, and shows little signs of seam lines or flash. 
Ignore the little Medusa to the left. ;)
 A closeup of the base show a sandy base that reminds me of the volcanic sand that is actually tiny rocks. There are also a number of rocks added to the base which further expresses that volcanic feel. 

There are two spots for added parts - one is an assumed stone hand holding a spear, and the other being a torso of a stone Hoplite (?) holding a broken sword. I used the V. Metallics steel for the armor, and red to add color.
Later on I would add some rust to make it seems like he's been there for quite a while.

I decided on this Medusa to give her a regular skin color and natural tail colors. The chest and hip armor was painted gloss black in prep for the V. Brass, and the bow is V's Gold.  To add a little snake to her face I gave her the slit pupils in the eyes.


The weak point of the kit was the arrow. I was about to replace the shaft with something a bit more sturdy, but then realized I could lean the arrow into the bow and with a dot of glue at the point. This will straighten the shaft. 

Here she is with my ever present can of soda to give a size comparison.  I added the diamonds that are seen on some constrictor snakes, and that completed the figure painting.
As mentioned I added a few different rust colors from V's Rust Set to the armor of the soldier and spear.  The base was painted in a Black Gray, and then washed with Citadel's Nuln Oil.  When that was dry I added 2 highlight dry brushings of a medium and light gray.  With that I was done.
Thanks for looking.