Tuesday, September 27, 2022

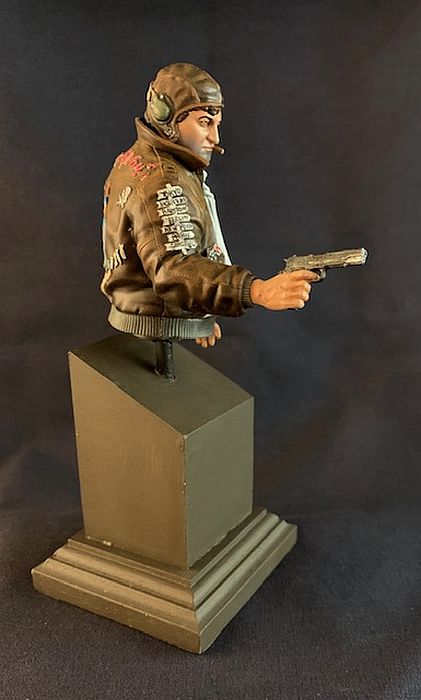
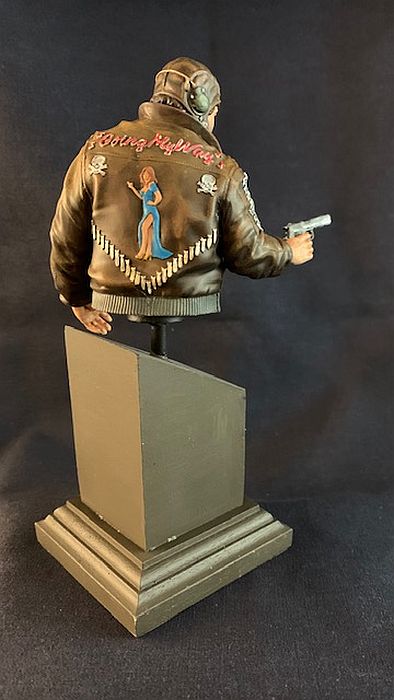
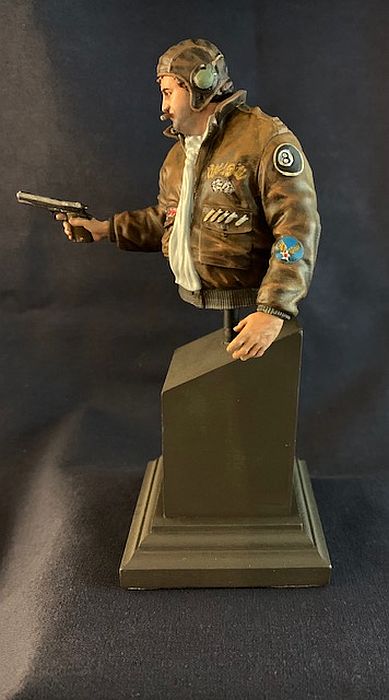
Wild Bill Kelso - 1941

 It was a few BPMS meetings ago that a fellow figure modeler handed me Wild Bill. Thanks, Joe!  This is a 75mm miniature bust from Dolman Miniatures. Apparently sculpted on the computer, and the details are crazy! The kit is flawless resin body (tho if you really look, there are remnants of grow lines) and the hands are pewter. The base is resin from my stash. I don't seem to have an out of the box pic. Sorry. 

Looking at a few screen grabs, he's wearing a worn, brown leather jacket, and a white-ish scarf-


An unreal level of detail!


We all know what John Belushi looked like, but I needed a portrait to make sure I get as many details as I can. 


Having rather light color skin and a scruffy 5 o'clock shadow, that will help  the look. The shadow was done with the "poor man's airbrush" - pastels. For what reasons a dark blue works best for stubble beard. The flight cap looked like a combination of leather and fabric.

There was no real screen grabs of Belushi's jacket. There are patches all over the place. The best place to go for this is the model's page on the Dolman site.


The hardest patch is the one down his arm that point out the various cities. Because (I guess) it was designed on the computer, the artist was able to write the names of the cities in. But what I learned the letters were very shallow and I couldn't get  the dark paint to sit in the letters and survive adding the white over the top.  My choice was to use a .05 pen. Even with that I think the pen was larger than the letters. Oh well, I did the best I could. 

The idea was to paint the base a WW2 Olive Drab color, and then use a printout of the movie poster. In my rush to get finished - this was on my desk for a looong time - I took the final pics without the name plate. :P  Thanks for looking. 
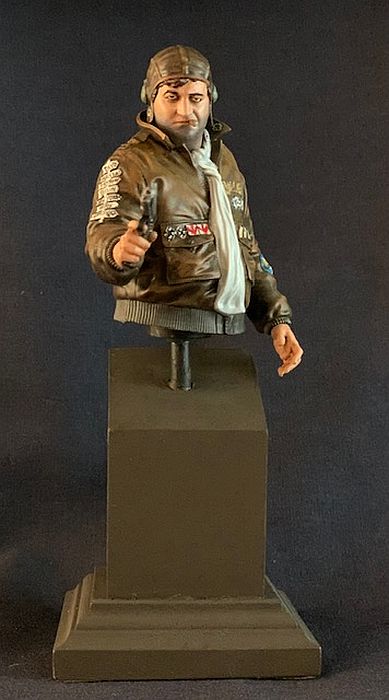

Writing in the city names was the most difficult part!


And for the sake of size comparison, here it is with a US Quarter. 


Monday, September 12, 2022

Jabba the Hutt

 Bo-shoo-dah.  This time around we have another Gillman kit, that is Jabba the Hutt. It comes in 10 parts of gray resin - the bust, base, 4 gargoyle heads, and the 4 gargoyle rings. Don't remember why I didn't take a pic of the base, but you'll see it soon enuff.


 The closest primer color I had to the figure was a tan, so I gave it a covering. Then testing out what green I wanted, I tried out V's Black Green.

While that was drying I decided to do the gargoyle heads in a bronze color. They were never the center of attention, and I figured it would give the base a little color. Still not seen - the base was just painted gray and washed with dark colors.


For my 2nd session, there wasn't very many pics of Jabba (the puppet, not the CGI figure) from different good light angles, so my best guess from what I could see were oranges and tans (beside the green). The original green I used fit in well, but I didn't carry it as far up as I should have.  No matter, this is the benefit of me never mixing colors. ;)  Doing it all with the airbrush, made things go very quickly. 


For my final session, I just needed to neaten things up, do the eyes, glue the rings in the gargoyle mouths, and then since the gargoyle heads stick out from the base, I epoxied them in. I also added some Citadel Nihilakh Oxide to simulate some verdigris color.  Even tho it's the desert I picture that room like a wet musty cellar :P

With that, I was done. Thanks for looking. 


Friday, September 9, 2022

The Big Muddy Monster

 You just can't slow down Paul Gill and Co. Here's another of their kits (sculpted by Mark Van Tine). This time it's the Big Muddy Monster.  I have to admit I didn't know much about this guy. But because I collect Sasquatches, amongst other things, I had to pick him up. 

An easy one this time - only 2 parts  - the bust/base and the hand - of well cast resin. 


 Not finding a lot of pics for this guy, I stuck to my tried and true trio of browns. A gray for the tree trunk, and the the color will be from the green vines. Oh yeah there's a yellow lizard in the back too. ;) 


 I decided to carry the green onto the sign, and then to tie the whole thing together added a little swampy algae green wash to the fur.. With that I was done. Thanks for looking. 


Look in to my eye...


Monday, September 5, 2022

Black Krrsantan

 This was a new figure in the Star Wars story for me. Black Krrsantan (nicknamed Santy) was a Wookie bounty hunter first seen in Darth Vader 1 comic in 2015. The  IMHO ill fated Boba Fett mini series on Disney+, he was paid to get Fett...


This kit, from Gillman Productions, is a 4 piece 1/4 scale bust.  A very clean kit, it had only the slightest mold line thru the head hair - twenty minutes and that was cleaned up. 


The screen grab above is the image I used as reference. But it amazed me that the vast majority of the images were from the comics. I remembered that his pauldrons were a steel/silver color, but all of the comics images had him with gold/bronze color. So if you want to be different and do the comic Santy, the pauldrons is a way to make the difference. I stuck to Vallejo's Steel for mine. 


Eeven tho Santy is just black with gray streaks , I couldn't just leave the straight black. So here and there I mixed in a dark brown to make things a little more interesting. I didn't realized while watching the show, but on the kit his two scars were prominent. I painted them a tan color - WAY to bright. With a number of washes I was able to tone it down. The belt was a simple 3 colors, and I also toned that down with some Citadel Nuln Oil. 

The base was last and it was supposed to represent a bldg. in Mos Espa (?)  Here tans filled in the space. Some metal colors for the machinery on the side completed the project. Thanks for looking. 


Saturday, August 6, 2022

Vladislav as a Cat in Clay

 Ever since the Sculpting Patreon group I was part of dissolved, I had a hard time coming up with ideas for something to do. So I ended up doing nothing. Until "What We Do" showed up on a cable channel.

One of the lesser known movies that I really like to watch over and over is the mock-umentary What We Do In The Shadows. It is the inspiration for the TV series of the same name. 

In the movie however, a film crew follows 4 vampires in New Zealand. The each have their various quirks, and one, Vladislav the Poker, played by Clement Jermaine.  Vlad was very good at transforming, until his difficult breakup with his girlfriend- The Beast.   From then on he could still transform but now he "couldn't get the faces right."  

The camera switches away to show Vlad as a cat but with a human face. 

This had to be brightened a lot to see what was gong on. 


 Now I knew what I wanted to do. While I'm not good at likenesses (and prolly never will be) how badly could I mess this up?  So I got to work and ended up with my version of Vlad Cat. I was thinking about casting a few before painting so he's still Sculpy gray.  Thanks for looking. 


Rebel Finale

Click HERE for part 2.


For the glaze for the face, I used a Thinner Medium by Vallejo. It's basically the paint "carrier" without any pigment. With water you get dilute it down to where the pigments separate out. With this medium, you can go a lot thinner than with water. I thought I had a pic of it but no. 

Moving on I added a number of red highlights for the jacket. One the back I decided to use a b&W blend for the lettering on top of a black background.  Early on I added some Rustoleum Chrome for the switch blade. It was now when I added black to the handle, dotting it with silver. I also added silver to the jackets zipper.  With that I was done. Thanks for looking. 


Rebel part 2

Click HERE for part 1.  

Whew, still a struggle to get up into the studio. On top of that, the new AC isn't as effect as my old one. Despite it being on nearly all the time, some days it's just too hot to stay up there.  My next place will be better suited for year round model building.

Anyway, the first thing was to get to James' face and I filled in the basics. Having filled the face in an adding a little shading. I didn't like it.  


 I remember back to watching all those Rafael Robledo Jr. videos  where he speckled a number of colors on his faces before hitting it with the flesh. Now he used a Filbert brush to throw the speckles. He was able to get really tiny ones. I couldn't get them small enough. I realized that if I dropped the air pressure of the a/b to nearly zero, I could get speckles. So I speckled away, with a little Silly Putty to preserve the dark hair. 


 The with a little flesh color I got the uneven skin look I was after. I've also been watching a ton of videos where glazes is used instead of washes, but that'll be for next time.  


 Thanks for looking.