Tuesday, December 6, 2016

New Horizons (part 1)

This is a relatively new kit from Real Space Models, and depicts the craft that just had it's flyby of Pluto. 
Looking over the parts they are for the most part pretty good. A few bubbles here and there, but nothing to worry about. A little Vallejo Plastic Putty and they were gone. I didn't count the parts but each experiment was it's own part (SWAP and Ralph had 2). The HGA was the main dish, a medium gain antenna. 3 wire supports,  and then the lo gain antenna on the end of 3 more wires were all separate. Then there's the bus. The only little negative I would say would be the pour plus were pretty thick in comparison to the part. The "wings" of SWAP took me nearly an hour to get off the pour plug with breaking it.   

I also picked up a detail kit from Shapeways which included PEPPSI, The HGA receiver, the RTG, and Lo gain antenna.  All of these were more detailed than the kit parts. But the lo gain antenna came with the supports attached. One of them was bent, and I knew sooner or later I would break that off. Took a few sessions but I did. 
But here we start off with the parts - 
This is a pic of me with my hobby saw taking off one of the pour plugs -
Taking my time I got all the parts cleaned and they look great -
(L to R) Alice, Cap for LORRI, LORRI, wings of SWAP, and PEPPSI
The next step was priming all the parts - 
I didn't take a pic, but since 99% of the craft is covered in gold foil, I painted all the parts a bright yellow. This is in case the foil rips. You won't be able to see a rip easily as you would, if I left the parts the gray primer.
After doing my 1:5 scale New Horizons I remembered foiling all the parts, especially the small ones, takes its toll.  I did the bus first, so when I got tired of foiling I could start applying the parts to the vehicle. 
Here we have the louvers and LORRI applied as well as the Student Dust Counter - 
LORRI was my first slow down. The LORRI instrument is approx an inch long. but the socket for it in the bus was only 1/4 inch.  Rather than drill out the bus and possibly ruin the foil, I chopped off the LORRI tube. After that I filled the bottom of it with Aves and painted it black. My plan is to put a few drops of clear resin in it the recreate a lens. Since the cap to LORRI is just butt jointed to the tube, this will go on at the very end.

I wrapped Alice and the edges of Ralph as well as the low gain antenna (very tough), so I turned my attention to the Star Tracker. After its installation, the instruction calls for painting  the top center part white. Done. Check back again for the next and maybe final part.  Thanks for looking


Monday, December 5, 2016

Pterosaur On Nest

This model has been on my table seemingly forever. I picked up this kit during one of Shane Foulkes' "collection selling" sales. I have no info on it. I'm assuming that part of it was already started. The reeds in the background seem to have been glued in place. I'm guessing the 2 eggs may also have been previously installed.  So all that was left for me was to paint up the animal and base.
As with all resin kits, things start off with a soapy wash and a prime with Stynylrez black primer - 
 For whatever reason I always seem to start with the base first and while the reeds reminded me of a marshy area, the rest of the ground seemed to say otherwise, so things were painted up to be high and dry. There are a few moulded in Ginko leaves, but I raided the wife's spice rack, and added a little more texture to the ground work. I also too some basil and stuffed it in and around the eggs -

Now on to the animal. Whether it is a baby as has been suggested or the female looking out for the eggs, both seem to me would not be brightly colored to bring attention to itself. So I painting in mute colors, matching closely with the groundwork. Thanks for looking. 


Thursday, December 1, 2016

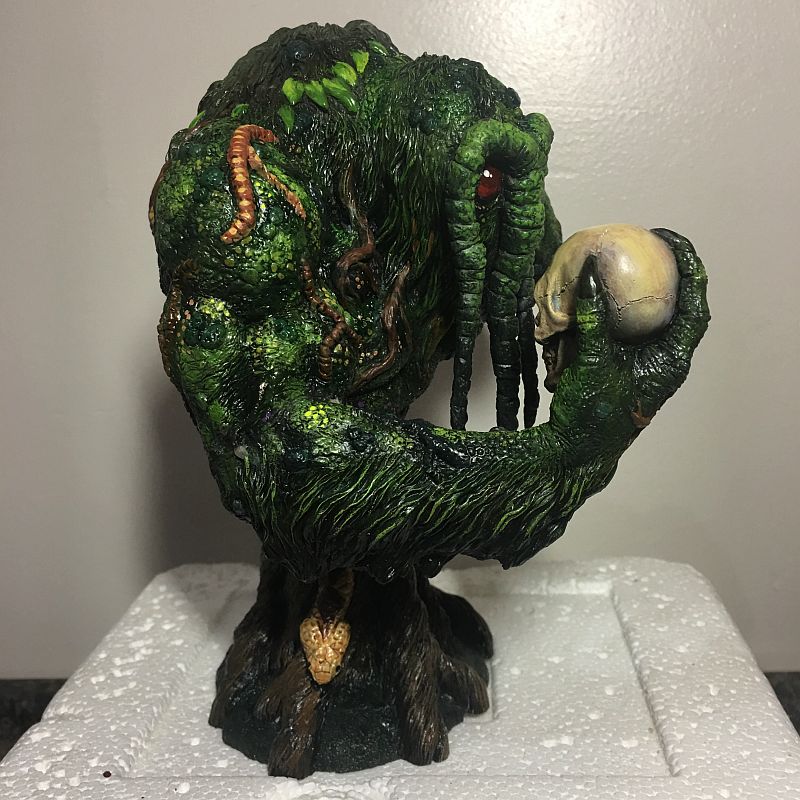
Gillman Productions' ManThing

Another kit from Gillman Productions, this time it's ManThing.  He's based on a Marvel Comics character from the early 70's and then was made into a live action movie in in 2005 that went direct to DVD and the Sci-Fi Channel.

Our ManThing comes in 4 basic parts - the body, the "tentacles around the eyes, the arm holding the skull and the tree base.  There are almost no seam lines, and only 1 or 2 bubbles that was in inconspicuous areas.
His arm as he contemplates a skull.

The join was tight, but just a little Aves to smooth things over.

A little practice making skin impressions with Aves.

More Aves sculpting practice on the nape of the neck.
I connected the body the the tree base, but left off the arm and tentacles for now. He's looking at the skull in the sculpt, and it comes quite close to his face. I didn't want to impede my painting so it was left off for now.  Then I got out numerous bottle of my Vallejo green paints.
Tree trunks are usually gray so I base coated the trunk in black and then dry brush some gray onto the bark. A final wash of a brown joined the colors together. In the back the skull was already base coated in V's Iraqi Sand, and then washed in the same brown.

 A Howard the Duck skull makes a cameo in the back of the base...

His eyes are supposed to be red, so I hit it with some tan first.  After, the eyes were coated with 3 colors of red - Citadel's Khorne Red, Mephiston Red, and then Evil Sun Scarlet. I painted to be jewel like, and added two white highlight dots in each eye.
Individual leaves,  twigs worms, and a snake was added with additional colors. The muscles were highlighted with various other shades of green.  Since he lives in the swamp I coated it in a Satin clear coat to finish it up.  Thanks for looking.


Sunday, November 27, 2016

New Aquisitions

I've been bad this time around, and have a few more kits to add to the stash. First up is a sort of grail kit. I thought this was long out of production, but found that Cellar Cast still has it available. The kit is Dracula and Lucy from Coppola's film Dracula. Just looking at the box gave an indicationOf how terrific the kit will look - 

There are no directions but the kit comes with a number of color images to show you how it goes together. The parts are pretty self intuitive anyway, so the build should be no problem.
I didn't count them out but there are probably 10-12 parts. There are no bubbles, But the resin does have a slight odor to it (tho not 1/2 as bad as some of the SE Asia kits). The are very thin seam lines which should give me no troubles to get rid of. Here are the parts - 


Next up isn't a kit but  finished pieces from Toby Wayne Studios. I first found this guy on You Tube where he demonstrates his sculpting, painting and other hobby skills. He also has a SITE where you can buy a few of his pieces. Most of them are in the horror or gore genre. I picked up an magnetic alien head - needed for my studio's magnetic white board, and a little guy named Eddie. Also included was a pretty neat note from the sculptor complete with "blood spatter."  :)

Yes, I know Eddie looks like something else. :-P And I'm thinking of changing the color of the water to try and make it look - not so much like what it does. Haha
Next are supplies to finish my Krampus mini from HobbyLinc. It's styrene roof material as well as styrene clapboard siding. I also picked up a set of chimneys to complete the look. More on that coming soon - 
Finally, to add to my classic monster collection I picked up the Phantom of the Opera from Saul Alvarez on the Figures Group on Facebook.  Saul is just the producer, and Mark Van Tine was the sculptor. The kit, once purchased the kit came very quickly, in a well packed box. The kit is the bust (with an excellent likeness) and a few pieces for a wall base.

Looks like I'll have enough work to do to get me thru the winter ... until the next offering comes. ;) Haha   Thanks for looking.


Thursday, November 24, 2016

Fantastic Plastic's FDL-6

This time around I went back to one a NASA's mystery craft. From Fantastic Plastic's site:
The FDL-6C SOMV (Sub Orbital Maneuvering Vehicle) is one of several designs to emerge from the AFFDL (Air Force Flight Dynamics Laboratory) during the 1960’s. The FDL concepts developed to explore the characteristics of spacecraft during hypersonic re-entry.  The FDL-6 shape was one of the shapes explored by the Lockheed Corporation.

It is rumored that, in the 1970s, the shape was explored again and the vehicle was sized to 33 feet long  to fit in the cargo bay of the US Space Shuttle.  This would allow it to be launched from orbit for a return flight to the United States. Whether this actually ever happened or not is not known.  The vehicle was to have an all metal TPS (Thermal Protection System) consisting of overlapping Columbium (Niobium) and Hastelloy “shingles” as opposed to the more fragile ceramic tiles seen on the US Space Shuttle.  It would likely have needed some kind of active cooling for the leading edges and nose similar to that designed for the McDonnell FDL-7.
Having a 'time flies' moment, the kit was released in 2009, and is not currently in FPs catalog of available kits. But I would keep constant vigil of their Store, as retired kits are brought back for limited runs all the time.

The kit is 23 pieces expertly casted by BLAP Models. There was no resin odor, no bubbles, and the pour plugs were very easy to remove.
It looked like a super simple build until I read the part where I had to cut the canopy from the fuselage. Uh oh.  I took my time and was pleasantly surprised how it turned out. It was then that I noticed a separate canopy in the bag of parts! Doh, I thought I had to use the cut out part! I used a PE type super thin saw from Hasagawa (I think).
 And finally open - 
Since the canopy opening is super small I thought it would be a good time to practice hyper painting the cockpit area. After all if I screwed it up almost nothing will be seen.
In the end I think it turned out pretty good. It's a shame it won't be seen. 

Here we are where the craft is mostly complete and primed white. I should have mentioned that FP gives you 2 choices for the build. It can either be white in a NASA scheme, or black with a USAF scheme. As you see by the paint - I went for NASA.
Here's a view from the bottom. One thing to note is the build was going along very nicely and I was cleaning of of the small wheels. POP! It flew and was promptly eaten by the carpet monster. Despite tearing the area apart it's still missing. In the end I took a piece a styrene and fashioned another wheel.  The other thing you'll notice is that the front had wheels while the rear had skids.
With the white primer most of the painting was done. All I really had to do was paint the bottom and the edges along the top to be black. The thruster rockets were done with Vallejo Metallics Steel. As a little side bar, I think the Vallejo Metallics are every bit as good as Alclad, and the over the top vote for me is that they are acrylics. 
I added some MIG black pigment to dirty (and dull) the inside of the thrusters. I also had some Gundam markers and used them for "painting" the attitude adjustment rockets.
The last step was to gloss the top of the ship and then apply the decals. Being it was a "concept craft" there was no weathering. I was still mad about the missing wheel, but I think it turned out ok. 


Thanks for looking.


Tuesday, November 15, 2016

New Aquisition

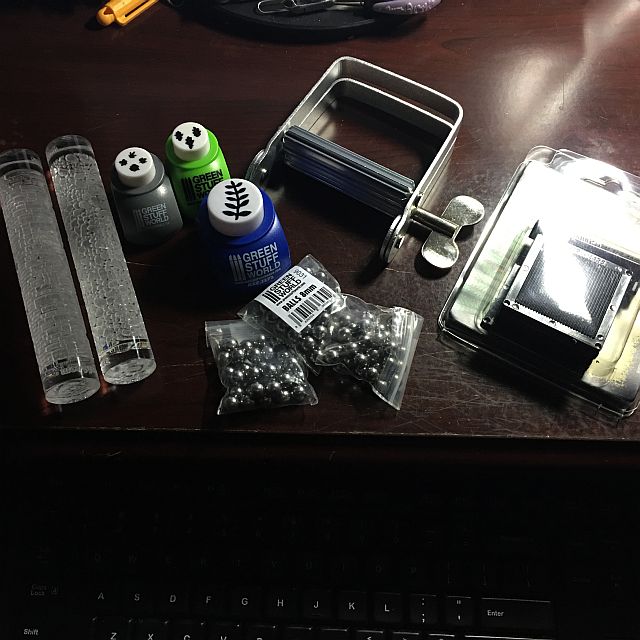
Another box arrived yesterday. This time from GreenStuff World from Spain. It's mostly for miniatures, but as I build in 1:72, It's close enuff for me to pick up a few things.

Left to right the two rollers are  for making imprints. One is for imprinting bricks, and the other for cobblestones. Right next to it are 3 stampers that will give me 3 types of leaves. The gray for maple, the green for Oak and the blue gives me a compound leaf. I got the larger compound leaf thinking I can use it fir my dinosaur dios.  
The bags contain some stainless BBs for paint bottles.  Anyone who uses Vallejo paint know that some of the paint is thicker and harder to mix than others. This will really come in handy.
The roundish looking thing, with the key is a "corrugator"  That tool will either give me corrugated tin roofs or when the foil is cut in thin strips will give me the Mediterranean style ceramic tile roof.
Finally, in the package that is reflecting too much light is called a Roll Maker. Taking a small roll of clay and will make hoses for any sci-fi (or not) craft. Turning the top part will also create the effect of tentacles for your latest sci-fi creation.  
Thanks for looking. 

Saturday, November 5, 2016

New Aquisition

Having gone a little crazy with a few Fantastic Plastic sale buys (info on these coming soon), I've been taking it a little easy lately. But this one popped up on Facebook from the mind of Moon Devil Studio's, John Dennett.
Here we have Pumpkin Puss. As mentioned it's an original kit that seems to be a cross between a pumpkin, alien and evil monster - 


You can see an evil face has emerged from the pumpkin just as he rises up on it's tentacle limbs. 

The kit stands about 6 inches tall and is flawlessly cast in odorless orange resin. There are no bubbles, and any seam that was present has been completely removed by John.

Seeming I got the first cast, as written as he autographed the bottom of the base. Nice!
This is a perfect little addition to any Halloween fans. I'm looking fwd to painting it soon.