Wednesday, July 13, 2016

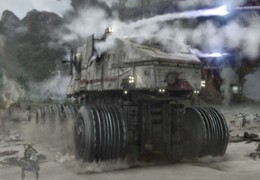
JPG's Star Wars Juggernaut

This time around I moved back to the Star Wars  genre to build JPG's Juggernaut. The Juggernaut was seen in a number of the Battles in the prequels - -


The model comes in quite a few parts - many of them being the wheels - 

Each wheel has a few mm of extra resin from the pour, and this needs to come off. I do have a sanding wheel, but the kit wheels small, and I was afraid of sanding the tips of my fingers off, so I still used the sanding wheel, but sanded with the power off. Its a coarse grit and went pretty quickly, but doing all 20 halves made it into a "wax on, wax off" type of situation. I was glad when they were all done. 

But after that, the chassis and the body parts went together almost too easy. All extra parts almost fell in place. What a nicely designed kit.


One little snag was at the end of the main body there were a few series of tiny bubbles, but some Tamiya putty made short work of them - -
Putting the small details on is where I ran into trouble. The problem is the instruction sheet looks like it had been copied 100 times before being copied once more before being put in the kit box. It was too blurry and lacked contrast to where I couldn't see what went where, in which position.  
Now I'm not picking on JPG on this. I gotten quite a few kits from different producers, and many have that "10th generation" copy look.  I would like them to see them put an original in .jpg or .pdf and put it on their site so the modeler could go and print out a super crisp copy.   OK, I'm off my soapbox. 

Once I found a good image I was able to put all the details on - - 

 Then I went to my new way of priming every and painted it all black with the Stynylrez primer - 

Next, came out my Vallejo Silver Gray color. This is a good color to use when you want to paint white. If you use white straight away, then you have no where to go to highlight. I did add White to a few panels here and there - -


I also added Vallejo Jet Exhaust metallic paint to the wheels to give them a slightly different look.
Next up is to gloss, decal and weather the vehicle.
I also have to start thinking about basing it...
Thanks for looking.


Wednesday, July 6, 2016

The Ceti Eel

Based on the creature seen in Star Trek: The Wrath of Khan. This was a quick little model I've been tinkering with for a while now and decided to finish it up and get if off the bench and onto the shelf.

I received the kit thru Gillman Prod.. It came in 4 parts - the body, two "leg claws", and the tip of the tail. It was cast in a cream color resin, and had only 4 or 5 tiny bubbles. On an intricate surface like this, that is excellent. 

After washing the parts, I primed them all in black.  Then I went about assembling the kit. The legs fit fairly well, and used some Vallejo Putty to fill the voids. Turning to the tail, I drilled both parts and pinned the tail to the body. There was a bit of a gap between the two parts and this too was fixed with V's putty.

Next I painted the entire top pf the model Vallejo's Cork brown. 


I then washed the segment spaces with Citadel's Nuln Oil. Once that was dry, I washed the rest of the plates with V's Agrax Earthshade.  Later on I hit the highest parts of the plates with V's Sand Yellow.  
Along the lines I added Citadels Sepia wash around the eye, and finally used V's Glossy Black for the eye slit.


Next up will be it's enclosure. Check back for that. Thanks for looking. 

Sunday, June 26, 2016

Dennett's Cosmic Corruption (aka Melting Man)

The next kit I tackled was another from John Dennett's MoonDevil Studio. It's called Cosmnic Corruption. As usual John has a backstpory to go with the sculpt --
"The effect of the radiation on the crew of the Space Station was unprecedented. The breach in the shields from within the vessel and the pulsing surge from outside the hull left no area untouched. According to the last transmission, nothing, no part of their bodies, not a cell was left unaffected by the invading poison. The idea that a human being could be exposed to such contamination and still survive is hard to fathom and yet eight people have done just that. However all communications have stopped. We cannot imagine what is happening out there. The approaching supply ship is only nine hours away from the station at this time and are detecting no unusual radiation in that sector. It will be that ship's Captain who will decide whether to approach and ultimately enter the station and risk exposing her crew to what remains on board." 

I named it The Melting Man. He went thru several incarnations as I mad up my mind on how I finally wanted it to look.  

This time I tried a new technique for starting a model. I first prime it black and then heavily drybrush the model with white. In doing so when you get that first light coat of color, you automatically start with two colors. Here I sprayed a tan and a little red color over the B&W, and it looked something like this --

 At this point the eyes and teeth  are still the drybrush white. Then I took a few colors, Brown, red, blue and purple and spattered dote over the top of what I had. No good. The color was already too dark, and the spatters didn't really show up. So I decided to light it up with a little more flesh color -- 

 Better, but a little too mono chromatic. So I added a few other colors in the form of Vallejo Game Color Inks. It was here that I needed to give him the terror look so I added they eyes.

As I was painting "Melting Man kept going thru my head  So I decided then that towards the end I would take clear 2 part epoxy, mix it with some red ink and end the model up that way. Well, the red ink was too thin and too red, so I mixed up a more of the little of the epoxy I had and used VMC Vermillion. What happened next was the addition of the paint started to set the epoxy. So I needed to rush the application. 
This is what I ended up with. I kinda like it, tho in spots the hardening epoxy is too thick in spots.
I also noticed in the pics that the inks I painted over the epoxy cracked and had to be painted over. I also noticed the black base got scratched in a few spots. Thats the bad thing about Vallejo primers - they are very stong once dry, but it take a full day or more for them to dry... 
So the these things have been fixed after these photos. I'll get around to a real final pic soon. Thanks for looking.  


The Croaker King part 2

Looking over the bust I felt that the dots for eyes just didn't do it for me. I didn't want to scrape them of the paint, so it took 3 or 4 coats of Scarlet paint to make them disappear. Then I tried out my Windsor & Newton Series 7 brush to add 3 lines to each eye (1 black pupil and a line of flesh each side of it). Next I felt there was too much green so I darkened down the purple I was using around the eyes and used it on his back. 


You'll also notice the base is done. In what turned out to be a semi failed experiment, I tried to use real fern leaves to make a camo pattern. The leaves were just too floppy and I didn't have enough to have it turn out the way I wanted.   Thanks for looking.
 

Saturday, May 28, 2016

Late May in the Shop - Galileo

I got a little time to work on kits. What I did was to try out the new Stynylrez one two of the new Moondevil mini busts. I gave them a shot in the black, only adding a few drops of Vallejo's Retarder Medium and it sprayed on very nicely. Since the models are now just black I didn't see any need to take pics of that. Look at the previous pic and instead of the green, think black.  ;)

Then I got to thinking about the Classic Space ships I've been working on - and dug out Fantastic Plastic's Rocket Ship Galileo. 


It's a kit based on the Heinlein book of the same name. To be honest I haven't read it, but did download it to my Kindle for a summer read. Anyway, it is a typical FP kit - very nice castings with odorless, bubble free resin. The only work you'll have to do is remove some of the pour plug.  In this model you get to choose the engine you want - be it the chemical or nuclear version. I chose the nuclear.

Here are some of the parts (my nuclear cap was on my PC desk as I was removing the pour plug as I went thru my emails...  On the top left you will see the chemical engine tho.
I started assembly by putting the wings on, and although it was a tight fir the seams did show so I it them with some putty.

That's were we are as of now. Check back for more. Thanks for looking.

New Aquisitions

I've been a little spotty with my blogging here. Health and other life issues are in the way, and I only get up there when I can. 

But that doesn't stop me from buying. The latest round are a few more of the mini busts from John Dennet and MoonDevil Studios. I didn't take pics this time but I did use his image to highlight what I have. The ones circled in purple are the ones I already have. The ones circled in green are the new ones.

Thanks for looking.

Tuesday, May 17, 2016

Rogue 1 Images

There's been a sneak peak at some of the new characters and ships from the new SW movie Rogue 1
If you don't want to know don't click passed the break. ;)