Saturday, February 2, 2019

Joy of Painting Finale

See part 1 - http://kevtk.blogspot.com/2019/01/the-happy-painter.html

From last time, the first thing that I had to do was repaint the eyes, from blue (damn internet) to brown. Eyes seem to be easier for me since I started out painting them a dark color.  
Since the remaining parts are big, instead of super glue. I got out the 5 minute epoxy and stuck the head and arms in place. A little V Plastic Putty, and a touch up of paint and I was done. Thanks for looking.


Looking under the easel, I tried to match his style for landscapes.

Thursday, January 24, 2019

3d Print Grow Lines - Getting rid of

While looking around You Tube for the subject in the title there were a number of coatings that could go on. All were rather thick and could hide small detail. 
Then I saw this one: https://youtu.be/rn4edNztaPU

Basically you spray the model with a rattle can that sticks to plastic and then immediatly spray a gloss clear coat. The videographer then put it under a fan to speed drying. 
In the vid he did admit that his grow lines were fairly thick and that to cover it some detail was lost, but under small printing, the detail remains. HTH. 

For full disclosure, I haven't tried it yet, but I have the perfect model to try it on soon.  Thanks for looking.

Wednesday, January 23, 2019

The Joy of Painting

This time around I'm doing a subject that's a little different. It's the TV painter, Bob Ross. Bob was the creator of The Joy of Painting,  that somewhere in the world is still playing to this day despite him passing away in 1995. 
The kit is from Goodfella's Resin, and comes in 4 parts - the body/base, the head, and two arms. In one hand he's holding his palette with paints on it, and a brush in the other. 
One sidebar is that this must have been a very good seller. The Goodfella's Resin guys got together with the Admins of Resin Maniacs Group on FB to have a Bob-Off. With everyone completing their Bob by mid February. 

As Bob often did landscapes, there is a landscape sculpted into his base.

After initial clean up - there was the faintest seam line running along his famous afro - one thing that jump out at me was the lack of an opening for the hand hold. I suppose that area filled in made casting easier, but the extra resin needed to go.

I started by doing a little investigation. Despite watching him for years, I needed to look up specifics. The first being the shirt. Nearly all the time he wore a blue shirt. Some were lighter than others but it was a blue hue. Only after I painted mine did I find he also wore a white and a very pale pink shirt. No matter. Putting down some medium blue for the shadows, then added V's Blue Gray for the highlights. I shot it from the top down to emphasize those shadows. 


Moving on to his head and face, it seems color depends on when you want to represent him. He was on TV from '83 to '94 so his hair went back and forth from brown to a reddish brown and back again. His beard as one would expect got a little more gray as time went on.  
But let me start with base coating it.  I started out with a dark brown for the shadows in the hair, and layers lightened and reddened as I went on. I started with the tan color for the face, but that seemed a little too yellow in this case. So the face, and hands were redone in Vs Beige Red.

Moving on I tackled the next biggest piece which was the palette. Now Bobs palette was clear, but scuffed up to eliminate reflections from the TV lights. If I wanted to go all out I could have given the part to a caster friend of mine to have it molded and cast with clear resin. 
A saw a few guys trying to mimic that scuffed clear by painting their gray. So I thought I would go WAY the other way and paint mine woodgrain. It's also good practice for painting large area of woodgrain. 
Looking at his brush I saw that it was white with yellowish bristles. On the show he once mention that he used duct tape around the silver metal part around the bristles, again, to eliminate reflections.  I was thinking about using duct tape, but thought it probably would look out of scale. So I used V's Gunmetal, and then just put a matte coat on it to dull it down.

 Turning back to the head, I lightened the hair, put the first layer of grays on the beard, and had to tackle the eyes. Looking online there was no mention anywhere of what eye color he had.  I finally found one site that said blue. Ok, I get out V's Azure and created the irises.  

In a subsequent online search  I wanted to see about the wrinkles on his face. Being on TV I was certain that he wore makeup for the camera.  I finally found a large image of Bob and the first thing that jumped out, was that he didn't have blue eyes!! The are brown!!  Dang it!!  I'll have to go and fix that next time. Also the wrinkles were lessened for the camera.
Check back next time for the finale.

Saturday, January 19, 2019

Mountain Giant's Base

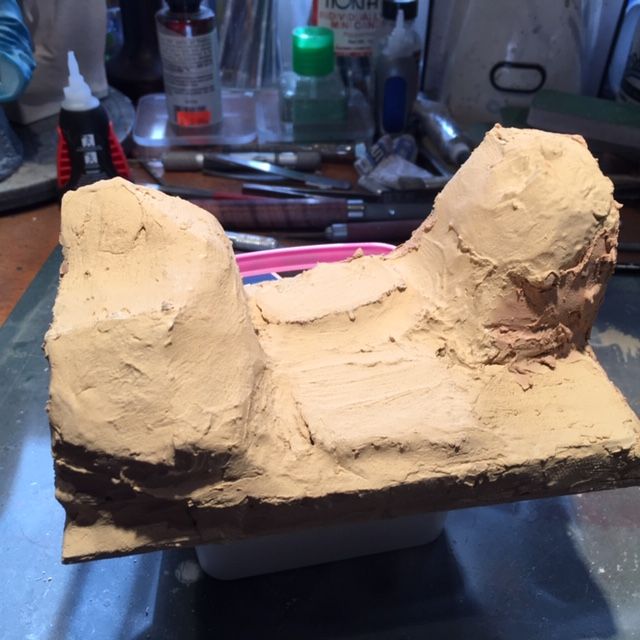
Not liking the disk bases for minis I set out to make some sort of a vignette. Taking info from the name, the Mountain Giant should have some sort of mountains.

I dug into my collection of little bits of foam from shipping boxes I found the size I liked, and then cut more to fill in the space for the two hills I have planned.  Gluing them with Woodland Scenics Foam Glue, I put everything in place. I realized I needed a smaller rise to offset the hills so I tore pieces off some sheet cork I had and added them to the center. 

Once dry I got out some Dap Plastic Wood that I had  put away in a drawer to use as the groundwork. 

First I started out just using my hands, but this stuff is very sticky, and it's best to use some spatula shaped tools. It also help to keep the tools wet. 

From there things progressed very quickly. And you need to be quick. The Plastic Wood dries pretty fast. It was already starting to firm up in  5 minutes.


As you see in the pics as the putty dries it gets lighter in color. Once dried, it's easily sanded. 
The Giant was moulded to be stepping off a boulder. To have come continuity I took some landscaping bark chips and made additional boulders. The bark chips make great rocks by painting them black and then subsequent lighter drybrusings of gray. I also painted the ground a dark brown.

From there is was just a matter of spreading some PVA glue around the base, and then with a static grass applicator, put the grass down. For realism, make sure to leave little bare spaces. It's the wilderness after all and not a lawn or golf course. ;) 
 In the pic the bare spot in the middle is where the Giant will be glued down. More glue and static grass around his feet will complete the base.


CMON Mountain Giant

Reaching back in the Blood Rage game, I pulled out the Mountain Giant. This is a softish type plastic which made getting rid of the seams a little difficult. 
Looking at the box art, everything seems to be tans and browns.


Not liking the disk shaped base I cut it off. the next step will be to creat a little vignette for the giant. Check back and thanks for looking.


Wednesday, January 16, 2019

Fantastic Four Susuan storm

Right from the start, I must admit I'm not the biggest Fantastic Four fan.  But I thought the plan for the kit where Susan herself could be cast in clear resin was ingenious. The kit was sculpted by Tony Spangler, and molded and casted by Mark Kaelin.
The kit comes in 5 parts - the head and shoulders, the body, a "4" base and a nameplate. 


Looking at the kit the clear head and shoulders casts was an excellent idea. Pulling it off I'm sure was problematic. Giving it a close look small bubbles can be seen inside and there was one under her nose. Now with it clear, it can't be filled. But with a bath of Future, many of the bubbles became invisible or at least less emphasized.

Next up, looking at the colors for Susan's uniform, between the comics, cartoons and now the movies + fan art there are a multitude of colors and styles.  So in the end I chose a simple light blue color and a dark blue stripe.  I also added a steel color and medium blue to the emblem on the chest.
 While all that was drying, I turned my attention to the base. Both were colored in a light Steel color, and then then highlighted in blue.

Masked up for the blue paint. 
I felt something else needed to happen with the seams in the clothing. I have some Gundam Markers and thought I could run some blue into the seam lines... no blue. I wanted to do this, so in the end I used the black pen. They are very easy to use, and fairly simple to clean up if you go outside the lines.   With that I was all done.   Thanks for looking.


Friday, January 11, 2019

McdevittMini-Hulk Finale

See part one here: https://kevtk.blogspot.com/2019/01/mcdevitt-mini-hulk.html

With essentially 2 colors, this guy was an easy one to complete. After the base colors were laid down in the previous session, all that was left was to add highlights and little details.
Starting off with V's Black Green, I added a little flesh color to brighten the color. This was done a total of 3 times. Since the pants aren't a real focus, they were given two highlights.

I added Ivory to the eyes and teeth, and then a highlight of V's Off White to the teeth, and a green pupil to the eyes. To unify all the colors I added Citadel's Green Wash to the skin, and purple to the pants.  With that the model was done.  Thanks for looking. 


A can of Coke for size comparison