Sunday, September 4, 2016

Fantastic Plastic Space Angel Starduster

 From Fantastic Plastic's site:
"Space Angel" was an animated sci-fi series produced by Cambria Studios. Set several hundreds years in the future, the show chronicled the adventures of Captain Scott McCloud, aka "Space Angel," Electronic/Communications expert Crystal Mace and Scottish Gunner/Engineer Taurus, all whom crewed the Interplanetary Space Force rocket "Starduster.
The Starduster itself was an elegant three-winged tail sitter distinguished by its bulging eye-like cockpit windows, mid-fuselage canards and massive tail. Weapons included both nose and tail-mounted cannons. The Starduster flew via conventional rocket technology with no consideration of faster-than-light travel."


Just got my kit in the mail yesterday and quickly opened it. Just an initial look, and I've been buying FP kits since the beginning, but I'm sorry to say that this has to be the worst kit I've seen from them.  :(   
It's upsetting as this is the first real negative review I've ever given. I guess a bright side could be the decals because they look good, but then again I haven't used them yet. 
The main fuselage mold looks like it slipped and has a lip almost the entire length, and when I started sanding a myriad of pinholes appeared. 
The canards feel more like a rubbery toy plastic than the resin that I'm used to. Like others have said in a different forum, I'll prolly have to make my own. 
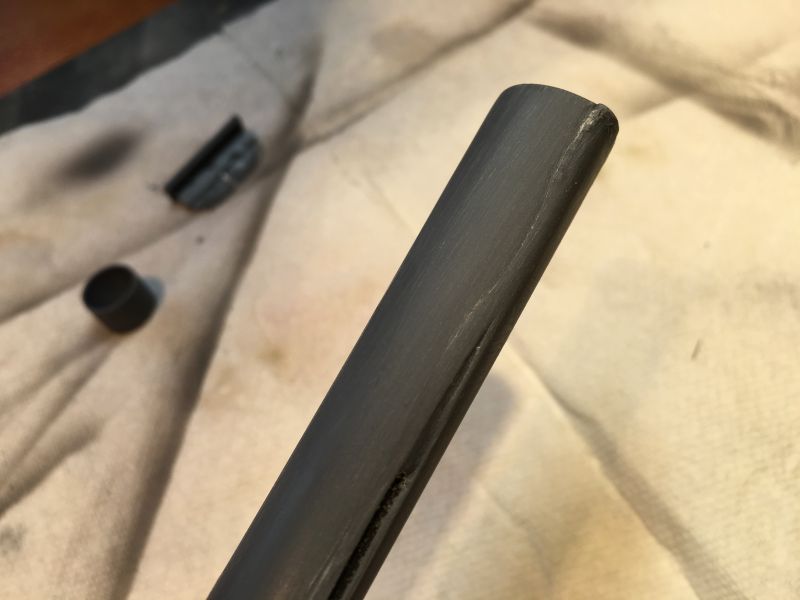


In honesty if I didn't start to mess with it, it would have been the first one I would send back. 
There is another build of another kit casted by Masterpiece and he's illustrated the same complaints. In the future, unless Masterpiece gets their act together I will avoid kits they've casted.

Friday, September 2, 2016

Heinkel He-178 part 2

More progress was made on this plane. The first thing done this session was to mask off the areas to be metal and apply the metallic colors. The instructions call for 2 different metallics. They recommend a "polished" metal and a "natural" metal.  They had "H" designations to the colors. Since I use Vallejo, I chose White Aluminum and Steel. To my eye, the colors still looked too close, so I will add a thinned layer of Smoke to the natural metal color.


Pulling off the masking tape, I looked up the conversion for RLM 2  (I think I said it was 4 earlier, sorry) and it turns out to be V's Green Gray.

After that I once again turn to my Metallics set and brushed on some burnt metal to the exhaust port.

While this model has it's problems and will definitely be a "2 footer"*, it's not looking too bad.

 Feeling ambitions, I took some of my 1.5mm tape and created seat belts. I did this because test fitting the canopy, you could see right in and it looked a little bland. The 1.5 is still too wide, but it will do for now. 


I didn't take a pic of it yet, but also during this session I added the canopy. I didn't fit correctly, but I just creatively painted it to make it blend in. Thanks for looking. 


* A "2 footer" is a model that will look OK from 2 foot away, don't look closely. ;)

Wednesday, August 31, 2016

Heinkel He-178 Part 1a

I call this part 1 a, because I ended up not having as much time as I thought I would have for this session.
This time around the tail planes and the wings went on. They had to be puttied on one side and then primed. I also got around to priming the canopy, but forgot to take a shot of it. Oh well, next time we mask off for the metal bits and then a coat of RLM 4 and we're done. ..


Tuesday, August 30, 2016

Report from JerseyFest 2016 - Part 2

After I finished the previous post and it went live, I remembered I left out little vid clips of some of the models that were lit. I think little vids make sense as it shows the lighting the best. Rather than add it on to an already long post, I'll just show them here - -

The Thing Spaceship

The Interstellar spaceship
The Beast and the Lighthouse
King Kong on TV. I thought this was VERY clever - 

Thanks for looking.

Report From JerseyFest 2016

JerseyFest is a 3 day scale modeling show that's is concentrating on Sci-Fi and Horror.  There's not a Sherman tank nor Bf-109 anywhere nearby. :) Haha Each year it has been taking place in the Marriott Hanover, in Whippany, NJ. The venue is a very nice place and they provide for a large Vendor Room, two large lecture demo rooms, and a slightly smaller model contest room. Each year the show starts on A Friday and there are a number of scheduled workshops.  The other cool part is the leaders of the workshops are well know experts in their fields. There was:
  1. Painting a Creature from the Black Lagoon Bust with Greg McKellar
  2. Airbrush Painting a Monster with Casey Love
  3. Sculpting a “Hulk” with Randy Bowen by Polyform
  4. Miniature Figure Model Painting by Morland Studios (Friday Evening Class)
  5. Painting a Star Wars X-Wing with Michael Salzo
 On Saturday and Sunday was the Vendor Sales and also a few lecture demos. They were:

Saturday

  • Randy Bowen – Sculpting demo
  • Casey Love – Overview of monster creation from sculpt to paint
  • Greg McKellar – Painting monsters demo
  • Sean Sides – The art of scratch building and tips for building and painting resin vehicle kits, including Star Trek and Battlestar Galactica models.
  • Steve Neisen – Overview of methods used to bring Sci-Fi spaceship models to life from concept to production.  Includes techniques used for various Star Wars and Star Trek models
  • Saul Alvarez – Demo of Painting ”Regan” from “The Exorcist”

Sunday

  • Randy Bowen – Overview of past, current and future Bowen models and statues including collaborations with other artists
  • Casey Love – Sculpting demo
  • Steve Neisen & Mike Salzo - Patterning, constructing and painting studio scale Sci-Fi vehicle models
  • Sandy Collora – Creature design and sculpture
Honestly the only thing I find rather annoying is the people running the show seem to forget to announce the times beforehand and it's until you are there do you find out who's talking when.  The show is based (IMHO) on a person being there the whole weekend, and honestly I think this is a mistake.  

I went on Saturday and due to circumstances behind my  control I got there late and missed most of the talks. I did get to see Randy Bowen's sculpting demo as it was the last one of the day. He ended up creating an awesome Caveman bust - 

 Looking thri the contest room is a terrific treat. Tons of awesome models. Here's a little slide show of some of the models. I didn't try to take them all, but just a taste of what's there. Click here for the slide show. 

Lastly I certainly found time to do at least a few laps thru the Vendor room. I made it a point to meet up with friends John Dennett of MoonDevil studio, and Paul Gill of Gillman Productions.  From Paul I got a kit of David as the Wold from American Werewolf in London. This is being released by Sharon Carter and cast by Paul - 
It's an older kit so as I glued on the legs for the image, I noticed that the legs don't fit perfectly and some filling will be necessary. The second thing is that my kit was boxed with 2 front left legs. So a quick FB message to Paul got that straightened out and I should have it in a day or two. I just noticed I didn't have the fangs nearby, so he's kinda gummy looking. The other thing is that it comes with a severed head, which is by his front paw.

The next is a Frankenstein sculpted and cast by John Dennett. What make this one different is that John used Mary Shelley's description of the monster from her book, and not the typical flat top Karloff make up. While I'm not a Frankenstein guy, it was different enuff for me to get. Here he is - 


John was gracious enough to include another of his "fiends" in my Box. Its the Chluthu figure - 


Next up is a new monster created by Sandy Collora.  La Tiburonera (the Shark Hunter) looka like a cross between a Snapping Turtle and the Creature from the Black Lagoon. I picked up the Bust of the Shark Hunter. He gave me a mini bust, and while we were talking - he also grew up on Staten Island - he drew his monster on the bag he gives for purchases. Pretty cool!


 Finally I found an awesome looking kit from Moreland Studios. It's Perseu holding up the head of Medusa to the Kraken (who looks like an alligator in the sculpt). Looking at the pic on the box, the amount of detail is amazing and it fooled me into thinking it was somewhere between 75 to 120mm figure. I didn't think realize the box and contents was too light to be a larger figure and was surprised when a 28mm came out of the box!. The figure is amazingly detail, just thats it's small. I'll have to take out my Optivisors for that one - 


Sorry the pic is a little blurry. Thanks for lookin'.

Friday, August 26, 2016

Heinkel He-178

Needing a change from my Figures, I decided to pull the Special Hobby He-178 out of the stash. I first saw this in the New Kits section of SAMI magazine.  It's not exactly my "genre" of X-planes and jets. But being it's "A first" I figured it's worth a spot on the shelf. 

The kit is one sprue, with a clear styrene "glass" , an instrumentation film, and a piece of PE.  Nice - 


I started the build with the cockpit and thats when I realized this wasn't going to be a simple build. The cockpit has to include a seat, the stick and the foot pedal mount. The foot pedals are formed with PE, but there are no indications on the part thats the floor of the cockpit. Oh boy...
So I just had to guesstimate. Then getting it in the cockpit I had to keep cutting the floor down so the seat and the stick would show in the opening of the plane. Ugh. I'm not used to, and don't like hacking up models like this.

Finally I got the two fuselage halves together with a lot of glue and tape - 

I needed to leave this for a while to thoroughly dry. So I went on to do the wings, which is in 3 parts. The wings "sorta" fit and again with lots of Tamiya Thin glue and some sanding afterward it went together. I moved to the landing gear which has PE folded around them. After getting the parts fold and glue to the styrene parts, I was ready for a break.

How can a kit have excellent PE parts, and the film for the instruments be so devoid if marking for where part should go?  Check back for another chapter

Thursday, August 25, 2016

Finishing Up The Howling

This time around it's time to put paint on Eddie. Once again, the lighting on the set was very dramatic and it was hard to tell what color Eddie was. That and the fact that there were man werewolves in the movie and I have a hard time keeping everyone straight. So I went with a generic gray, and more brown on the face and hands. I also painted the eye a beige, in prep for making them a piercing yellow. Here's the start -


I basically did my usual, and make the deepest recesses darker and the highlight brighter. So here he is all finished and on it's base -
With some dramatic lighting


I think this time I missed on the seams. Using the Aves, I got carried away with the fur and didn't keep the direction in mind. Also in places I made the fur tufts too small for the surround fur. Oh well. It's a nice 2 footer model.  Thanks for looking.