Sunday, March 6, 2022

Project Vanguard Satellite

 Wow have times changed.  I don't remember what I did as a kid, but knowing what I know now about correct assembly, making seam lines vanish, smooth painting etc... this kit drove me crazy, and it fought me all the second half of the build. 

The biggest problem was that there are a lot of labels as decals, and oddly only every 4th or 5th decal didn't disintegrate, but broke into a few chunks. Some I was able to slide into place, others I just couldn't. The worst was the one where it said Meteorite something or other. That one disintegrated, and as can be seen was only left with "Met."  Each label only had one copy, so that was that. But luck enough the whole core assembly goes inside the sphere, and can barely be seen. 

Then there was my superglue. I super glued the core to the bottom of the clear dome, and the core did everything but stick. It left me with a couple of glue marks on the clear part - no fogging so that's a plus.  The worst of my decals was the large title "Project Vanguard." The "P" broke apart as did the "G" in Vanguard. Bad enough that I had to get paint to fill in the letters.  It was enough to take the wind out of my sails. While I had other things I wanted to do, including adding Faux wiring to the core, I just put the top cover on and called it a day.  

Here are two shots of the finished satellite. Thanks for looking


Monday, February 28, 2022

Project Vanguard Satellite

 This kit brings me WAY back in time. The original was the first model kit I ever got. I was probably 7 or 8 at the time, and talked my Mom into getting it for me at a little Mom & Pop store - DeVita's Dept. Store. 

  The model is a re-pop from Round 2, and is in a copy of the original Hawk box. There was a sticker on the plastic I saved saying "Available for the first time since 1966."Knowing what the real Vanguard looked like, I wondered why the kit was done this way. It only too me 50+ years to read the box where it says 

" The model represents the first of these larger (20 in. diameter)operational Vanguard satellites that was launched on  April 28, 1958. However it failed to achieve orbit..."
So what we know of the successful satellite was the "minimal 6.3" satellite. And by doing the math the scale of this model is 1:3 scale.

I started the assembly with the central core, and then not sure of the opening size, I started painting the different parts up separately.

I was trying to put this part off as the center curved section was very flimsy, but had to go for it./ I had to add my own tabs from little bits of styrene ti firm up the joint. Some can be seen inside.

While the glued sections were setting up I started painting the little experiment stripes on the center core.


With the seam glued up, I sanded and sanded to get the smoothest transition I could. I was about 75% successful, so I taped a little border and then added Tamiya putty to get rid of the seam line.  

On the bottom you can see I added the clear dome, and glued that in place. I taped over the clear plastic, so I don't scratch it up.  It's sitting on its provided base. 

In the back I added a few more colors to the core. All I need there are two stripes of yellow. But that's for next time. Thanks for looking.


Wednesday, February 16, 2022

The Outer Limits Galaxy Being

 This is John Dennett's newest offering. IIRC it's from The Outer Limits' very first show. The story is about a radio station operator that seemingly contacts his counterpart from the Andromeda Galaxy (ignore the science). Wanting to impress his girlfriend about the stations range, he boosts the signal all the way up, and  accidentally sucks the alien, who's made of electricity, into this world! 

The kit is John's usual 2 part bust - the figure and the base. It's done in flawless blue gray resin.

For a lot of my character busts I give my self the dilemma of do I paint it as if it were real? Or do I do it as an actor in costume?  Since I discovered how the effect was done. I decided to paint the actor, who was William Douglas

For those that don't know the effect, they dressed Douglas in a brown wet suit because of the B&W film. Then they smeared the suit with oil, and when developing, made a negative of the being.


So this turns to be the easiest paint job I ever did- just brown.  All I had to remember that was in trying the trick, light had to be dark and vice versa. Painting the other parts I didn't know what different hues would do so I kept all the colors in the brown family. After the below pic was taken I coated the whole thing in Spaz Stix Super Gloss.


Then with the image viewer I have - Irfanview -  I first made the image B&W, and then made it a negative. I also tweaked the Brightness, Contrast, Gamma Correct, and Saturation. It gave me a result I was happy with, looking like the alien on the show.  Thanks for looking.


Tuesday, February 15, 2022

Moondevil's Tiny Tim

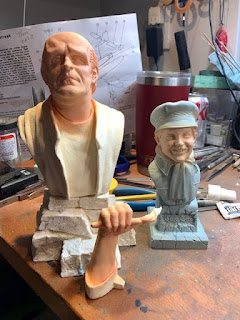
 Never too early for Christmas time. I received the lil guy from John Dennett right around Christmas but didn't get him done in time. Rather than to forget and rediscover him next Dec., I decided to get him done now, so he'll be ready to join the others on display for the Holiday. The bust is an exactly likeness of the actor Glyn Dearman, and while nearly all of the images I saw were B&W, the only one in color was one I didn't care for. So this time I just went for it. 

The kit is in 2 parts - the bust and the base as is usual with a lot of John's kits. Since Tim was a sickly boy I decided against the rosy skin and gave him more of a pale look. Adding to the effect, I added some darker flesh around his eyes.

I have him a brown coat and cap. The cap I wanted to mix with a little leather brim. Maybe I pulled it off? As usual for me I started with the darker blue and then stippled 2 or 3 levels of highlights.  I gave the hat and coat the same technique with their colors, and as mentioned try to give the brim a leather look. 

There was no mention anywhere of Dearman's eye color, so I just went with a rather neutral azure/gray. 

The base was done with a green gray and a heavy dry brush of some blue around the name. The letters were done in white, and with that I was done. Thanks for looking.


Sunday, February 13, 2022

Douglas Sky Streak part 2

 It's been a while since I had the oomph to get back to the lair, But I got there and did a little more opn the Skystreak. 

My first fully (almost) successful elimination of seam lines on resin I gave a light coat of primer. 

There's a few Euro guys building models on You Tube where they paint a dark primer, and then some white squiggles on top of that which mimics an uneven topcoat spray. So I tried it.


Doing research, I read the color was Insignia Red, the write up also said Tamiya's equivalent was Flat Red. I don't have Tamiya, but Vallejo also has a Flat Red.  After the spray which covered and yet still showed a hint of the squiggle, the color dried... not the right color. So I ended up giving it a mist coat of V's Scarlet (a *tiny* bit more orange). It looked good, but that coat was enough to hide the squiggles. Dang it!!

The next day I came back and added the decals. evidently there is a few versions with both red and white color schemes. Being this is probably one of the oldest kits I have, I wasn't too sure about the decals, so the day before I put some Decal Film over them.  So today I cut them out and added them. Besides coming off the backing paper a little slowly they all came off in one piece. The stars and bars went over a little raised area, and with the film on they were a little thick. Before calling it for the day, I added some setter, to see if they snuggle down. Check back for the result. After that is add the canopy and the wheels and I'll have another done. Thanks for looking.


Thursday, January 13, 2022

Young Frankenstein's Monster

 Looking for kits to start the year (besides the Skystreak) I found Mark Warthling's Pestilence Labs Monster from Young Frankenstein, and John Dennett's Tiny Tim. I guess I want to get a head start of next Christmas. But he's for a separate post.

First thing to decide is what color was the Monster. Fortunately the movie being filmed B&W on purpose, and there were plenty of color images available. Where the box are shows a blue-green. He's definitely a blue.


One dilemma I always have for myself is should I paint him up as if the character is real, or as an actor in makeup. I usually go for the former, but this time I went for the later. I got out my flesh triad and went to work.

The blue went over the skin tones. I actually muffed up at this point putting too much blue on, and eliminating all the skin tone. I tried to save it my using my lightest skin ton as the highlight. Worked fairly well.

Then it was time to paint up the clothes. His shirt was a black, and the jacket was a brown. The stone was was painted with 3 colors to add a little extra color to the model.

The kit comes with a broken mug from his scene with the hermit. I was lucky enough to find this screen grab, as I thought I noticed a design on the mug while rewatching the movie. I tried my best to copy it.

Almost done I tackled the fire, and is my typical fire recipe. Remember that fire has to be painted backwards from the usual Base color, shadow, highlight. The lightest (hottest) color appears closest to the source of fuel - his finger in this case. 

The last thing was his eyes. Looking up Peter Boyle's eyes, according to a few statistic websites, I was surprised to find out that his eye color is black! Having a pupil show up against that would be a problem. So I made the irises a dark gray.  I also chose the eyes down as if he's pondering *whats happening to my thumb* look. A little gloss over the eyes, and I was done. Thanks for looking. 


Wednesday, January 5, 2022

Douglas D-558-1 Skystreak

 The new year starts off with a look back to the NACA days and the aircraft D 558-1 Skystreak built by Douglas. From the website:

The D-558-I "Skystreaks" were among the early transonic research airplanes like the X-1, X-4, X-5, and XF-92A. Three of the single-seat, straight-wing aircraft flew in a joint program involving the National Advisory Committee for Aeronautics (NACA), the Navy-Marine Corps, and the Douglas Aircraft Co. from 1947 to 1953. In the process, the Skystreaks set two world speed records.

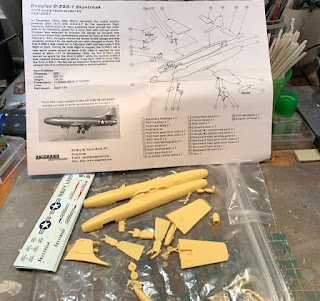
This is another very nice albeit old 1:72 resin kit from Anigrand Craftswork.

Not taking any chances of it being a tail sitter I added a lot of the Liquid Gravity beads to most of the open spaces forward of the landing gear.

The cockpit panel was just bare, and there was no decals for one, so I just added my own white dots. I should have looked first as all the instrumentation is black, but no one will be easily able to see it anyway...

The session ends with me closing up the fuselage with probably the best fit I've ever encountered with these smallish resin kit companies. Also on the drill is the seat. I tried something a saw where a tissue is white glued to the seat so it can be manipulated and form folds or creases. In this case it didn't appear to work. I just used one ply from the tissue. I'm thinking the tissue was too thin. Next time I'll try some toilet paper. Who knows- maybe 1:72 is too small to try it?  The final thing in the image is a line of sand color paint. Under the paint is a .5mm tape that will be the seat belts. But that's for next time. Thanks for looking.