Wednesday, May 23, 2018

Horten HO VII

While waiting for my I.M. pilot to arrive,  I discovered that I had another Luft '46 plane in the form of Planet Models Horton VII flying wing.
Having built another Planet Models resin kit, they are very nice.

Diving right into it, I assembled the interior. One thing that caught me, and also caught me with the last Planet kit, is there are no specific spots for the seats etc... So gluing the parts in and then trying the cover on, I found I put the 2nd seat too far back. So I had to get the back seat, and stick out and reposition. Hopefully I remember for the next one... ;)

I think I took this pic *before* I had to move the seat. The other thing is that the back seat has it's own instrument console, but it goes on the top part. So you need to see where that fits in as well.


As mentioned there's not a lot of parts and while waiting for some sub assembly to dry I painted the bottom with RLM 65. The wheel wells and the interior will be painted RLM 2 - 

More next time. Thanks for looking.

Red Star 47

With the desk clear I decided to tackle Indrustria Mechanika's Red Star 47. Industria Mechanika is a very good garage kit "co." with a varied stock based on the various artists. His models go from Ma.K type vehicles, to 5th Element type vehicles to all sorts of different figures of different sizes.
From IM's website:
From the mind of Christophe Desse comes the Red Star 47. This 1/35 scale Russian-styled flyer is ready for either in-flight or on-ground scenes.
Looking through Christophe's work - and there's a ton of it - I couldn't easily find his Red Star. I link his pages if you want to investigate yourself. 
Opening the box you find a number of very well done parts.  If certain spots you can see where they masters were 3d grown, but none of the grow lines show on the visible sides of the vehicle. The back page of the instructions show color renderings for 5 different paint schemes. Here are the parts - 

Started off I was charged to assemble the front grill. I hit the first snag in that the air cover holes have little spots where the PE cover is supposed to fit in. But the PE nubs to stick in the slots were to small. I had to come up with a workaround. They were all eventually installed - 

The next step was moving on to the cockpit and the main body. Then I saw something weird. On the box it says that a pilot was included. But the instructions say the pilot is optional (read - not included). I didn't want t make this flyer sitting on the ground, and didn't know how the pilot would fit in if I just kept building. Forward progress, besides cleaning the pout stubs and priming, was halted until the pilot arrived. 
Stay tuned...

Saturday, May 19, 2018

Black Heart's Vlad Finished

With the base coat finished and dried, I picked up with the shadowing and highlighting. Here can be seen that I also started on what I took to be pearl's around the cap. With the black base coat, I simply added a white pearlizing paint  - 

The pearls didn't take as long as I imagined, so it was on to some pigments for the dark 5 o'clock shadow and I was done with the bust. 
It was here that I decided I wanted something a little more unique for the base. I'll think of something. Thanks for looking.


Friday, May 18, 2018

Vic Torry's Saucer Finale

We left off last time with the saucer and stand in gloss black primer .
I was going to do something special with the base but decided to just leave it as it is.

For the saucer I decided to use Vallejo's Duraluminum for the color and gave it a spray. Once dried, I added blue and then a dot of white to make it look like the engines are firing. 
Finally, I used Kristal Klear to make the from window glass. Thanks for looking.


Tuesday, May 15, 2018

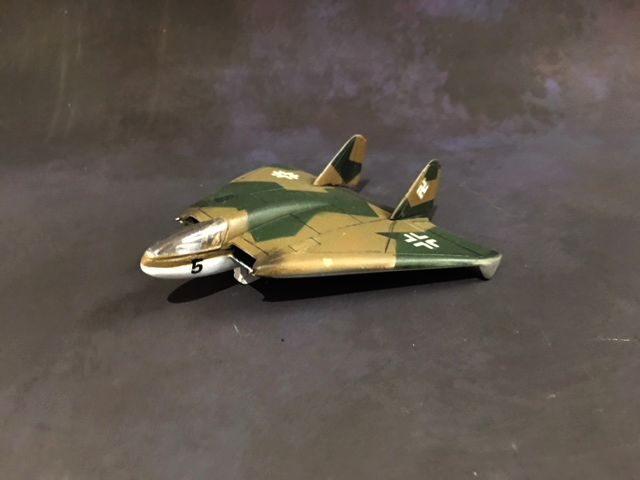
The Luft '46 Finale

I've had both these planes sitting around about 95% done for a week or more. The part that I dread the most - installing the canopy -  was what was left. But I just had to get these things off my workbench. 
     Since the last time the Me. 1092 got painted a simple dot pattern that I saw on one of SAMI's builds. Originally I thought I ruined it as I felt the dots were too dark compared to the background. Then I had a brainstorm and lightly misted the base color over the whole model and the dots were nicely toned down. 
     The other chore was that I had to remake the panel lines. member the old ones were like Grand Canyons all over the model. My plan was to just draw them on with a graphite pencil. A member of my model club told me to just scratch them back in. Big mistake. There are a number of spots that I botched and basically just gave up.  The landing gear and wheels were from a 1/72 scale Me. 262, but the back wheels were way too big. For anyone paying attention if they were raised they would never fit in the wells. :P  Anyway this is what I ended up with - 


The Lippish 13.B went a bit easier. My main problem with this one is that I didn't want all my German plane camo to be the same, and while I forget the numbers now, I basically lighten the lighter color and darkened the dark color.  The problem came when I tried to mix more of the lighter color. I used a flesh to lightened, but could remember which one, I have about 10 flesh colors. It wasn't until I had 4 or 5 false starts that I found the right paint color and finished up around the canopy.  I also stretched some tube sprue and created two guns that fit in either side of the cockpit. 
Here's this one. Thanks for looking, but don't look too close  ;)  - 


Monday, May 14, 2018

IT's Pennywise

With the remake of Stephen King's IT, Gillman Productions has produced the new Pennywise.  Having just seen the movie (meh) it was time to start my take of the monster clown. The kit comes as two pieces - the bust and the base. The base representing what was the sewer. The sculptor, Mark Van Tine, also signed the bottom with a little illustration -
Next was looking for suitable reference image. There were a lot and I settled on this one - 
Being he's basically white on white I thought it best to start with the hair. Starting with a mix of Leather brown and Mahogany the paint went on quickly - 
Looking at the base I outlined the letters and the pipe with black and then started filling in with color. The pipes are done in Vallejo copper from their Metallics line - 
Turning back to the clown the hardest part was getting the lines through his eyes symmetrical - 
I washed all the creases with Vallejo's Light Gray wash. But then taking another look, I noticed that the main part of his shirt had a blue cast to the shadows. So I made a wash of V's Blue Gray and added that in. With that, the figure was done. Thanks for looking. 

I painted the sneaker red to bring that color over from the front of the kit.

"You'll float too. Everyone floats!"


Black Heart's Vlad

Black Heart Models, know for their 1:1 scale busts, have started a "micro" series of figures. Some of them are even historical in nature. I recently picked up Hannibal and Vlad the Impaler. Today, I'm starting Vlad. Besides what you see in the image it also comes with a pedestal type base  -

First thing was to look for an idea of color. Most of the images I'm familiar with are the woodcut or illustrations based on the woodcut.  Also a lot of the newer images had either a blood red vest or cape. To me that was a little too cliche. I settled on this pic -

As always I start by blackening the eyes and then start base coating -
Base painting well under way -

I did use red for the hat but will be darkening it down with some washes. The vest is Cavalry Brown, which has sort of on the red end of brown. The edge of the cap was smartly done. It looks like the sculptor used beads on a thread, and wrapped it around the band. Cool idea!

Thats it for today. Thanks for looking.

On to PART 2