Thursday, June 8, 2017

Zombo and the Hedge Lion - The Not at Wfest Builds

For those in the know, Wonder Fest went off last weekend. Wonder Fest is a scale model show and competition more dedicated to the horror, sci-fi, and fantasy genres. If you'd like to know more check the link or for a better flavor search "Wonder Fest" in YouTube. There will be a ton of video.
One of these years I'll get there, but this time around I have two completed builds and one that's getting ready for paint, MFTW Vampira (will be seen in it's own post), that were done during the WF weekend time frame. Being these were easy builds, I have no WIPs as once I started I just got in a groove and moved along.

The first is Zombo. Zombo was a character that appeared in an episode of the Munsters (1966).  
 
This has been colorized. Cannot find an actual color image.


Eddie, the son, wins a contest to meet Zombo, and appear on the Zombo show. Like many kids, Eddie thought Zombo was real, and when he got to meet the man behind the Zombo - Louis Nye - he was hugely disappointed to where he ruins Zombo. I'm sure the episode is on You Tube. 

The kit is about 6 inches tall, and was gotten from a guy on eBay. As a bonus he also threw in Gran'pa Munster. Nice! But anyway, the kit came in 3 parts - the head/body arms are all one piece and then the two claw hands were separate.

The sculpt was ok. There are parts especially close to the deep folds of the costume where it get a little rough. 

I didn't want to just maks another B&W model. So I took the colored image for the face but did the symbols on his robe and cape in Vallejo Silver and Gold. The robe was done in German Gray, and the cape in Gray Black. His face was done in a Blue Gray. To change things up I made his pants and shoes two colors of brown.
I'll have to come up with a base for him as none came with the figure. As of right now, Zombo is just stuck in a piece of foam primed black.  


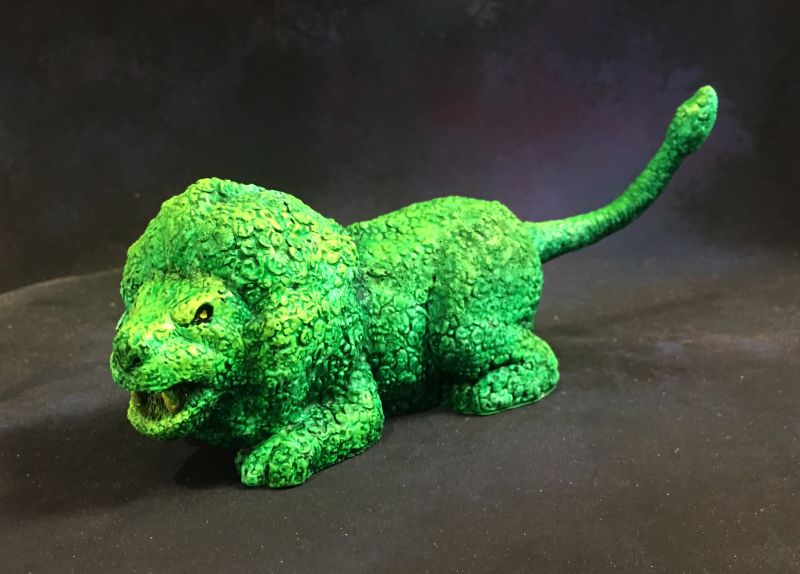
The next build is another simple one. It's the Hedge Lion that appears in the book and made for TV version of The Shining. As you prolly all know the book/TV mini series and movie are very different stories. 


The Lion was obtained from Gillman Prod., when you bought their Jack Torrance with an axe bust. 
The Lion came in two parts - the body and then the tail. I painted a base coat of Vallejo green with lighter green highlights, and the shadows were done in Citadel Green wash. The eyes were painted black, then a dot of white, to lighten the area knowing I was going to end it with yellow. Vallejo yellows are rather weak pigment wise.  Thanks for looking.


Wednesday, May 31, 2017

Brengun Hermes (part 1A)

Before I post a finale of the Hermes build, I've been talking with a friend on the Real Space forum. I was lamenting on how small the Hermes was. His reply was that he had a 1/144 that might be smaller. I too have a V2 in 1/144 and I should have made a wager. LOL
Dragon's V2 (left), Brengun's Hermes(right)

Saturday, May 27, 2017

Brengun Hermes A-1

 This time around  I'm tackling the smallest kit I've done as of now in the 1:144 Brengun Hermes A-1. 
From the Encyclopedia Astronautica:
The Army Hermes A-1 single stage test rocket was an American version of the German Wasserfall anti-aircraft rocket.
Development began in 1946 of an American version of the German Wasserfall rocket. Problems with the rocket engine delayed the first (failed) launch to May. Another failure in September 1950 was followed by a success on 2 February 1951. After two more tests in March and April the program was terminated in 1951, having been rendered irrelevant by more successful development of the Nike Ajax surface-to-air missile.
 The rocket part of the model come in 13 pieces, and the base comes in 6. This shows 2 of the 3 parts that have to be put on each side of the rocket.

Repeat this step 3 more times and the rocket is completed.


The base was next and it appears to be a trolley type system on rails. It also seems to be much different from the Brengun Hermes kit that was reviewed by the IPMS USA in 2014. I like their trolley much better.

The first wheel I cut off the stem flew to the nether regions. Despite the tiny size they were detailed pretty well. Too well for me to try and copy. So I cut 4 slices off a styrene rod the same size. It doesn't look good. Despite this I painted it up anyway. I'll have to decide if I want to use it or not. 

Next time is the painting. I've sort of decided to use the 5th test scheme.  All this will happen next time. Thanks for looking.


Friday, May 26, 2017

Lost Boys David - part 3

Part 1
Part 2
 We start off this final session with paint to his leather jacket. As soon as I put the first bit of it down I realized it was the wrong color. But decided lets see what happens - Bob Ross' Happy accidents and all...

While I'm thinking about it, I turn once again to the base. I add a variety of colors to what looks like 2 broken logs some dirt and rocks. Then decided for whatever reason (?) it needed a little purple on the rocks -


Nope. After a few coats of Citadel's Nuln Oil, I decide the Vallejo Orange Brown base for the leather jacket isn't going to work. So I go back to my old standby V's Leather Brown (Doh).
A coat of Nuln Oil later and it looks like what I want - dark - but not black or gray - 
 
A little hard to see but the scratch built earring is in place

 Jumping back to the base, I added some clumps of grass to the dirt areas. Then I get a brainstorm and decided to create the Chinese food carton of worms/noodles. Unless provided, none of my models have title cards. So I decided to try and make one. Since the model is from a movie I decided to somehow try to incorporate into clap board to the title card. I print out a few sizes of the logo, and spray them with a Satin Poly to seal the ink. I pick what I think is the best size, and then start cutting styrene. Nothing super accurate, just so people will recognize what it is. What a pain in the you know what to do the stripes simply with just the Tamiya tape I had on hand.  IMHO it turned out ok - 
Looking it over, I think I'm done. As always, I could tinker with it forever, but at some point I have to abandon it. ;)  Thanks for looking.

A little hard to see but I added 0.01 solder to mimic the threads from the missing button


Thursday, May 25, 2017

Lost Boys David - part 2

Getting into the kit, the first thing I tackled was to add pant legs to cover up the boots. I have no idea how to sculpt fabric, or leather in this case, so I just went for it  - 

Next was to shave off the extra buttons and the feather earring - 
After a quick priming, it was time to move on to accurizing the coat. I worked on one side by taking the second button off, and converting the top most one to some sort of silver badge. It looks like one of those pins that was popular  in the 80s, but with the image peeled off - 
The other side I also took off a button and converted another to a watch body. As mentioned, the medal was wrong, but close enough. 
Then in a detail crazy moment, I noticed there was no holes in the button for the thread. Not having a drill bit small enough to drill in 4 holes per button, I managed to get 2 holes per button - 
Then I decided it was time to put a little paint to the face. I started with a mid tone, knowing that it needs to be more pale. Keifer in the movie, with the help of the lighting was very pale. I also started painting his outfit. David looks to be dressed completely in black. But I know whats not the right thing to do. Straight black leaves you no where to go. So his shirt was done in Vallejo's Black Gray. You can't see it yet, but the overcoat will be done in V's German Gray - 
If you look closely at the knee from the above image, you can see it's still very rough. So it was time to get the Tamiya putty and try to level off some of the rough areas - 
This is where we will leave it for today.  Thanks for looking. 

Tuesday, May 23, 2017

New

The mailman was busy bringing boxes to my house again this week. Also I found a model that had been stashed away, so that will be included in this list -

Paleocraft's Elasmotherium

One of the first rocket powered fighters, an eBay grab

The just found model

Fantastic Plastic's new offering

Another awesome Star Wars kit. Need I say more? ;) 

While I'm not a huge Star Trek fan, I will build the Enterprise, because it was a gift. The NX-Alpha doesn't have a saucer so I don't mind building it. ;)  Thanks for looking.

Lost Boys David- Part 1

This kit has been in my stash so long, I no longer know who I got it from or anything about it. All that I remember was got got it with a Wolfman kit from someone selling in the Members Swap and Sell on The Clubhouse. 
Subsequently I did find out that it was produced in 1996, edit: and sculpted by Shawn Nagle, which answers why it was rather rough. 
The kit came in 4 parts - the body, 2 hands, and the base. The resin was a brown/orange color. I don't know whether that was the color of the resin, or just that the resin aged. I've seen some older kits turn that color.


The face sort of looks like Keifer Sutherland - not great, but not terrible. But looking at screen grabs from the movie, I found a number of discrepancies. Firstly as you may be able to make out in the above pic, he's wearing boots. All the screen grabs I've seen, he is wearing boots, but they are under the pants.


So the top edge of the boot will be cut off and shaved down. My rookie sculpting skills will come into play to make the pants extend down to the top of his boots. 
 
Then I got a nice pic of a prop replica of his coat. The model has 4 buttons on each side of the overcoat. Umm, no. 
On the prop, the right side had only the 2 bottom buttons, the third one up is missing, and top one is replaced with some sort of metal badge.  The left side had the same 2 bottom buttons, then the third button was replaced with a watch that was attached to the coat backward. In place of the top button was a medal. The medal was there, tho not exactly accurate. Close enough. The errant buttons need to be cut off and the other pieces need to be sculpted on.
There is a leather jacket under the topcoat. The model has it with a zipper. I couldn't find any clear pics to indicate whether it had one or not. The prop replica says no, but I couldn't find any other clear images.  I'm not a sculptor and figured I already had too much to do, so I left the zipper. 

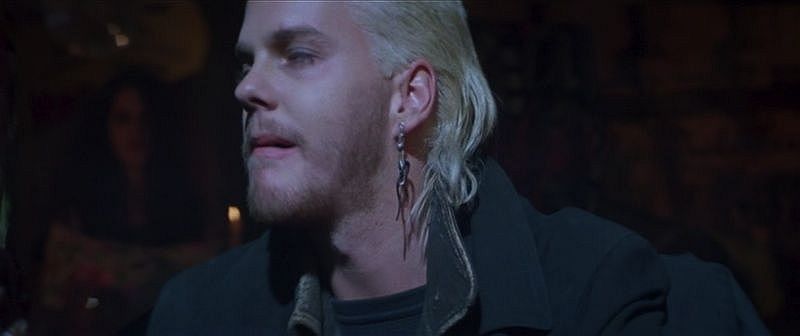
Finally, David wore two different earrings at different points in the movie. The one he wore the most looked like a few folds of wire with a short length of fabric or leather in the bottom fold  (the other was an earring with a tiny knife on the end). 
The model, had what looked like a short length of jewelry with a feather on the end. I thought, could that be a knife? No, it was a feather. So it was cut off. 

We'll see this work in part 2. Thanks for looking.