

This is my blog for my scale model building, and sculpting. Other hobby posts could include my fossil collecting, my herps or arachnids. I hope you find it interesting enuff to read. Enjoy.
Saturday, December 12, 2015

Friday, December 4, 2015
New Aquisition: The Carver
In my never ending search for "oddball" kits, I came across the website of Jean Louis Crinon and found a bounty of kits right down my alley. The one I picked up first is The Carver.
I don't know of any backstories with the sculpts. So what we have is a ragdoll that has carved a Halloween pumpkin, but what the prototype image shows is that the doll has blood splatter on his shirt from possibly carving up something else.... Oooooh.
I don't know of any backstories with the sculpts. So what we have is a ragdoll that has carved a Halloween pumpkin, but what the prototype image shows is that the doll has blood splatter on his shirt from possibly carving up something else.... Oooooh.
Sunday, November 29, 2015
Blue Gemini Part 2
I managed a few more hours in the hobby room and continued with the Blue Gemini. Taking a good look at the clear parts that are the Gemini doors, I decided they needed a dip in Future.


Wednesday, November 25, 2015
Anigrand's Blue Gemini
Finishing the X-19, and still having some free time I picked out another kit that I thought would go quickly. So I chose Anigrand's 1/72 Blue Gemini.
From Anigrand's site: In 1961, after success of the Mercury spacecraft launch, NASA contracted McDonnell to design a larger two-man Mercury mark II for longer periods in orbit. This bigger spacecraft which soon renamed Gemini that require a larger launch vehicle, a Titan II missile. The Titan II was Air Force missile and naturally required close coordination with the Air Force. The Air Force was interested in the Gemini program because it would be ready much earlier than the Dyna-Soar space plane while Russians already had men in orbit possibly carrying nuclear bombs. In 1962, the Air Force had designated the spacecraft as Blue Gemini. It would essentially be an off-the-shelf NASA Gemini vehicle. In January 1963, Air Force and NASA officials went to Pentagon to propose DoD participation in Blue Gemini, but was rejected and cancelled by Secretary of Defense.
From Anigrand's site: In 1961, after success of the Mercury spacecraft launch, NASA contracted McDonnell to design a larger two-man Mercury mark II for longer periods in orbit. This bigger spacecraft which soon renamed Gemini that require a larger launch vehicle, a Titan II missile. The Titan II was Air Force missile and naturally required close coordination with the Air Force. The Air Force was interested in the Gemini program because it would be ready much earlier than the Dyna-Soar space plane while Russians already had men in orbit possibly carrying nuclear bombs. In 1962, the Air Force had designated the spacecraft as Blue Gemini. It would essentially be an off-the-shelf NASA Gemini vehicle. In January 1963, Air Force and NASA officials went to Pentagon to propose DoD participation in Blue Gemini, but was rejected and cancelled by Secretary of Defense.
X-19 Done
I finally got around to putting the decals on the X-19 and I'm calling this one done. The decals didn't line up exactly with the drawing on the directions. I don't know if some of the decals were too big or the guy drawing the illustration was doing so out of scale. But they went mostly where they belong. ;)
One thing I learned was that I should have left the nacelles with the propellers OFF until the decals were complete ...
One other thing I learned is that I put some of the decals over the windows to get them in place before cutting them. These windows was the Microscale Kristal Clear. Once the wet decal went over the window, the moisture instantly re-wetted the glue and turned it White. OH NO! But not to fear as the water dried that "glass turned clear again. Here's the pics - -

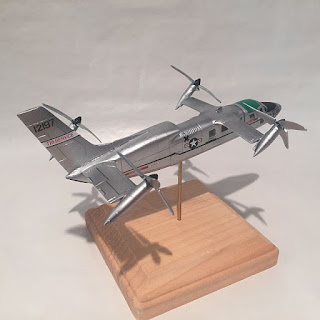
One thing I learned was that I should have left the nacelles with the propellers OFF until the decals were complete ...
One other thing I learned is that I put some of the decals over the windows to get them in place before cutting them. These windows was the Microscale Kristal Clear. Once the wet decal went over the window, the moisture instantly re-wetted the glue and turned it White. OH NO! But not to fear as the water dried that "glass turned clear again. Here's the pics - -


Friday, November 20, 2015
Rocketship XM Finished
This time will be a short post, The only thing that had to be completed was the decal. I ruined two of them but the third time was the charm.
This time I started with the same image, but instead of just changing the color of the text from gray to an orange color, I also made the black - blacker.
After printing I let dry and gave it two coats of Krylon Crystal Clear Gloss allowing 24 hrs drying between each coat.
I had no problems this time. Here it is -
 The decal looks a little wavy especially on top, but somehow that's an optical illusion. It's perfectly flat. Thanks for lookin'.
This time I started with the same image, but instead of just changing the color of the text from gray to an orange color, I also made the black - blacker.
After printing I let dry and gave it two coats of Krylon Crystal Clear Gloss allowing 24 hrs drying between each coat.
I had no problems this time. Here it is -

Thursday, November 12, 2015
Finishing up The Rocketship XM
I already had two tries at the decal. The first problem was my fault, the second one... I don't know what happened. As soon as I put the decal in place there was a little chunk taken out of it where the "e" is in Rocketship. Not noticing it right away I went to move the decal into place and where it bent it cracked, and a crack that couldn't be hidden. :(
I'm gong to give the home made decal one more shot before ordering a real one from Fantastic Plastic.
But I moved on to painting the ship itself. I had previous given it a coat of V's black gloss primer. Then today, not having the Titanium color that is called for in the directions, and Vallejo not having that in their inventory, I decided to use the color DurAluminum. It's darker than Aluminum, but not as dark as the Steel appears to be.
Here's the almost final image. I'll be back with just a finished image when I get the decal sorted out. Thanks for lookin' - -

I'm gong to give the home made decal one more shot before ordering a real one from Fantastic Plastic.
But I moved on to painting the ship itself. I had previous given it a coat of V's black gloss primer. Then today, not having the Titanium color that is called for in the directions, and Vallejo not having that in their inventory, I decided to use the color DurAluminum. It's darker than Aluminum, but not as dark as the Steel appears to be.
Here's the almost final image. I'll be back with just a finished image when I get the decal sorted out. Thanks for lookin' - -

Subscribe to:
Posts (Atom)