Wednesday, September 18, 2024

The Origin of Lowbrow

 Starting the base I needed some foam, and something solid. I had a few oval MDF flats pre-made for bases. I took 2, and glued them together and then glued them to a piece of foam.

Once the glue was dry, I used my hot wire foam cutter to cut the oval shape into the foam using the MDF as a guide.

From there Is aw a YouTube video where they mixed Mod Podge together with paint and some sawdust to get a textured surface. Little did I know that everything is for sale on Amazon; even sawdust! I was able to buy two containers - rough and fine sawdust, and it was delivered in 2 days!  I mixed all the ingredients, including some black paint together, and because of the sawdust, had to add water. Unfortunately I mixed in too much and ended with a soupy mix. But I still thought I could use it. Taking a palette knife I was able to add my mixture like icing on a cake. I added a few pebbles, and bark chips to recreate rocks. I also temporarily pushed the car into the wet mix so it would have a spot for it to sit when this all dried.

This took a few days to dry, but while I waiting I took some folded over Frog tape and created leaves for a plant I was going to add. Then I mixed up a little ball of Aves and created what will be a cycad type plant. 

When the mix dried I added a few different shades of tan and yellow beige to the soil, and a reddish to the plant. I added the cycad and a big rock carved out of foam. Fred and the car were glued in next, and the final step was adding Wilma. She was glued to the back wheel and her feet to the ground. Thanks for looking. 


The Tsiolkovsky Moon Rocket

 Years ago Fantastic Plastic started started a new genre in their store of the classic rockets from the movies, etc...  A number of kits from the line were produced and he manages to release new ones.

But this one I picked up from CultTVMan from Adam Johnson and AJAmodels. From their info sheet: In 1935, Konstantin Tsiolkovsky  was asked by Boris Shumyatsky to assist in writing and designing a moon rocket for a film called "Cosmic Voyage." The films depiction of a rocket launch and moon landing was accurate and ahead of it's time.  Tsiolkovsky died during the film's production, marking it as his last achievement in life, and his goal of the promise of manned space travel.

The kit is made up of 6 gray resin parts, plus a number (they are still wrapped up) clear acetate pices to make a display stand. Decals are also included.

Starting the build I noticed the first problem. The fuselage parts are well done, but they are mismatched. They are both the same length, but if you line up end to end the 4 circular windows don't match. So the thing to do here is make sure the windows are circles and worry about sanding both ends of the ship later.


With the fuselage fully super glued. It was now time to tackle the seam-line along the length of the craft. To keep things neat I laid down two rows of Tamiya tape and then applied Tamiya Putty to the seam. 


That's all the time I had for this session. Check back when the 3 fins get installed. Thanks for looking. 


Wednesday, September 11, 2024

The Origin of Lowbrow - Flintstones

 This kit I first saw on You Tube or the Net, and since the Flintstones were a big part of my childhood as a kid, I had to have.  The kit is from Iceman Collections and parts are all 3D printed.All the parts are very well done, and the grow lines have all been well hidden - except for Wilma. But her sculpt is so dainty that I didn't want to mess with her too much.

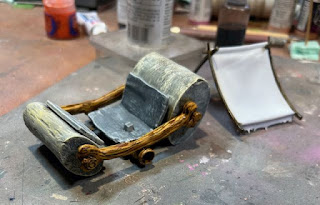
I started out with the vehicles, and since it's made up of stone and wood, grays were used for the stone and a light brown was sprayed on first, then streaked with a darker brown for the grain was added with a thin brush. Finally a was of Citadel's Agrax was put over the top. While I had the brown out, I also painted the frame for the top.


 While that was drying, I turned to Fred. Having seen Fred a zillion times, I was well aware of his dark hair skin color and orange suit. The only thing I had to search for was the color of his tie. I this version he got a little soul patch which needed to be painted, and the weird part was he has no eyes - he'll be wearing shades later. He also has a stub of a cigar. So that will need some paint too.


While that's all drying, I turned my attention to Wilma. This version is showing a lot of skin, so I started out with my usual deep pink to start the skin tone. 


 From there I used Vallejo's Game Air Flesh for the skin tone. Then followed up with her white dress, shoes and necklace. Then the red hair was done, starting with the darkest color.


Coming back later, I gave her a face with lashes, blush, and eye shadow. Glad I had my Opti-visors! :) 


 With the figures more or less done, it was time to try and put everything together. This model, like all 3D designed models I've dealt with so far, have tolerances so tight that unless things are put together in such a way, things won't fit. The parts I saw that I noticed Fred, the steering wheel and the seat. Fred and the seat was fairly fiddle-y and it took a little negotiating to get the steering wheel into his hand and into the spot for it. But he was in there. Also as seen below I got the glasses on. They were VERY fragile. I wanted some of that changing iridescents from Green Stuff World for the lenses, so a glass black went down first, then two dots of the green to blue changing paint.


Wilma is only attached to Fred/the car by her tiny hands, so so sort of base was needed. I took one of my ovals and adhered it to some foam and then used the hot wire cutter to get the shape. From there I mixed up some of my black Mod Podge with some saw dust for texture. I added a little water to make it a bit thinner, and then with a palette knife to add it like icing on a cake. Being very wet it's time to dry it. That's where we will stop for now. Check back for the finale.


Tuesday, September 10, 2024

Edmund Fitzgerald

This is another kit out of the depths of my stash. The Fitz was done my Iron Shipwright Models, and in looking for the url, I see they are still around being bought by Commander Models. 

The ship is 1/700 scale working out to about 12" .  Being an older kit, the smaller pieces have a bit of flash on them and will take some time to clean. It looks like they took off the pour plug on the bottom of the hull with a grinder. The bottom is a bit rough, but if you are going to sit it "in water" that won't be a problem. The one big problem is that while the grinder was still spinning, it accidentally hit the side of the hull. That needs to be fixed!

The image from the website indicates they redid the molds and things are better arranged. 


 Since mine will be in water, I'm not worrying about the bottom, so the first think to tackle is the gouges on the side. I started out fill them with Tamiya putty, but didn't like the look and redid it with some Aves. The next thing is to tackle the decks. I guess they were in the box so long that each one had some type of warpage. A quick dunk it super hot water fixed that.

The gouge and the warp

 I decided that I would clean the fiddly bits as I needed them, so next is a coat of primer, and when dry, the base colors. The ship is basically two colors - white and Hull Red. 


 That's where we are going to leave it for this session. Check back for more.