
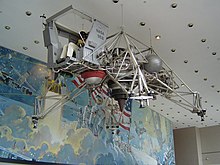
Finally back with another session. Most of my down time has been investigating additional details for the vehicle. I did receive the CD from the model producer, and it concentrated on the one on display at the Air and Space Museum. While a good walk-around for something hanging from the ceiling, I was really looking for any and all details that was on that rear deck - which of course was plastered up against the ceiling.
I even downloaded a LLRV MONOGRAPH, and bought a BOOK from Amazon. All to no avail. I finally came close to what I wanted in the form of master modeler Ben Guenther's scratchbuilt LLRV in 1:48 scale.

As mentioned Ben's is 1:48, and the build from "crackerjazz" on the ARC Forums is 1:18; mine is only 1:72! So I have to know my limits.
Getting to work, the first part I needed to add was the altimeter. It is two lenticular shapes on a triangular base. What I did was take some of my blue stuff, and guesstimated the size, and pressed 2 tiny beads into the BLUE STUFF. Once hardened I mixed some MILLIPUT (Aves doesn't work with Blue Stuff), and pressed it onto the depressions. While that was drying I created the triangular base with more Milliput.


Next was the landing struts. Somewhere early on, wheels were switched out for posts. According to one account, a strong wind was getting the LLRV rolling along. The kit parts were 4 rectangles, and 4 rods of styrene. Since they were supposed to be shock absorbers. I found a tube in my stock that the rod fit into and used that. It was to thick, but if you want "something" there, beggars can't be choosers.


The other thing I did was hold the end of the styrene rod close to heat. My plan was to get it hot and then press it, to get a flare at the end. But as the heat approached the rod, it started mushrooming on it's own. Perfect!
Finally in one of the A&S Museum pics it shows what I'm taking as an oxygen cylinder (because it was green) under the pilots seat. The two red arrows show the cylinder and the altimeter. It was at this point where I realized that the altimeter and that mystery box locations were swapped. %#*&* !! But luckily with slight pressure with an Xacto blade the 2 parts popped right off. I put them in their correct positions, and then decided to quit for today while I was ahead. Check back for more details. Thanks for looking.
No comments:
Post a Comment