Monday, April 30, 2018

Future Retro Moon Suit Finale

I left off with the assembly under way. I finished that up, and then turned to the decal.  First thing I noticed was that it was VERY thick. Almost to the point where I thought it was a sticker and not a decal. Even cutting the decal close, in a few spots it wasn't close enough and if you really look, you can see the carrier film. Oh well. 
I added some black/gray "dust" to the suit and positioned it on the moon base.  Thanks for looking.


Vic Torry's Spaceship

Vic Torry and his Flying Saucer was a pulp comic released in 1950 at the height of the flying saucer craze. In one episode Vic, an aviator, and his girlfriend are given a flying saucer by a dying alien. Getting in, it is programmed to return to the home planet of Mercury. They land amidst a civil war...

I picked this kit out of the stash after the Moon Suit and Charon builds, I wanted something simple. Looking it over I don't think I could get anything more simple. 
The Atlantis kit is 4 parts of yellow styrene for the saucer and 4 parts of purple for the base. It also comes with a card stock cardboard of pages of the comic. It also comes with a little blinking LED, but I'm leaving that out.
 The one thing that confused me about the model is that the kit is yellow plastic, the saucer in the comic is yellow, and a lot of the models I see built are painted from a yellow through a gold color. But right in the first page of the comic, the script says the saucer is silver! 
Hmmm.  I will be painting my saucer silver!  

Looking the kit over and test fitting, it's apparent that there are no windows, so I will have to add them later. But first I blacked out the interior so it hides the yellow and the fact that there is no interior. 
You can see that the two engines have also been attached.
I then closed the two halves up and puttied the seam around the edge.  After that. I painted the craft Vallejo's gloss black primer to be ready for V's Metallics. 

I like their Duraluminum color. But that's for next time. Thanks for looking


Future Retro Moon Suit part 2

Most of the sanding and smoothing done, I started the assembly.
A few of the resin windows on the bottom were troublesome. They were fit and sanded, and tried again, and more sanding, until the part went in place smoothly. Then I applied the superglue and it didn't fit. UGH. One got a little blob of glue on one corner. But by this time I was tired of fiddling with it and just stuck it in there. I attempted to sand it while in place, and then added a few drops of Future. Doesn't look great, but not that bad. I may do some weather to hide it a bit...   Thanks for looking.
Resin windows aren't totally clear, but I like 'em better than vac form.

This is the window that caused me all the problems.
Antenna attached.


Thursday, April 26, 2018

Future Retro Moon Suit

I've had this model  from Futuristic Models in my stash for a while now. IIRC there was supposed to be a styrene version produced by someone, but apparently that plan must have just gone away. Liking the Future Retro look and wanting one, I picked this model.
There are two version of this Moon Suit; one with the astronaut running with a rock and a rock hammer, the other with the astronaut just standing there. I have the running version. It's apparently based on this image from Life -


The kit is a gray resin, with the windows a clear resin. The clear is mostly clear and dips in Future made it slightly better. There was a seam line on the main body par, and some flash here and there, but nothing that couldn't be dealt with- 

The aforementioned seam
The other thing to notice was the very big pour plug on the main window. I always take clear resin as being brittle, so I was very careful with the dremel tool getting rid of this plug.  I did get a crack on the bottom but I luckily caught it in time and super glued it closed.  All the clear parts then got a dip in Future. 

Taking a break from cleaning the seams - yes there is a little noticeable line along the accordion section of the arms and legs - I decided to paint the astronaut - 

More painting and I start the assembly next time. Thanks for looking.


Tuesday, April 24, 2018

Me. 1092. I didn't forget. Part 4

We left off with some Tamiya putty on the xtra large panel lines on the plane. 
I left it for a few days and then started wet sanding. Many of the problems appeared to disappear, but after  spraying with Tamiya primer, I still have a ways to go for a smooth fuselage.  Sigh.  
Thanks for looking.


Thursday, April 19, 2018

Charon Vignette Finale

As I was putting this together, I realized that I mad a major goof. The demon(#1) who has his arm thrust forward, was glued in place a little too forward. This made the second demon also too far forward, making the lost soul too far forward. 

I noticed this when the other side of Demon #1 did not meet up with the water. How could I have missed that?? The only thing to do besides trying to pull him off and chance breaking him, was to get out the Aves, and create a wave extension. This is what I did.  I think I did a decent job of masking the goof.  
After that I got some of Vallejo's Realistic Water, mixed it with some of V's Green Slime and filled in the water up against the bodies.  Thanks for looking. 


Charon's Vignette part 3

This session I did some work on the figures - the two demons, the lost soul and Charon - 


I'll put it all together for the next time. Thanks for looking.

Lippisch Li.P. 13B part 3

This time around the paint is finished and the decals are on - 


 After the pics were taken I also installed the seat and then formed a stick with stretched sprue.  I took another look the the windscreen. Even though I gave it it's Future bath,  it's a clear resin part and I never removed the little stub. That needed to be sanded off. Then it needed another dip to get rid of the sanding marks. Installation of that next time. Thanks for looking.


Monday, April 16, 2018

Charon's Vignette part 2

This session I got to put a little paint of the vignette. Being it's supposed to be the boat to Hell, I wanted to keep it dark, but not so dark you couldn't see anything. So I decided on high contrast for this. But first the base coat on the boat and river Styx (sorry for the harsh lighting) - 


New

This time around I have 2 figures and another weird plane.  Anyone who knows me, knows I like the weird or bizarre aviation.  This one I saw covered in a recent issue of SAMI magazine.  It's the Kalinin K-12.  From  a site: 
Experimental tailless bomber with two M-22 engines, yet another step on K.A.Kalinin's way towards his dream - rocket-powered supersonic flying wing aircraft. Light bomber carried crew of three.
Confidence in the K-12 was so high, that the experimental aircraft was included in Tushino parade fly-past on August 18, 1937. Painted in impressive feather-pattern, it was presented under nickname 'Zhar-ptitsa' (Fire-bird).
Ten K-12 were built, but production was cancelled when K.A.Kalinin became a victim of Stalin's purges.


I was able to get this kit from Ebay, coming all the way from the Ukraine. 
 
Next up are two busts. Pan (from Pans Labyrinth) by Angels by Noemi, and can be gotten from her ETSY page.
And fans of horror knows this bust needs no intro - Peter Cushing as Baron Von Frankensten, by John Dennett, and MoonDevil studio.  The Baron is the first in a set of busts of Hammer Film characters. The next one,which is already released and on it's way to me, is Christopher Lee as Frankenstein. But we'll see that next time. Til then here are the busts - 


Lippisch Li.P.13B part 2

Moving right along with the Lipisch I finished painting the rest of the camo colors and also added the vertical stabilizers.  

I also needed to add a skid ski to the bottom of the craft. This apparently replaced any wheels on the plane. 
This was easier said than don't because it installs at an angle, and there was no easy way align it correctly without sitting the plane done and letting it find its own angle.  But when you do that the back of the skid wants to lift off the ground. Ugh.  But in the end I did get it to sit flat on the ground, albeit with a slight twist. But I wasn't going to mess with it any further.

A little tough to see the skid, but it's there. ;)
Next is to gloss it for the decals. Next time. Thanks for looking.

Sunday, April 15, 2018

A new SOLO ship?

From a trailer from the SOLO movie. I don't remember seeing this ship before...

Saturday, April 14, 2018

Aradia's Charon

This time around I will be digging into the Charon kit from Aradia Miniatures. This was one of the levels gotten from their Kickstarter talked about HERE

A first look at the kit, it's is pretty intimidating. There are many parts and no instructions. You have to constantly refer to the box art which IMHO is a bit dark and hard to see.  Here are the parts - 


Taking a look at the parts in trying to separate them out, I was a little disappointed to see that in the largest part, the waves, it looked like the new mold slipped a bit leaving a lip - 


This though was in the back and remedied with an exacto knife and sanding sponges.  The 2 parts of the wave were glued together and the boat bow (which was one piece) was just placed on top. The fit was good, but I will need to add a bit of Aves in a few spots - 

Besides the two demon heads that are swirling in the water, the figures include Charon, two other demons, and a female "victim." Some of the figures need to be build so I further separated them into subassemblies - 


Let the painting begin - but that's for the next time. Thanks for looking.


Lippisch Li.P.13B

Needing a breather from the Me. 1092/3, I opened up Anigrand's Lippisch 13B kit. Having previously looked at it, I knew with minimal parts it's should be a fairly simple build. 
From Anigrand - 
In early 1944, due to the fuel shortage in Germany at that stage in the war, Dr. Alexander Lippisch and his design team though to use other kind of material be the alternative fuel for the power of his ramjet fighter designs, such as P.13a. They tried "coal" powder and designed a hexagonal / round shaped chamber which was suitable for coal combustion, and was refilled from top center. However, the fuel chamber could not fit into the P.13a fuselage. It was led to the follow-on design, the P.13b which was started in November 1944. It also featured a delta wing plan design as Lippisch's favorite. The cockpit was moved forward for better pilot's visibility. The double rudders were chosen to provide steady flight. The main landing gear was the retractable landing skid, and rear rested on the reinforced wingtips. No actual craft was built as end of the war. It only stayed in stage of concept sketches.
Here are the minimal parts - 


Fitting the two main parts together to see, before I applied glue, it's noticed that there are no engines. So the first thing to do is to darken the openings to make sure no ones looks in and notices no engines - 
One thing I did miss, was the opening at the other end. It wasn't obvious and just an oops.

Gluing the two parts of the fuselage, the kit was essentially just about done. Looking at the instructions, there was no specific color callouts (b/c the plane never really existed) so I used the typical RLM 81 and 82 for the top, and RLM 76 for the bottom. The camo shown had hard edges, and it was at this time that I noticed the painting images looked to be the same size as the model. I then cut up the painting image to make stencils for the model. But first I airbrushed the darkest color in to the approximate locations - 
You'll notice I also painted the cockpit (which is just a seat and stick) a dark gray. After this I sprayed with a matte poly, and left it to dry. 
Thanks for looking.


Me. 1092/3 part 3

Getting the Me. together from the last episode, I took a good look at the panel lines. In some spots they really look like mini Grand Canyons. So I've decided to fill in the ones that really offend, and then take a look at the rest. Here's what we have after filling -

While I was waiting for this to dry, I too a look at the previously Futured canopy. As is with too many canopies, in an effort (I'm guessing) to keep things in scale, they seem to make the details too faint.  I have been using the Tamiya Tape to cover the glass panels, but a member at my modeling club suggested I use Bare Metal Foil as it's thinner and makes the canopy frames easier to see. Which I did, and the frames are *still* barely visible -
After seeing this was the best I was going to get, I put the kit down for a few days. In the meantime I opened up the Lippisch kit. see next. Thanks for looking.

Wednesday, April 4, 2018

McDevitt's The Punisher

This time around I worked on Troy McDevitt's The Punisher. It is one of his Comics series. Each bust is sitting on a stack of comics having to do with the busts subject. To date Troy has about 10 busts in the series. I recently heard that he has seven more coming out shortly. So if you're a model and/or comix fan, check 'em out. 
The kit comes in three parts - the bust, the stack of comics, and one standing comic book - 

It was very nicely casted with no bubbles and only one fine seam line along the stack of comics.
Things went so smoothly that I only remembered to take a few pics - 
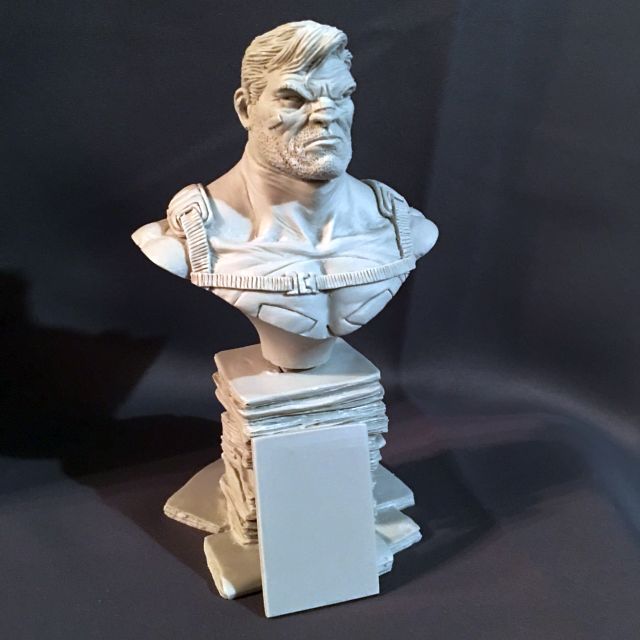
Here the figure is just base coated

Starting to add detail

He had a heavy brow, so he's tilted back to see the eyes
I just kept tweaking the details, until I was happy, then started in on the stack.  In the time it took my to build the model, I had no idea what I did with the decals for the comics. Emailing Troy, he gladly sent me another set. I cut the first one out and had it in the water a number of seconds before I realized that they weren't decals but just cutouts. Doh!! But it made installing them a whole lot easier. I used Tacky Glue, and they went on 1, 2, 3. Once dry I used Army Painter Light Tone to shade the pages of the comics and I was done. Thanks for looking.