Sunday, April 28, 2019

New

I never think to post these as any models come in, but here's my latest additions.
I nice package came from Gillman Productions. In it came Caesar from the newest rendition of Planet of the Apes, The Sand Worm from dune, and a GK producer is starting (a hopefully long) run of celebs from Hollywood's heyday. The first one is Gary cooper as seen in Beau Geste.


Then my collection of Medusas grew by 2, with Atlantis Miniatures, and Zabavka Models entries. 


Monday, April 15, 2019

Deinonychus Finale

(See part 1)

This guy has been languishing on my side table since last Nov! Time to finish it off. Having just shown the kit parts, first thing to do was assembly -


Giving the rock base some color


This is where the model sat and sat. 
In all honesty, I usually don't start painting until I get an idea. VERY few times that idea never comes. This is one of those times. So I stuck to colors that went along with the tan Stynylrez primer, and threw in another color to make some things stand out. A few washes later, I glossed the eyes and mouth, and put Satin on the claws and I was calling this one done.  Thanks for looking. 

It was so big I couldn't fit it on my "set."


Saturday, April 13, 2019

LLRV Finale

Go to Part 3

Looking toward the cockpit section, again each variation had different features. I "think" I'm still close to the example I'm using. 
here the pilot is in his seat. There was a wide variation of what they wore - from a flame proof suit, to the orange "suit". I found a few with the pilot wearing a sort of light colored olive, that's the one I chose. In the pic it also looks like he was wearing regular brown leather work gloves. So I added that even tho the color makes it looks like he's got bare hands. Between his knees you can barely make out the yellow and black of the ejector seat ring. There was a few images where there was foot pedals - so with some bent wire, I included them.
In the rear, additional wiring and plumbing were added. I added drips of super glue where needed to get rid of the wood grain that came thru the paint. These boxes are supposed to be metal, not wood. ;)   
One oops is that I added glue to the 4 stubs where the engine attaches to the ring. As I pushed the engine into place the glue stuck before I got the whole thing in. The engine is supposed to be below that top frame work. Oh well.


The last step, was creating a little base for it. I took a square piece of foam, and covered the top with Free Form Air clay. This product is super light weight, and air dries in a few hours. It is sticky, but somehow is less so when you use a little at a time. Adding water really lets you smooth things out. A cut some balsa sheet to act as a frame.

Once dry, I sanded it as smooth as possible and then I found a VIDEO of a flight from Edwards, and it shows a regular gray concrete with some black "tar" lining some of the sections. There was also white lines and dots painted on the concrete. I tried to mimic this. 


So with that, I was done. Thanks for looking. 


Friday, April 12, 2019

Hutter HU-136 Stubo II

This was a model I've wanted to get out of my stack for a while. The Stubo II is a Fantastic Plastic offering, that comes back in stock every once in a while. 

From the Luft '46 site:
The second design (from the Hutter brothers)  - Stubo 2 (short for Sturzbomber or dive-bomber) - was also to be heavily armored and was similar to the Hütter Hü 136 (Stubo 1). The fuselage was lengthened on the Stubo 2 to accommodate the internal bomb bay which could hold a 1000 kg (2205 lb) bomb load.  

Ultimately, the Air Ministry passed on the unusual proposal, choosing instead to manufacturer the far more conventional Henschel HS 129.

The kit comes in 14 parts including a seat and stick, which you'll never see, and I left out. The canopy is clear but following the directions, the majority of it gets painted.  

 Being cast by Anigrand, you know you are getting a good kit. As usual, the parts went together with minimal effort. 

One thing I noticed with this kit is if the fuselage holes don't match the pins in the wings - swap them, don't clip the pins. They are made to fit only to one side. Cool idea!

A lil seam filling.
  The process continued effortlessly, and a coat of white paint, for the fuselage, and V. Game Color Gory Red, was the shade of red I chose. Then it was time for the decals.  The decals went on just as effortless as the rest of the build.  After a short wait the Micro-Sol went on and suck the decals into all the panel lines perfectly. 
It was here that I noticed that there was no decal for the gun placement. It wasn't sculpted into the fuselage, so I thought it was a decal. Looking closely at the instruction sheet, it says the model was created after the original which didn't have guns.  So if I wanted I could carve wells into the fuselage (THAT wasn't going to happen) or I could create a decals for it.  Umm, didn't the FP guy create decals for his? Why couldn't his design be added to the decals sheet? Even if it added another $1 to the price of the kit, I'd pay it.
Having no ability to create a drawing for a decal, mine will do without.
Hard to see - the skid also went in place with no problems.
Looking back one thing I should have done that I didn't was paint the inside of the canopy. With the white paint on the outside and the light tan resin showing on the inside, the windows almost disappear. I'll have to keep that in mind for the next time.  

While I was waiting for the clear coat covering the decals to dry I went apart creating a base for it. It consists of a square of foam that it coated in DAPs Plastic Wood.  I started out using a spatula, but it seemed to go on faster and smoother with just a wet finger. Being the craft just has one landing skid, I created a mini sawhorse to level the plane for display.

I plan to add some grass around the edge of the vignette, and rather than create a new post, I'll be back and edit this one when that gets done.   All done.

Thanks for looking.


Wednesday, April 10, 2019

Cheetah Woman Finale

Taking the next step for the cheetah woman was to put the spot son. This model was done right after I did the mini Close Encounters dio. After putting in all those dots for lights, I should have thought ahead and did something else. Here we go with more dots...

To finish her off, she needed a base. As a reader of the Massive Voodoo blog, they recently had an article where the author tries to fit an entire story onto a small base. Michaels had these 2"X2" blocks, and I decided to try that.  O took the block, and added a piece of foam to create a level. Also added was bits of cork. Yet another article I read somewhere was to tear off pieces of cork and it will make realistic rocks. This is supposedly better than having a drawer full of rocks. ;)  That gave me this -

Once the glue for the foam and cork dried, I coated the entire top with Vallejo Desert Paste. While still we I added Cheetah and a few more stones. 

Once that was dry I added some more paste, and added some dried grass tufts, and more cork rocks.  With that applied, I was done. Thanks for looking. 


Friday, April 5, 2019

LLRV part 3


(Go here for Part 2)
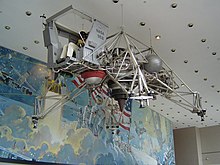
 Continuing on with a fresh outlook, And finding this image of a museum model -

I went about to mimic what I see, including some wiring. I had no intention to try and get every wire, but it needed some.
I also noticed 2 framework pieces that needed to be added


Taking a break from that part of the build, I added some paint to the engine. The end is V. Metallics Silver, and the center part is the old M.C. Steel to get a little variation. I also washed in a black to bring out the details. - 

Getting close to the end I primed it all in gloss primer.

Then when that was dry to the touch I couldn't help myself and painted the entire craft in V. Metallics  Aluminum. I just placed the seat in its spot for the pic. 
Check back for the finale, and thanks for looking.


Wednesday, April 3, 2019

LLRV part 2

(Go here for Part 1
Finally back with another session. Most of my down time has been investigating additional details for the vehicle.  I did receive the CD from the model producer, and it concentrated on the one on display at the Air and Space Museum. While a good walk-around for something hanging from the ceiling, I was really looking for any and all details that was on that rear deck - which of course was plastered up against the ceiling.

I even downloaded a LLRV MONOGRAPH, and bought a BOOK from Amazon. All to no avail. I finally came close to what I wanted in the form of master modeler Ben Guenther's scratchbuilt LLRV in 1:48 scale. 

As mentioned Ben's is 1:48, and the build from "crackerjazz" on the ARC Forums is 1:18; mine is only 1:72!  So I have to know my limits.

Getting to work, the first part I needed to add was the altimeter. It is two lenticular shapes on a triangular base. What I did was take some of my blue stuff, and guesstimated the size, and pressed 2 tiny beads into the BLUE STUFF. Once hardened I mixed some MILLIPUT (Aves doesn't work with Blue Stuff), and pressed it onto the depressions. While that was drying I created the triangular base with more Milliput.

After cutting free the rounded shapes all that was left was to gently sand the base to shape. 

Next was the landing struts. Somewhere early on, wheels were switched out for posts. According to one account, a strong wind was getting the LLRV rolling along.  The kit parts were 4 rectangles, and 4 rods of styrene. Since they were supposed to be  shock absorbers. I found a tube in my stock that the rod fit into and used that. It was to thick, but if you want "something" there, beggars can't be choosers. 


The other thing I did was hold the end of the styrene rod close to heat. My plan was to get it hot and then press it, to get a flare at the end. But as the heat approached the rod, it started mushrooming on it's own. Perfect! 

Finally in one of the A&S Museum pics it shows what I'm taking as an oxygen cylinder (because it was green) under the pilots seat.  The two red arrows show the cylinder and the altimeter. It was at this point where I realized that the altimeter and that mystery box locations were swapped. %#*&* !!  But luckily with slight pressure with an Xacto blade the 2 parts popped right off. I put them in their correct positions, and then decided to quit for today while I was ahead. Check back for more details. Thanks for looking.