Sunday, July 31, 2016

Sir John's Secret

2010's Wolfman gave us Benicio Del Toro as Lawrence Talbot returning to England after his brother turns up dead. It's also a reuniting with his father, Sir John, played by Anthony Hopkins. But John has a secret ...

The kit, sculpted by Mark Van Tine and casted by Gillman Prods.,  is excellently done in 2 parts (the bust and the base). There's no flash or bubbles to be found. 

I kinda remembered what Sir John looked like from the movie, but it was rather difficult to find photos that weren't screen grabs where the colors were affected by other lighting on stage. The most popular one had the whole image in a sort of yellow light. This was no good. 
I finally found "behind the scenes" pics which show a costume in natural light - - 

With these images it was time to go to work. Firstly there was a light seam hidden in the fur. It took about a half hour to clear that away and make it disappear--

 
the kit right out of the box and the base just stuck on.


The seam removed and fur replaced with Vallejo Plastic Putty

The removed seam on the other side...

The base has detail all the way around

Very cool. The sculptor signed it for me!

I then move fwd with the new way I prime kits - painting them black and then heavily drybrushing in white. The reasoning behind this is when you thinly apply color, it will automatically give you two tones--

Primed B&W

First coat of brown

Agrax Earthshde was added
 In the movie, Sir John is an older man with gray hair so when he turns in to a Wolfman he keep his gray hair. So after painting the highlights and shadows of the fur, the final step was to highlight certain parts of his body with Vallejo's Light Gray. Being a coward I always wait until the end to do the eyes. A quick search told me Anthony Hopkins has blue eyes, and I saw nothing in writing letting me know he was wearing contacts. So blue eyes it is - - 


It was obvious that the based was on a wooden block. So rather than hiding that, I brought out the wood grain, but kept the block old looking. The pentagram was painted Vallejo's Old Gold and highlighted with Brass. The scratches were painted with Cavalry Brown, which is actually a deep red, and then put some V's Gloss over it to make it stand out a bit. I also created a "shadow in the pentagram with the same Cavalry Brown.  That did it. I'm done. :)   Thanks for looking.


Saturday, July 30, 2016

Resin Realities Bride of Frankenstein

The Bride was one of these models that while I'm not necessarily into,  the kit "spoke" to me in a way where I had to have it.  I *think* I picked it up a few years ago at either a JerseyFest or a Resintopia show that was in NJ. 
The kit, made by Resin Realities,  was fairly simply being only 2 parts. There were a few seam issues but I started off quickly. In my fervor to begin I didn't notice that there was a pretty prominent seam running down her face. So I cleaned off the paint and started on the seam and reprimed - - 
You can see that at this point she has a regular skin coloring. This would change a few times as I progressed. I found  I had Vallejo's Game Color - Dead Flesh.  Remembering a rare color photo of Karloff's Frankenstein was green. I figured that she should be similarly color, tho not as much.  This paint choice hit the bill. However what I did was to add a little white to it to lighten. Also, knowing that Elsa Lanchester had red hair despite not seeing it in the B&W movie, they used her real hair over an armature to create the Bride's special 'do - I painted her hair with a dark brown and then a lighter brown and then Vallejo's Orange Brown as the red highlight. 

Don't use red. Redheads never have *red* hair!

At this point another kit attracted my attention, and the Bride was put on the shelf for quite a while. 
A few days ago, I decided to clean up all my half done models, so the Bride came back to my desk. Looking at the face and knowing it needed a highlight the color I chose previously left me no where to go but to add straight white as a highlight; which I did. But the white was too stark - -
To fix it, I masked the hair and gown off with paper towel and Silly Putty. I then lightly misted her face in V's Buff. I had noticed when I used it previously that it wasn't a substitute for tan but had a bit of green in it.   However this only made her have a yellow cast. So I added a drop of white and a drop of the Dead Flesh and that worked out ok.

Now it was time to create shadows for her gown. I figured the typical blue and gray were already done, so I took some Citadel's Bugman's Glow, added white and used that. I figured the rosy color would be a little more feminine- -


Having the rosy shadows, and the gray primer, all I needed to do is airbrush different densities of white over the gown to achieve the different highlights and shadows. 
To finish, all that was left was to add the eyes. A quick search of Fritz's Paint Guide told me Elsa had green eyes, and adding them finished off this long project. Thanks for looking.


Friday, July 29, 2016

Rocketship Galileo

Another in Fantastic Plastic's line of "classic" space ships, the model was based on Robert Heinlein's book. The story goes: 
After World War II, three teenage boy rocket experimenters are recruited by one boy's uncle, Dr. Cargraves, a renowned physicist who had worked on the Manhattan Project, to refit a conventionally powered surplus "mail rocket". It is to be converted to run on a thorium nuclear pile which boils zinc as a propellant. They use a cleared area in a military weapons test range in the desert for their work, despite prying and sabotage attempts by unknown agents.
Upon completion of the modifications, they stock the rocket, which they name the Galileo, and take off for the Moon, taking approximately 3 days to arrive. After establishing a semi-permanent structure based on a Quonset hut, they claim the moon on behalf of the United Nations...

Then the excitement starts...
The model, which was retired a while ago, comes in 9 pieces of blue resin. There are no bubbles or odor and very little flash. 


Putting it together is pretty straight forward and the parts meet up nicely, tho there is room for a little putty work. 


All images show the space ship as white - and by now you know I hate white. To me, white never looks white, and I'm always looking for the "brighter than Sun" white. No such thing. 
So the paint went on over a gray primer - 


Of course there's always little divots that need to be addressed. The added work was done when I dropped the model and snapped off the vertical fin :-P  -


You have two choices for the engine exhaust - a nuclear exhaust (which is what I used) and a chemical exhaust. The landing gear are made up of two skids. A length of styrene rod is included and you must cut the struts to the provided length, then glue to the skids, then to the rocket. 


All in all it was an easy kit to put together. The window and door was simply score marks on the fuselage. I tried the mini painting technique for doing windows/gems - I'll leave it to you whether it worked out (I didn't think so). The exhaust was painted Vallejo Glossy Black and then I used V's new Aluminum metallic paint. That stuff is awesome! 


Anyway there it is. Keep watch of Fantastic Plastic's site as he brings back  certain retired kits for a limited time. So it may be possible to see it available again one day. Thanks for looking.

Tuesday, July 26, 2016

New Model from Skink Haunt

Being an on again, off again customer of Skink Haunt, I received an email letting me know of a new kit. Previous he had been known for his animals of Taiwan, where I picked up a few of his reptiles and amphibians. 
He started sculpting some outlandish sci-fi/fantasy sculpts that are a bit outside my price range. But the Octo-Girl (his name for the kit is simply Octopus) is odd enuff that I like it, and it's within my price range.  

It comes in 12 parts, a little flash, no bubble, but it's the type of resin that has a petroleum smell to it when you cut into it and sand it. 
The next day after I really washed it with soapy water and let it dry, I went to my hobby room to start to put it together.  Whoo boy it was a hot day - :-P
 
 But I muddled thru getting most of the model together. I left off the "ears" and the arms as they were both very thin, and was afraid of breaking them. They will go on when I get the feet/legs attached to the base.  Here's where I am - 
Seams will need filling

This will be her on the base. I plan on adding more to the base.

From the back

Closeup of the back. I added dots of V. putty. I see a spot I missed.

Skink's mark

Topside of the base
 Putting it together and puttying the seam I hot it with some black primer, then drybrushed white - my new way to prime. I see that more seam work needs to be done to the front of Octo-Girl. Thanks for looking. 


Monday, July 25, 2016

Dennett's Spleen Stealer


I have been looking at this little bust from John Dennett staring at me for a few weeks now and decided to throw some paint on it. The week before I got my delivery of a few paints from Citadel's red line.  I got Khorne Red (which has a bit of purple in it), Mephiston Red, Evil Sun Scarlet, Troll Slayer Orange. I have seen the last 3 used on a number of mini vids on You Tube. Everyone has been bragging how these paints have a lot of pigment in them and really stand out. It was time to try it. 

I started  by coating the entire model in Mephiston Red - -

and then gave it a coat of Citadel's Nuln Oil - - 


 After the Nulm Oil dried I highlighted the figure, with evil Sun Scarlet, and then another high light of just the topmost features with Troll Slayer Orange - -


I also used my new best friend of paint  - Vallejo's Iraqui Sand for the eyes and teeth. The teeth got a coat of Agrax Earthshade by the gums, and then some off white dry brushed on the tips of teeth.
I looked on the color wheel and saw that blue was opposite the orange-red, so I gave the creature blue eyes. Thinking of something different I made double iris' and pupils. The pupils were simply black dots. Here's the final pics. Thanks for looking. 


Friday, July 15, 2016

A New Star Wars Vehicle?

From Entertainment Weekly's site:
"Director Krennic’s shuttle seems at first glance to be similar to Kylo Ren’s starship from decades later in The Force Awakens. Krennic’s vessel has a similar bat-wing design, but its cockpit has more of a pyramid shape, with a single shark fin on top. Described as the Delta-class T-3c shuttle, the placard says: “Once it lands and deploys its passengers… all sense of dread proves extremely warranted.”


I like it. 


Wednesday, July 13, 2016

JPG's Star Wars Juggernaut

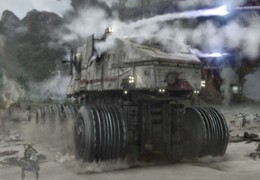
This time around I moved back to the Star Wars  genre to build JPG's Juggernaut. The Juggernaut was seen in a number of the Battles in the prequels - -


The model comes in quite a few parts - many of them being the wheels - 

Each wheel has a few mm of extra resin from the pour, and this needs to come off. I do have a sanding wheel, but the kit wheels small, and I was afraid of sanding the tips of my fingers off, so I still used the sanding wheel, but sanded with the power off. Its a coarse grit and went pretty quickly, but doing all 20 halves made it into a "wax on, wax off" type of situation. I was glad when they were all done. 

But after that, the chassis and the body parts went together almost too easy. All extra parts almost fell in place. What a nicely designed kit.


One little snag was at the end of the main body there were a few series of tiny bubbles, but some Tamiya putty made short work of them - -
Putting the small details on is where I ran into trouble. The problem is the instruction sheet looks like it had been copied 100 times before being copied once more before being put in the kit box. It was too blurry and lacked contrast to where I couldn't see what went where, in which position.  
Now I'm not picking on JPG on this. I gotten quite a few kits from different producers, and many have that "10th generation" copy look.  I would like them to see them put an original in .jpg or .pdf and put it on their site so the modeler could go and print out a super crisp copy.   OK, I'm off my soapbox. 

Once I found a good image I was able to put all the details on - - 

 Then I went to my new way of priming every and painted it all black with the Stynylrez primer - 

Next, came out my Vallejo Silver Gray color. This is a good color to use when you want to paint white. If you use white straight away, then you have no where to go to highlight. I did add White to a few panels here and there - -


I also added Vallejo Jet Exhaust metallic paint to the wheels to give them a slightly different look.
Next up is to gloss, decal and weather the vehicle.
I also have to start thinking about basing it...
Thanks for looking.