Saturday, July 22, 2023

Tamiya X-1 Finale

 The finals steps for the construction was to put on the landing gear and doors. Usually I put them on when the instructions say to, and then I always knock them off somewhere along the line. Another was to paint and glue on the cockpit canopy. The final step was to put on the decals. Despite looking rather aged, they went on with no problems. One toward the end did rip, but joined up rather nicely. 

With the number of pitot tubes on the craft I decided to glue the plane onto it's base. For that I took a regular 6"X6" square piece of wood and then cut some styrene grooved with "expansion joints" for detail. With that, I was done. Thanks for looking. 


Wednesday, July 19, 2023

The Patterson Bigfoot (1967)

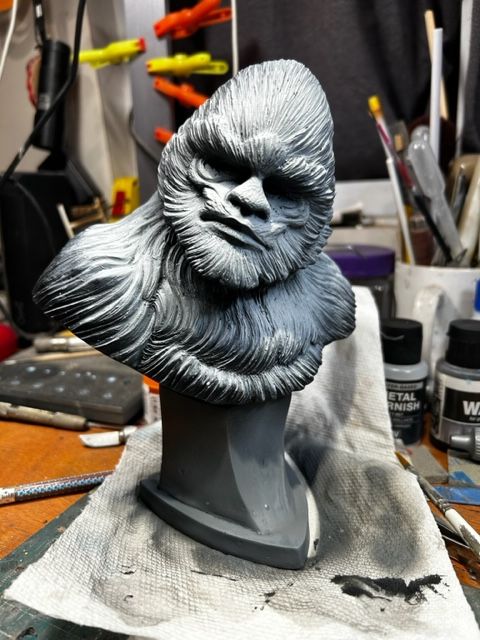
 This next bust comes, once again, from Gillman Productions.  The bust is approx. 1/4 scale and comes in 2 parts - the bust and the base. As usual the kit is spotlessly clean and work can begin almost right away. 


This bust is to represent the 1967 Bigfoot that was filmed by Roger Patterson, and Bob Gimlin along a logging road in northern California. It was said that the film was taken on October 20, 1967, but some critics believe it was shot earlier. Gimlin mostly avoided publicly discussing the subject from at least the early 1970s until about 2005 (except for three appearances), when he began giving interviews and appearing at Bigfoot conferences.


The film Shows him a very dark creature. But I thought a little artistic license would work as I would create a sort of  OSL (Object-source lighting). Tru OSL is when the lighted object is part of the sculpture, but in this case I decided to use a setting sun of the the side of the beast. 

It was just a case of basic layer painting, some highlights and then adding detail around the deeply sunken eyes. The flat back of the bust and base gave me an idea for something different (for me).


 Using various shadows of browns from almost black thru a reddish cork color I added the highlights and shadows according to how I added the primer.  Also looking up gorilla eyes, I got an idea of what I wanted this guy's eyes to look like. 


For the base I decided to call out my inner Bob Ross. As a teenager my parents had gotten me one of his paint sets, and I used it quite a bit, but that was 40 years ago! But I gave it a shot and came up with this woodland scene. The Bigfoot, rocks and downed trees were done in bas relief on the base.  I don't think it's all that terrible. Thanks for looking. 


Groovy Goolies Wolfie

 It took me about 2 seconds to look up the colors for Wolfie, and with that I had a thought. This cartoon series was supposedly started in 1970. I would have been 10 years old, and tho I don't remember the cartoon, I would have been building models for a year or two. So I decided except for putting the extra thick gloss on the base, I would paint it like a 10 year old.  I couldn't leave it with drips and drabs but left all the other tasks out. I didn't use any washes around the minor details. There's also no highlighting and shadows either. 

As I started painting I did realize that I made a huge mistake in assembling the entire model  first. I definitely should have left the the/neck separate to get into all those tiny areas.  But the 10 year old would have built it all up, so I tried my best to get in all the little nooks and crannies.  And after an hour of painting I was done. Thanks for looking. 


Teenage Werewolf Finale.

 This time I basically finished up the base, with a new paint I found works well for concrete - It's Chalk paint called Cocoon. I then added some tufts of grass and painted the sign with a wood grain. One the back it's sculpted like a tree with some leaves, so those were painted in.

On the figure, I finished off the shirt, painted in the stripes and fixed up some of the shadows around the face. I had to cut down the sign to fit within the frame, and used some Mod Podge to glue that down. With that I was done. Thanks for looking. 


Sunday, July 16, 2023

Tamiya X-1

 Back to my aviation subjects. This time I'm digging into the historical that isn't a hypothetical or drawing board plane. It's the Bell X-1.  Most people will remember it as a supersonic research project built by Bell Aircraft

The model is 1:72 scale with 2 sprues of gray styrene, one clear, include the making for a see through section of the aircraft, and one sprue of white which will be a base for building the aircraft in flight mode. 


First thing after giving the instructions a once over was to convert all the paint ref. numbers (all Tamiya) to the color names. I decided that I wouldn't make the plane see through so I could eliminate a lot of the planes extra innards... Assembly of the cockpit was first.


The kit comes with a ball bearing to act as a weight, and they have that located in the first cylinder behind the cockpit. I also thought this a good idea to add as I couldn't tell if you could see it or not once the cockpit was installed. (You can't). 


Right after the above image was taken I installed the instrument panel, and then the engine cluster in the read. Only other thing to do was close it up. 

Time to get paint on the X-1. Vallejo is notorious for have pretty weak pigmented yellow and orange colors, so I bought the Tamiya brand. However reading it again it's 8 parts orange, 1 part Tamiya Clear Red. I didn't have Clear Red, but Vallejo has Transparent Red. I thought the result turned out pretty well. 

Next was to install the wings and horizontal stabilizers. All went on fairly easily except one of the horizontal ones the tab seemed in the wrong position. I cut until it might has well been a butt joint. So I added some CA glue to the styrene cement, and gave it support. I left it over night to dry. So that where we'll leave it for now. Check back and thanks for looking. 


Wednesday, July 12, 2023

Groovy Goolies - Wolfie

 Here's a blast from the past to help add to my werewolf collection - if Wolfie from the 1970's cartoon Groovy Goolies. I got this 3D print from Scott Johansen, who has an arrangement with a 3D artist producing a lot of the characters from our childhoods. 


 For some reason I was the age to watch the cartoon, but I just don't remember it. No matter, he's still a werewolf and a welcome addition. 

He's probably 200mm in height and comes in 7 parts of gray resin.


The first thing I had to get used to seeing and fixing was the "chicken skin" that's left after the supports are removed from the part. The second thing is filling the holes formed so that when the part is built hollow, the extra resin can dry out. I started simply with Aves, but found that most of the time it just fell inside of the part. What I came up with next was to sharpen the end of a styrene rod add superglue and then jam it into the hole. Once the CA cured I cut the rest of the rod off and moved on to the next one. 

Two of the rods to fill the drain holes.


It took a while to sand the rods down to where they disappeared into the part. The figure glued up fairly quickly and I hot it with some primer, which revealed more chicken skin. I'll get on that so check back for a possible finale next time.


I Was A Teenage Werewolf

 From Saul Alvarez comes Michael Landon in one of his first movie roles (1957) as Tony Rivers, the Teenage werewolf. The first thing noticed was that the film was in B&W, and should I paint up the bust that way or go for color. I chose color and the next problem was what color the jacket was. Most of the movie stills are in B&W, and the posters had him in both a blue and red jacket... I, and a few others decided to go with the red. Looks more like one of those HS jackets. 

The sculpt is very well done in 1:4 scale. It comes in 4 parts - the bust, arm, base, and the sign for the school, plus it came with a card with the high school name.  Looking at the jacket sculpt and then at some of the stills, it looks like the jacket was  wool vs. the smoothness of the sculpt. So taking some Tamiya Putty I roughed up the jacket more or less. 

 Turns out I didn't taken any early WIP images. Here we are about 1/2 through - 


 Check back for the finale. Thanks for looking.