Wednesday, July 12, 2023

I Was A Teenage Werewolf

 From Saul Alvarez comes Michael Landon in one of his first movie roles (1957) as Tony Rivers, the Teenage werewolf. The first thing noticed was that the film was in B&W, and should I paint up the bust that way or go for color. I chose color and the next problem was what color the jacket was. Most of the movie stills are in B&W, and the posters had him in both a blue and red jacket... I, and a few others decided to go with the red. Looks more like one of those HS jackets. 

The sculpt is very well done in 1:4 scale. It comes in 4 parts - the bust, arm, base, and the sign for the school, plus it came with a card with the high school name.  Looking at the jacket sculpt and then at some of the stills, it looks like the jacket was  wool vs. the smoothness of the sculpt. So taking some Tamiya Putty I roughed up the jacket more or less. 

 Turns out I didn't taken any early WIP images. Here we are about 1/2 through - 


 Check back for the finale. Thanks for looking.

Thursday, June 29, 2023

The Chupacabra

 This was a little one piece kit that I picked up from Dellamorte on Etsy some time ago. How he does it is I assume sculpts and casts the figures, gives it a primer and then drybrushes one color onto the details. This guy was painted green for the longest. I thought it was time for a change. 


 His base was a little small so I glued it to a larger wooden oval base and added additional "dirt" and other bits over some watered down PVA. 


 I then added a triad of primers to highlight what I wanted - 


 From there I had no idea what I wanted to do with him. Looking online at some art so hopefully get some ideas from other artists, I found that most of them had their beasts look like black dogs with red eyes. I needed something else.

From there I thought that animals they were finding in real life looked like coyotes with mange. So that was my first go. I would make him hairy in spots and bare skin in others.  I got out my static grass applicator and after putting down some PVA in a hit or miss pattern, I went to town with some 2mm static grass. 


 Now for color. I had his original green color stuck in my head so Looking at the color wheel I decided on blue and green. Other colors would add tiny dots of color. 

I painted up the ground work as usual, and then painted the remnants of it's goat dinner and I was done. Thanks for looking. 


Sunday, May 21, 2023

NASA Blue

 There was a question asked about the color that NASA uses for all it's vehicles - 

https://www.nasa.gov/centers/langley/images/content/687045main_UAT-cirrus-946x710.jpg


https://live.staticflickr.com/4815/45166695194_2130562b94_n.jpg

Doing a little search, the majority of the modelers that responded to the question says that Mig Colors 229 is the best match.


Wednesday, May 17, 2023

FRankenstein Finale

 The next session and it was time to cover the splatter. I had some colors in my head. Some worked out and some didn't. In the end most of the splatter was wasted and disappeared under layers of paint. But trying to keep the splatter I have to say that I am improving with my glazing techniques. So I'll count that as a win. 

I wanted him a flesh color, but also remember than in the movies, tho B&W, was supposed to be green. Then the sculpt had a lot of rotting holes and rotted areas. Also the Shifletts' style is pretty free form, and they don't sweat the small details. So I decided to highlight that to enhance look.

I ended up with a light flesh and a green misting glaze. the rotted areas were a mix of brown red and purples. Then some clear UV resin over some wounds to make them still oozing -after all in the story he's only been dead a short time. ;)  

Thanks for looking. 


Sunday, May 14, 2023

Shiflett's Frankenstein

 For my next few builds I decided to get thru some of the smaller models I have laying around. One of them is the Shiflett Bro's Frankenstein. As a patreon of theirs, every so often they offer a figure at discount for the members. I picked this one up a few months ago. 


 Once again I got over eager and started the paintup before taking pics. I've been playing with the spatter technique to bring the skin alive, altho if I thought about it, this would be the one figure who should look the least alive. ;) 

Sorry for the quickie. More later...

Monday, May 1, 2023

Zuppo Marlon Brando

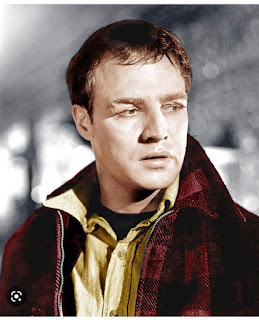
 I was glad when this kit came along and I was able to add to my classic Hollywood figures and busts. This is Marlon Brando as seen in On The Waterfront. Looking for any color image of the character, I only came up with the colorized movie stills, and  of course he's not wearing the same jacket. So I did my best to assign a color to the different hues of B&W.  Here's a pic of Brando from the movie.


The kit is 1:4 scale and Miguel Zuppo once again does a very nice rendition of the character. In my haste to get started, I didn't get an image of the resin model, so here he is with some primer. 


 I've been watching numerous YouTube videos on how to make skin look more real. I figured I would try them one by one, until I find one that works for me. This one isn't too bad as it consists of spattering the skin with various colors. Applying a little extra Cavalry Brown (which is a dark red) to the eyes and other skin indents, and some dark blue to where a 5 o'clock shadow would be.


After that I mixed some of the skin tone with some Beige Red and misted over the face (leaving the eyes rather dark) until nearly all of the dots were unified with the top color. From there I added more of the basic skin again for the highlights. I then made the Cavalry Brown into a weak wash and added back any skin folds that got covered. In real life Brando has dark brown hair, but I found a still that I liked where they apparently highlighted it. So likewise I added highlights to the hair. In the still he was applying his own "bruise" makeup, so rather than get the chance to ruin a skin I liked I gave him a little bloody mouth. 

The base was just a plain brickwork with a concrete cap, and on the back he has an image of a pigeon and a pistol, which both got painted in. With that I was done. Thanks for looking.