Thursday, June 29, 2023

The Chupacabra

 This was a little one piece kit that I picked up from Dellamorte on Etsy some time ago. How he does it is I assume sculpts and casts the figures, gives it a primer and then drybrushes one color onto the details. This guy was painted green for the longest. I thought it was time for a change. 


 His base was a little small so I glued it to a larger wooden oval base and added additional "dirt" and other bits over some watered down PVA. 


 I then added a triad of primers to highlight what I wanted - 


 From there I had no idea what I wanted to do with him. Looking online at some art so hopefully get some ideas from other artists, I found that most of them had their beasts look like black dogs with red eyes. I needed something else.

From there I thought that animals they were finding in real life looked like coyotes with mange. So that was my first go. I would make him hairy in spots and bare skin in others.  I got out my static grass applicator and after putting down some PVA in a hit or miss pattern, I went to town with some 2mm static grass. 


 Now for color. I had his original green color stuck in my head so Looking at the color wheel I decided on blue and green. Other colors would add tiny dots of color. 

I painted up the ground work as usual, and then painted the remnants of it's goat dinner and I was done. Thanks for looking. 


Sunday, May 21, 2023

NASA Blue

 There was a question asked about the color that NASA uses for all it's vehicles - 

https://www.nasa.gov/centers/langley/images/content/687045main_UAT-cirrus-946x710.jpg


https://live.staticflickr.com/4815/45166695194_2130562b94_n.jpg

Doing a little search, the majority of the modelers that responded to the question says that Mig Colors 229 is the best match.


Wednesday, May 17, 2023

FRankenstein Finale

 The next session and it was time to cover the splatter. I had some colors in my head. Some worked out and some didn't. In the end most of the splatter was wasted and disappeared under layers of paint. But trying to keep the splatter I have to say that I am improving with my glazing techniques. So I'll count that as a win. 

I wanted him a flesh color, but also remember than in the movies, tho B&W, was supposed to be green. Then the sculpt had a lot of rotting holes and rotted areas. Also the Shifletts' style is pretty free form, and they don't sweat the small details. So I decided to highlight that to enhance look.

I ended up with a light flesh and a green misting glaze. the rotted areas were a mix of brown red and purples. Then some clear UV resin over some wounds to make them still oozing -after all in the story he's only been dead a short time. ;)  

Thanks for looking. 


Sunday, May 14, 2023

Shiflett's Frankenstein

 For my next few builds I decided to get thru some of the smaller models I have laying around. One of them is the Shiflett Bro's Frankenstein. As a patreon of theirs, every so often they offer a figure at discount for the members. I picked this one up a few months ago. 


 Once again I got over eager and started the paintup before taking pics. I've been playing with the spatter technique to bring the skin alive, altho if I thought about it, this would be the one figure who should look the least alive. ;) 

Sorry for the quickie. More later...

Monday, May 1, 2023

Zuppo Marlon Brando

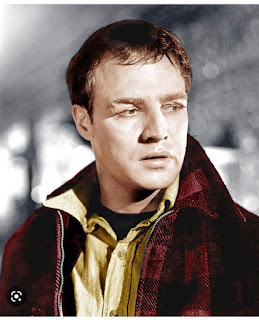
 I was glad when this kit came along and I was able to add to my classic Hollywood figures and busts. This is Marlon Brando as seen in On The Waterfront. Looking for any color image of the character, I only came up with the colorized movie stills, and  of course he's not wearing the same jacket. So I did my best to assign a color to the different hues of B&W.  Here's a pic of Brando from the movie.


The kit is 1:4 scale and Miguel Zuppo once again does a very nice rendition of the character. In my haste to get started, I didn't get an image of the resin model, so here he is with some primer. 


 I've been watching numerous YouTube videos on how to make skin look more real. I figured I would try them one by one, until I find one that works for me. This one isn't too bad as it consists of spattering the skin with various colors. Applying a little extra Cavalry Brown (which is a dark red) to the eyes and other skin indents, and some dark blue to where a 5 o'clock shadow would be.


After that I mixed some of the skin tone with some Beige Red and misted over the face (leaving the eyes rather dark) until nearly all of the dots were unified with the top color. From there I added more of the basic skin again for the highlights. I then made the Cavalry Brown into a weak wash and added back any skin folds that got covered. In real life Brando has dark brown hair, but I found a still that I liked where they apparently highlighted it. So likewise I added highlights to the hair. In the still he was applying his own "bruise" makeup, so rather than get the chance to ruin a skin I liked I gave him a little bloody mouth. 

The base was just a plain brickwork with a concrete cap, and on the back he has an image of a pigeon and a pistol, which both got painted in. With that I was done. Thanks for looking.


Saturday, April 29, 2023

Northrop XP-79B Finale

 For the finale, my main job was to paint the plane and then add the canopy. Websites were saying it was white, the instructions called the color linen. So I decided to split the difference in that I took Ivory, and add one drop of V's Iraqi Sand which is a light beige color.

Next was the canopy. I found that yes indeed, the canopy was split vertically down the middle. So I was just a matter of gluing the 2 halves together.  They are to be butt jointed together, and I had a piece of Tamiya tape at the ready. I had the two pieces and touched it with some Tamiya thin,seeing the glue run around the joint. I then added the tape to make sure they held until the weld was complete. Thinking so, I gently put it down on the tale and let go. Immediately I felt my finger slowly pull away! What?! Yep. Glue came out of the joint and ran to where my finger was, leaving this very nice finger print. Insert multiple cuss words here. 

While I was waiting for the canopy to dry, I created a little tarmac with the plan of gluing the plane to the ground to eliminate the tail sitting or the need for the little post to hold the plane up. 

After the glue was dry I sanded the sanding marathon, first with some 3M sanding sponges from fine to ultra fine. Then I went into the 1000ths grit. After hours with canopy was smooth again, but there was still a cloudy bit to it that wouldn't go away - even after a few dippings of Future. What I ended up doing was mixing Future with V's Smoke and created a window tinting. It ended up mostly making all the work I did to the interior moot, but the cloudy mark was covered up. 

Thanks for looking. 


Wednesday, April 5, 2023

The Northrop XP-79B

 I picked up this kit a while ago, just because it fit my  idea of an odd ball plane. It wasn't mentioned on the box that it was a Northrop design until I started to research. 

The military, toward the end of WW2 felt they needed a plane that could ram enemy planes similar to what Germany was rumored to be designing.  Northrop came up with this design complete with magnesium wings to help the plane survive the hit. 

One was built and on it's first trial the XP-79B made its first flight on September 12, 1945, however, 15 minutes into the flight control was lost for unknown reasons while performing a slow roll. The nose dropped, and the roll continued with the aircraft impacting the ground in a vertical spin. There are two accounts of the end. One that test pilot Harry Crosby attempted to bail out but was struck by the aircraft and died. The other that in the spin, with such forces, he was unable to open the door open to bail out. The problem was identified, and Northrop was ready for prototype #2, but they were told with the war over, there was no longer a need for a Flying Ram. 

RS Models, out of the Czech Republic offers the 1:72 scale kit on one sprue with another smaller sprue for the clear windscreen. Directions were exploded views and as I will find out a little vague on where parts actually go. The decals are well done.


 As part of the design, the pilot was to lie prone to better help him with the g-forces. The model comes top and bottom so part of the cockpit area attaches to the ceiling of the plane, the other part on the floor. A box forms the confines of the cockpit.

A bench for the pilot to lay on is to be painted a leather color, and the steering goes underneath the bench. The first vague part comes here. There's no real indication of how far out the wheel sits. So I made my best guess. The color calls for the interior to be "interior yellow." I never hear of this before and thought they meant the zinc chromate color. I only had the green zinc chromate which bears no resemblance to yellow so I painted it lime green (a color which will be changed in the 11th hour).

The tub with two sets of where instruments went. I painted instruments the best I could only to realize that once the halves are glued together no one will ever see them again.  Across the front part of the cockpit more instruments are on a flattened bar.


This let to the problem with the bar and the steering wheel. With no indication of where it went, I had it in my head that it seemed possible for the pilot to be stretched out with his arms holding the wheel on the "outside" of the instrument bar.  

That was until I found this image - - 


 So a little late but the mystery of where the steering wheel went was solved. This solved another mystery of WHY would they make the windscreen in two halves, split vertically down the middle??  Why when it's like that in real life.

But that will come next time after the glue dries and all the clamps come off the plane. Thanks for looking.