My local model club - BPMS - announce a model challenge to coincide with the 75th Anniversary of the US's entry into WW2.
Not being a military model guy, I had a hard time decided what I was going to do. Being figures was my thing, I looked for something that might fit the bill. I found this 90mm Alpine Miniatures kit of a 101st Airborne Screaming Eagles soldier from Last Cavalry. Doing a quick search I saw that there were there at the Battle of the Ardennes Forest. From a friend building a similar scene with armor vehicles I know that there are many pine trees in the forest, and with that I had the vignette in my head.
I started with the figure, and honestly the box art was of little help. But doing an online search led me to a seller that had a series of 360° view of the model. They didn't call out the colors so I did my best to match them up.
Because the soldier wasn't dressed for the Ardennes winter, and I would have to use artistic license, I decided to help it look better by adding a bit more red to the soldiers cheeks, nose, and hands to give the illusion he's very cold.
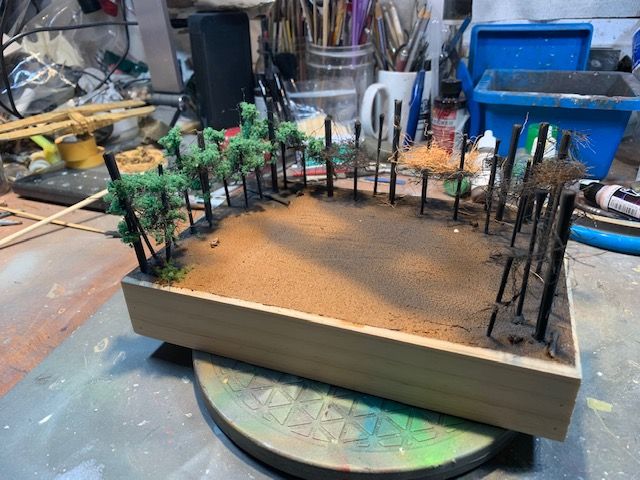
I found a section of log in Michaels, and two two different sized dowels to represent the trees. This is supposed to be an old growth forest so I took it that the trees would be pretty large. I cut the dowels at 7in. lengths, which is plenty of room above the soldiers head. They were screwed thru the base and into the dowels from below. The ground is the Plastic Wood putty, because it dries incredibly fast.
I wanted to make a sort of "roof" for the top of the vignette to frame the scene so I have to make a few pine branches.
I started out with 3 or 4 long folds of florist wire and tightly twisted them.
After taking it out of the drill I untwisted a few strands to create the smaller branches. Next step was to dip the branches into Mod Podge.
After making sure I only had a thin glue layer at the ends of the branches I pour whats know as Chinchilla Dust over the glued wire. This is sand for... chinchillas... apparently they can't take water and only takes dust baths. It's used here because it is incredibly fine grained and helps maintain the scale look. You buy it in a jug the size you see and one of these jars will last a life time!
The Mod Podge also dries *very* quickly and I was able to glue them into drilled holes at the top of the trees. I did leave one on the forest floor with yellow leaves to busy up ground with a few dead branches. You can see I also added dusted Mod Podge to help simulate some roots for the trees. The trunk of the trees also got glued and then a dust bath to help simulate the bark.
Next step was to add the dirt. It's that pre-mixed stuff you get from miniatures dealers. You can see I also added the "needles" to the pine trees. They are just 2mm static grass tufts grabbed with tweezers and the bottom dunked into Mod Podge. After dunking, hold the tufts for a few seconds and the Mod Podge will start to skin over. Then push it into place on the branch and the tuft will stay put. They made pretty good needle bunches! Do that a few dozen times, and you have nice pine branches.
Adding a few layers of yellow and brown grasses to the forest floor, it was time to add the snows that was seen in pics of the Ardennes. My soldier didn't have the heavy winter jacket on so I took artistic license and only added a little snow... And with that I was done. Thanks for looking.
Friday, December 20, 2019
Troop Transport
This kit has been in my stash for a very long time. So long in fact that it outlasted the producer - Two Fat Guys. Sidebar: one of the guys went on to form JPG Productions. The 1:2256 scale model came in 7 or 8 parts (I forget now) and was very easy to clean up and get ready for building. The parts went together effortlessly.
Looking at images from the Phantom Menace movie, it had this beige, almost rust looking color. What I decided to do was start dark and then mask off sections which would be panels. Then sprayed a lighter color.
I did the masking and painting for a number of levels until I had my lightest color. Then removed all the masking tape. Thankfully no paint peeled off from this procedure. This made the wings look "busy." Then I weathered the ship.
Then it sat and sat. I knew I wanted to do a little vignette of when the ships landed in the forests of Naboo. finally when I found time, I took an open ended box from Michaels which I turned over and used for a base. Then I took 3 different sized dowels (one size was wooden cotton buds) as the trees. I used cut up pieces of the fiber hanging basket liners as branches.
When that was done I added two different times of ground foam as leaves and I finished it up by gluing the ship in place. Thanks for looking.
Looking at images from the Phantom Menace movie, it had this beige, almost rust looking color. What I decided to do was start dark and then mask off sections which would be panels. Then sprayed a lighter color.
I did the masking and painting for a number of levels until I had my lightest color. Then removed all the masking tape. Thankfully no paint peeled off from this procedure. This made the wings look "busy." Then I weathered the ship.
Then it sat and sat. I knew I wanted to do a little vignette of when the ships landed in the forests of Naboo. finally when I found time, I took an open ended box from Michaels which I turned over and used for a base. Then I took 3 different sized dowels (one size was wooden cotton buds) as the trees. I used cut up pieces of the fiber hanging basket liners as branches.
When that was done I added two different times of ground foam as leaves and I finished it up by gluing the ship in place. Thanks for looking.
Friday, December 13, 2019
Jacob Marley
Another excellent sculpt from John Dennett and Moondevil Studios. The 1:5th bust was cast in a light green odorless resin. The kit comes in 2 parts - the bust and the base.
After washing with warm soapy water, and giving it a coat of primer I wanted to make Jacob the ghost he was when seen in his scene of A Christmas Carol. I had used Citadel's Nihilakh Oxide on the Ghost Lighthouse Keeper and decided Jacob needed the same treatment.
But first he needed his earthly colors. As this movie (1952 film) was in B&W, I was free to use whatever I want. So I decided on a white shirt, black jacket, and maroon tie, pale flesh and auburn hair.
From there I started his ghostly change -
I went back and forth with Jacob adding and subtracting the green and white, until I got a look I liked. The base was painted, and I added a little snow. Done. Thanks for looking.
After washing with warm soapy water, and giving it a coat of primer I wanted to make Jacob the ghost he was when seen in his scene of A Christmas Carol. I had used Citadel's Nihilakh Oxide on the Ghost Lighthouse Keeper and decided Jacob needed the same treatment.
But first he needed his earthly colors. As this movie (1952 film) was in B&W, I was free to use whatever I want. So I decided on a white shirt, black jacket, and maroon tie, pale flesh and auburn hair.
![]() |
| Ol' Ebenezer looking on favorably |
![]() |
| The purple is masking fluid to protect painted eyes |
I went back and forth with Jacob adding and subtracting the green and white, until I got a look I liked. The base was painted, and I added a little snow. Done. Thanks for looking.
Tuesday, December 3, 2019
Shinto of the Turtle Clan
This very detailed mini is from CMON's Rising Sun game. Normally I'd just do the bigger sized monsters and demons, but this little one just had too much detail to ignore. I somehow never took WIP shots, so this post will be a showcase. Thanks for looking.
Sunday, November 24, 2019
Salamander Finale
This session I added a few more highlight glazes to the leaves, and then gloss coated them to make them look wet.
Turning to the salamander, the same thing was done. I added various intensities of a dark red glaze to give the salamander some depth.
To finish up I set the salamander in place and then with the UV resin I put a drop of resin in low spots where it was standing, and then once hitting it with the UV light, the resin cured and he was glued in place. Another one done. ;)
Thanks for looking.
Turning to the salamander, the same thing was done. I added various intensities of a dark red glaze to give the salamander some depth.
To finish up I set the salamander in place and then with the UV resin I put a drop of resin in low spots where it was standing, and then once hitting it with the UV light, the resin cured and he was glued in place. Another one done. ;)
Thanks for looking.
Wednesday, November 20, 2019
Taiwan Lesser Salamander
Huh? Yep, a salamander. Not to think I'm all into ghosts and monsters and fantasy figures, I really collect anything that that catches my eye. This kit came from Skink Haunt who was big into creating animals of Taiwan (it looks like lately he's also moved into creating monsters). This kit has to be 10+years old by now. Back then I didn't think I could do it justice with a lifelike skin tone. But I figured I was confident enuff to try it now.
The kit is only 2 parts, the animal and a base. I'm guessing it's a 1:1 scale kit.
The salamander is what it is, not a lot of detail, but well done. The base, on the other hand, is chock full of details. I wondered if he sculpted it, or took real leaves and twigs etc... and molded and cast that. It comes in a plastic bag and gives you this -
The kit only had a few imperfections, most like the remnants of pour spouts. Sanding those down I was reminded that the kit is from Asia, as the smell from the sanding definitely has that petroleum smell of the resin that many of them use.
Once smooth the kit was given a coating of V's NATO Black. This is my new fav as to my eyes, it's not just black, but has a slight green cast to it.
After that I gave the salamander and the leaves a mottled look with two colors of gray - the second a bit lighter than the first. Following the illustration one leaf was red and the other orange. This is what I followed. Check back for the next WIP.
The kit is only 2 parts, the animal and a base. I'm guessing it's a 1:1 scale kit.
The salamander is what it is, not a lot of detail, but well done. The base, on the other hand, is chock full of details. I wondered if he sculpted it, or took real leaves and twigs etc... and molded and cast that. It comes in a plastic bag and gives you this -
The kit only had a few imperfections, most like the remnants of pour spouts. Sanding those down I was reminded that the kit is from Asia, as the smell from the sanding definitely has that petroleum smell of the resin that many of them use.
Once smooth the kit was given a coating of V's NATO Black. This is my new fav as to my eyes, it's not just black, but has a slight green cast to it.
After that I gave the salamander and the leaves a mottled look with two colors of gray - the second a bit lighter than the first. Following the illustration one leaf was red and the other orange. This is what I followed. Check back for the next WIP.
Godzilla!
I picked this one off the shelf as I saw it as a fast little build. Sculpted by Troy McDevitt, is a very nice caricature, with one two bubbles on two of the teeth, and seam lines that were nearly invisible. The part fit very well and only a little bit of Aves was used along the spines, and where the spines met his tail. After that it got a coat of Vallejo Air NATO Black as a primer.
I like the NATO Black because to my eyes it looks like there a little green in it, and models don't just look black. After that it got a drybrush of a mid range gray. while that was drying I got out some Ivory and painted the teeth and eyes. Then some Gray Green for the toe and finger nails. I also mixed some of the Gray Green with the Ivory, and painted his gums.
Liking the new Godzilla I had the idea to have his spines light up in that blue white coloring, so sprayed the edges a wide swath of dark blue.
Leaving the blue to dry , I went back and gave the teeth a was of Nuln Oil. The eyes also got dots of Gory Red.
From there I went back to the spines, and gave a smaller edging with a light blue. When that dried, I had an even lighter blue that went in a smaller strip along the spines. To finish it off a added dots of white to tallest spines. To finish him off, his teeth got a dry brushing of Ivory. Done, nice and easy. Thanks for looking.
I like the NATO Black because to my eyes it looks like there a little green in it, and models don't just look black. After that it got a drybrush of a mid range gray. while that was drying I got out some Ivory and painted the teeth and eyes. Then some Gray Green for the toe and finger nails. I also mixed some of the Gray Green with the Ivory, and painted his gums.
Liking the new Godzilla I had the idea to have his spines light up in that blue white coloring, so sprayed the edges a wide swath of dark blue.
Leaving the blue to dry , I went back and gave the teeth a was of Nuln Oil. The eyes also got dots of Gory Red.
From there I went back to the spines, and gave a smaller edging with a light blue. When that dried, I had an even lighter blue that went in a smaller strip along the spines. To finish it off a added dots of white to tallest spines. To finish him off, his teeth got a dry brushing of Ivory. Done, nice and easy. Thanks for looking.
Subscribe to:
Posts (Atom)