Sunday, August 27, 2023

The Jersey Devil

 This kit has been in my stash for a long time. After first seeing it, I had to have it, but once a copy was mine I didn't think I could do it justice, and put it in my pile. The mark on the kit says 2013.  While I consider myself a pretty good novice, I thought I would give it a try.  And the timing was right as my model club (the BPMS), was asking for a kit I would build as part of my pledge. This is where you pledge a model to build in January and by October, you have it finished. 

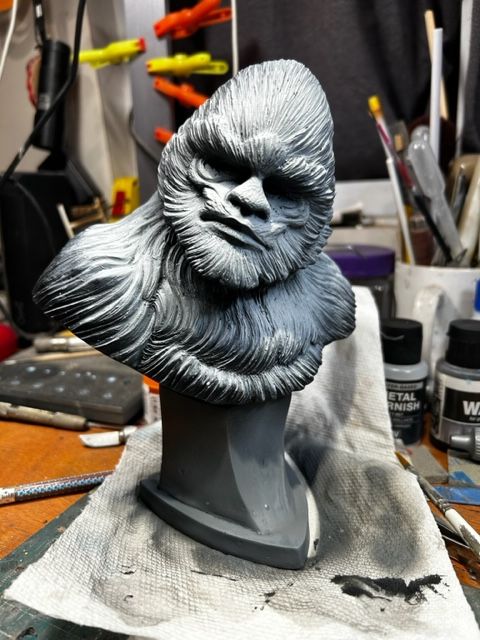
Back to the kit. This is another from John Dennett's Crypto Legends series. As mentioned the sculpt is outstanding. I don't think anyone has measured the JD, so I have no idea of the scale of the kit. It comes in 10 pieces and a base, made from very clear cream color resin. Here and there you see a hint of a seam line, but a minute or two of scraping and it was gone. 


 With all the parts I figured despite it having tabs, I would pin all the parts. Here's where I ran into something odd. As I drilled into the part it looked like the dust coming out of the hole looked "wet." But when I wiped the drill bit I didn't feel it was wet. Odd.  But something was going on as I was most of the way pinning and gluing the parts the minute epoxy stopped working.  I had heard of stories years ago of kit weeping after they were cure. This was uncured resin coming thru. This situation it didn't come thru until I drilled into it.  switching to regular CA glue solved the problem.


It was time to start priming and thinking of a color scheme...  I drive along side the Pine Barrens on my way to Cape May, so I know whats down there. The sculpt hsd the JD on the edge of a swampy area, so the base is figured out for me. 

Check back for the color scheme of the JD, and thanks for looking. 


Thursday, August 10, 2023

The Thing - MacReady

 As is my usual, I have 2 or 3 kits going at the same time. So they all usually finish withing a few days of each other. This time I have the character MacReady as played by Kurt Russell. 

The kit is in 4 parts - the bust, each hand, and the base.  The likeness is once again excellent, and the casting job is terrific. Only the slightest work is needed to get rid of a hint of seam line on one side of his head.


 Starting to put the primer on...

As with Norris I went overboard with the under colors. Plus there's a little more color on the icy cliff.

From there is was just a matter of looking at a still to find out he had on a gray t-shirt, blue hoodie and a brown leather jacket. His hair is brown and the Net tells me he has blue eyes. Looking at another still, the wire he uses on the blood test was a red on a white spool. I thought the white would be too stark in his hands so I used V's Sky Gray - a very light gray. 

The wire was a small paper clip cut to size and stripped of a little bit of the plastic coating. The paper clip was also painted red, and the bare metal was painted with V's Copper. The Petri Dishes in the film were clear, but I wasn't about to cut it all away and try to recreate it with clear plastic. I painted it up the best I could to make it look transparent.

For the ice, I saw this YT video where they mixed the Woodland Scenics Snow with some clear UV resin. To me it look a little too clear so I added a drop of white. One drop was way too much and IMHO made it too start.  I used Precision Ice and Snow's winter wash on the spaceship - yep the spaceship is sticking out of the mountain on one sire - That just wasn't enuff color so I mixed up more WS Snow and UV resin, leaving out the white paint and added it on. It really looks like chunky ice.   That about does it. Thanks for looking.


Tuesday, August 8, 2023

The Thing - Norris

 Over the past few months I've been collecting busts by Gillman Prod., featuring the characters from 1982's The Thing. So far, they have released 5 busts. One little extra was that if you bought the first 3 you got pieces of a kit that will form the Norris Head Spider. At one point you could buy the actual head at a discount. So the Norris Head make kit #6. 

All are approximately 1/4 scale and I'll start with Vance Norris. He was played by Charles Hallahan (1943-1997). There's still a debate as to when Norris gets assimilated. But it comes to a head when he has a "heart attack" and during defibrillation his chest opens up and bites Dr. Copper's arms off at the elbow and from a monster emerges. 

The kit is very well done with 2 parts - the bust and the little monster head. There was a little cleanup of Norris' hair, and where the little monster head meets the next, there needed a little Aves to close a gap. Otherwise cleanup was effortless. 


 Here I tried a little under-painting. Some of it worked well, but in some areas it was just too much. 


I was doing the MacReady figure at the same time, and I wanted to give them two different skin tones, so I started Norris with Vs Dark Flesh (which isn't really that dark).  From there it was adjusting the highlights and shadows. I painted the throat veins with various greens, and then used Citadel's green wash to fill in the deepest areas. After that I used a green tinted UV resin to make it shiny and gooey. The UV resin matched too closely to the paint I used so I tried some of the Army Painter Speed Paint. It too went on like a heavier wash, and a little V. Gloss brought the goo back to the forefront. 

 Similarly I did the same thing only with reds and pinks to the chest/belly area, and to the coiled monster and gave that a coat of the Pink UV resin to that. The resin was easily painted on  (make sure the brush is disposable), and some UV light sealed the whole thing up. Just to make sure I sat it out in the Sun the next morning - Just to make sure.  With that I was done. Thanks for looking. 


Saturday, July 22, 2023

Tamiya X-1 Finale

 The finals steps for the construction was to put on the landing gear and doors. Usually I put them on when the instructions say to, and then I always knock them off somewhere along the line. Another was to paint and glue on the cockpit canopy. The final step was to put on the decals. Despite looking rather aged, they went on with no problems. One toward the end did rip, but joined up rather nicely. 

With the number of pitot tubes on the craft I decided to glue the plane onto it's base. For that I took a regular 6"X6" square piece of wood and then cut some styrene grooved with "expansion joints" for detail. With that, I was done. Thanks for looking. 


Wednesday, July 19, 2023

The Patterson Bigfoot (1967)

 This next bust comes, once again, from Gillman Productions.  The bust is approx. 1/4 scale and comes in 2 parts - the bust and the base. As usual the kit is spotlessly clean and work can begin almost right away. 


This bust is to represent the 1967 Bigfoot that was filmed by Roger Patterson, and Bob Gimlin along a logging road in northern California. It was said that the film was taken on October 20, 1967, but some critics believe it was shot earlier. Gimlin mostly avoided publicly discussing the subject from at least the early 1970s until about 2005 (except for three appearances), when he began giving interviews and appearing at Bigfoot conferences.


The film Shows him a very dark creature. But I thought a little artistic license would work as I would create a sort of  OSL (Object-source lighting). Tru OSL is when the lighted object is part of the sculpture, but in this case I decided to use a setting sun of the the side of the beast. 

It was just a case of basic layer painting, some highlights and then adding detail around the deeply sunken eyes. The flat back of the bust and base gave me an idea for something different (for me).


 Using various shadows of browns from almost black thru a reddish cork color I added the highlights and shadows according to how I added the primer.  Also looking up gorilla eyes, I got an idea of what I wanted this guy's eyes to look like. 


For the base I decided to call out my inner Bob Ross. As a teenager my parents had gotten me one of his paint sets, and I used it quite a bit, but that was 40 years ago! But I gave it a shot and came up with this woodland scene. The Bigfoot, rocks and downed trees were done in bas relief on the base.  I don't think it's all that terrible. Thanks for looking. 


Groovy Goolies Wolfie

 It took me about 2 seconds to look up the colors for Wolfie, and with that I had a thought. This cartoon series was supposedly started in 1970. I would have been 10 years old, and tho I don't remember the cartoon, I would have been building models for a year or two. So I decided except for putting the extra thick gloss on the base, I would paint it like a 10 year old.  I couldn't leave it with drips and drabs but left all the other tasks out. I didn't use any washes around the minor details. There's also no highlighting and shadows either. 

As I started painting I did realize that I made a huge mistake in assembling the entire model  first. I definitely should have left the the/neck separate to get into all those tiny areas.  But the 10 year old would have built it all up, so I tried my best to get in all the little nooks and crannies.  And after an hour of painting I was done. Thanks for looking. 


Teenage Werewolf Finale.

 This time I basically finished up the base, with a new paint I found works well for concrete - It's Chalk paint called Cocoon. I then added some tufts of grass and painted the sign with a wood grain. One the back it's sculpted like a tree with some leaves, so those were painted in.

On the figure, I finished off the shirt, painted in the stripes and fixed up some of the shadows around the face. I had to cut down the sign to fit within the frame, and used some Mod Podge to glue that down. With that I was done. Thanks for looking.