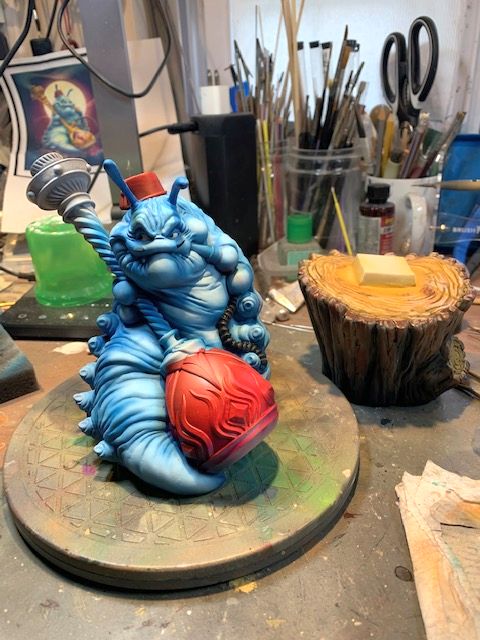
After a week or two of laziness, I got myself into the studio and finished off the Caterpillar.
First up was finishing off the highlights on the hookah. Then I re-adjusting the highlights on the caterpillar itself. I thought I finished up by using V's Metal Varnish on the hookah, and V's satin on the Caterpillar. Then I noticed that I didn't do those eye looking things on it's back. So I got out the Gloss Black and finished those. I was really tempted to make them look like eyes, but I thought that might be *too much.*
I epoxied it to the base and I was done. Thanks for looking.
Saturday, June 6, 2020
Thursday, May 21, 2020
The Smoking Catepillar
This was a kit that caught my eye for being different, even tho it's featured in a story and an animated movie. ;)
This caterpillar is from Creepy Tables, and comes in two sizes - 22cm and 15cm. I chose the 22cm version. It is a limited edition and I have either 30 or 36 (hard to read the handwriting) out of 200. It's still being offered so I guess there are a few left at the time of this writing. It comes in 6 pieces of resin, that is very nicely done. FAINT seam lines were seen in one or two places and probably could easily go unnoticed.
Here the parts were assembled - tho the caterpillar was just rested on the stump. Will glue them together at the end - and primed. The connection between the top and bottom parts of the hookah needed extra attention.
Following the color image that came with the kit, I started airbrushing the blues on the body.
More messing with the light and dark blues, and filled in the body of the hookah. On the image it's made to look transparent. I'm not able to copy that so I just made 2 levels of a purple red into a red, and then a pale red reflective highlight. I used the same red colors for his fez.
Wanting to paint the decoration on the hookah gold, I added the gloss black.
The wood stump also got my regular wood treatment of black then gray and dark brown. Going way out on a limb I added a stylized wood grain to the top as practice since it can't be seen, and then on the cut branch on the front of the stump. Check back for the gold trim, jewels, and the final details.
Thanks for looking.
This caterpillar is from Creepy Tables, and comes in two sizes - 22cm and 15cm. I chose the 22cm version. It is a limited edition and I have either 30 or 36 (hard to read the handwriting) out of 200. It's still being offered so I guess there are a few left at the time of this writing. It comes in 6 pieces of resin, that is very nicely done. FAINT seam lines were seen in one or two places and probably could easily go unnoticed.
![]() |
| Here's what you get |
Here the parts were assembled - tho the caterpillar was just rested on the stump. Will glue them together at the end - and primed. The connection between the top and bottom parts of the hookah needed extra attention.
Following the color image that came with the kit, I started airbrushing the blues on the body.
More messing with the light and dark blues, and filled in the body of the hookah. On the image it's made to look transparent. I'm not able to copy that so I just made 2 levels of a purple red into a red, and then a pale red reflective highlight. I used the same red colors for his fez.
Wanting to paint the decoration on the hookah gold, I added the gloss black.
The wood stump also got my regular wood treatment of black then gray and dark brown. Going way out on a limb I added a stylized wood grain to the top as practice since it can't be seen, and then on the cut branch on the front of the stump. Check back for the gold trim, jewels, and the final details.
Thanks for looking.
Sunday, May 17, 2020
Dune Sandworm
It's almost embarrassing to admit that this is another one that's been in my stash for a long time. I'm guessing that 90% of my stash has been there a long time (blush).
But anyway this is a nice quick project. Sculpted by Kent Kidwell, it's a one piece kit with lots of details for the size.
Going from memory I remember a lot of brown dirt in the movie, so I started with a red earth primer.
I have too many earth tone paints in my collection and wanted the worm to be a little different at least, from the ground. So the colors of both changed a number of times. But it all went along pretty fast - 2 or 3 hours and I was calling this one done. Thanks for looking.
But anyway this is a nice quick project. Sculpted by Kent Kidwell, it's a one piece kit with lots of details for the size.
Going from memory I remember a lot of brown dirt in the movie, so I started with a red earth primer.
I have too many earth tone paints in my collection and wanted the worm to be a little different at least, from the ground. So the colors of both changed a number of times. But it all went along pretty fast - 2 or 3 hours and I was calling this one done. Thanks for looking.
Thursday, May 7, 2020
Kyaaten
This is another nice little bust I saw on the New Announcements group on FB. It's approximately 200mm and sculpted by Joaquin Palacios for Epica Tales.
The model comes in three resin pieces - the bust, the arm, and the column base. You need to supply your own rod connecting the bust to the base. She also comes with her own sticker. It's an excellent sculpt and cast with no bubbles or seams apparent.
Thinking Middle eastern I used a flesh that was a little darker than normal. I also gave her dark hair. One other thing is I goofed while drilled the hole for the rod. The bottom cut is a lot more steep than other busts, and in a Aves and a second try.
It was right at this point of the build when one morning I heard a bang coming from the attic. I went up to investigate to find somehow a Starling had gotten in. Of course it flew around and landed on the desk knocking the model over and of course breaking the little knife she's holding off. A bird in the house must be bad luck as I don't know whether the bird or the carpet monster ate it, but it's never been seen again. I'll have a cut another out of sheet styrene.
I've seen some that give her an almost completely transparent top. I wanted to try something close (never done it before), but maybe not as far as some other take it. I started out by covering all the surrounding skin with Silly Putty.
Where the cloth pulled tight I only misted the off white color, and gave a little more coverage by her neck and waist. I added pure white at the tops of the wrinkles, and then lightly brushed on some of the pearlizing paint on the top and bottom for a little extra shine. The part that was the skirt got full coverage.
On a different project I noticed that Green Stuff World's metallic paint behaved badly if put on top of a gloss black. But gave a terrific two tone metallic if painted over white. So I painted all the jewelry with white and then used a blue and red. The effect turned out pretty well. The parts that I wanted to be gold got the usual gloss black coating.
I painted her lips with V's Cavalry Brown which is a dark red, added a highlight then to match up some of the metallic green I used elsewhere on the model, I gave her green eyes. A little eye shadow and blush from pastels finished off her face.
Then I painted up the column base with V's Dark Sand, and pulled out my Mummy bust to remind myself of what I did with that base, then more of less copied it. The column looked a little thin so I found a 40mm plastic base. I glued the column on, and then filled around it with V's ground texture. A wash of Sepia on the sand, and painted the rim a black brown and I was done. Thanks for looking.
The model comes in three resin pieces - the bust, the arm, and the column base. You need to supply your own rod connecting the bust to the base. She also comes with her own sticker. It's an excellent sculpt and cast with no bubbles or seams apparent.
Thinking Middle eastern I used a flesh that was a little darker than normal. I also gave her dark hair. One other thing is I goofed while drilled the hole for the rod. The bottom cut is a lot more steep than other busts, and in a Aves and a second try.
It was right at this point of the build when one morning I heard a bang coming from the attic. I went up to investigate to find somehow a Starling had gotten in. Of course it flew around and landed on the desk knocking the model over and of course breaking the little knife she's holding off. A bird in the house must be bad luck as I don't know whether the bird or the carpet monster ate it, but it's never been seen again. I'll have a cut another out of sheet styrene.
I've seen some that give her an almost completely transparent top. I wanted to try something close (never done it before), but maybe not as far as some other take it. I started out by covering all the surrounding skin with Silly Putty.
Where the cloth pulled tight I only misted the off white color, and gave a little more coverage by her neck and waist. I added pure white at the tops of the wrinkles, and then lightly brushed on some of the pearlizing paint on the top and bottom for a little extra shine. The part that was the skirt got full coverage.
On a different project I noticed that Green Stuff World's metallic paint behaved badly if put on top of a gloss black. But gave a terrific two tone metallic if painted over white. So I painted all the jewelry with white and then used a blue and red. The effect turned out pretty well. The parts that I wanted to be gold got the usual gloss black coating.
I painted her lips with V's Cavalry Brown which is a dark red, added a highlight then to match up some of the metallic green I used elsewhere on the model, I gave her green eyes. A little eye shadow and blush from pastels finished off her face.
Then I painted up the column base with V's Dark Sand, and pulled out my Mummy bust to remind myself of what I did with that base, then more of less copied it. The column looked a little thin so I found a 40mm plastic base. I glued the column on, and then filled around it with V's ground texture. A wash of Sepia on the sand, and painted the rim a black brown and I was done. Thanks for looking.
Saturday, May 2, 2020
Protoceratops
This is another kit in my stash so long I no longer remember who it was produced by. I'm sure after a few people see this, they will know and tell me.
Anyway, I'm guessing it's a 1/10 -15th scale kit that came in 2 parts - the animal and the base. The only thing was that three of it's feet are attached to the base. They didn't line up so you had to do the best you could and then start sculpting with the Aves.
You can also see all the repairs made. I really dislike when the sculptor/producer try to "help us out" by getting rid of flash or seam-lines - especially when they are aggressive about it.
While beginning to prime in noticed an imperfection that turned into a big bubble on the edge of it's frill. Despite me not liking the scales just being small tube marks pushed into the clay for scales - it did make the repair a little easier to hide.
First round of priming revealing more ankle work needed.
Was going to leave it at this point, but felt I needed to do a little more...
Added a little more color, defined the eyes, and emphasized the muscles a little more. I also added some foliage to the nest material, and also created two bushes to finish it off. Thanks for looking.
Anyway, I'm guessing it's a 1/10 -15th scale kit that came in 2 parts - the animal and the base. The only thing was that three of it's feet are attached to the base. They didn't line up so you had to do the best you could and then start sculpting with the Aves.
You can also see all the repairs made. I really dislike when the sculptor/producer try to "help us out" by getting rid of flash or seam-lines - especially when they are aggressive about it.
![]() |
| Base can be seen in the background |
First round of priming revealing more ankle work needed.
Was going to leave it at this point, but felt I needed to do a little more...
![]() | |||
Friday, April 24, 2020
The Reptile Finale
This session was to put the finishing touches on Anna. The biggest decision was what to do with her clothes. They seem to have that wavy two toned striped pattern -
My solution was to paint the top black, gloss it, and then use semi-gloss German Gray for the stripes. Turned out OK IMHO.
The other things were to color in the eyes and to whiten the teeth a little. Was a little tough painting the black rings around the base of each eye...
This one is done and will be placed in the Hammer Film Wing of my little museum. ;) Thanks for looking.
My solution was to paint the top black, gloss it, and then use semi-gloss German Gray for the stripes. Turned out OK IMHO.
The other things were to color in the eyes and to whiten the teeth a little. Was a little tough painting the black rings around the base of each eye...
This one is done and will be placed in the Hammer Film Wing of my little museum. ;) Thanks for looking.
Thursday, April 23, 2020
The Reptile
This is another beauty of a kit from John Dennett - from his Hammer Films collection it's The Reptile from the 1966 movie of the same name. In this village people are being murdered and discovered with what looks like a snake bite. It is discovered that the Doctors daughter has been tuned into The Reptile after being abducted by a snake cult.
The kit comes in 2 resin parts - the bust and the base. The kit is practically flawless with no bubbles or easily seen seam lines. This is another case where I got right into it and didn't take any before pics. Here's she is with the base coat started.
Check back for more, and thanks for looking.
The kit comes in 2 resin parts - the bust and the base. The kit is practically flawless with no bubbles or easily seen seam lines. This is another case where I got right into it and didn't take any before pics. Here's she is with the base coat started.
Looking closely at the image, she has a rather complicated mask. Looking ahead even the costume she wears looks rather complicated. I'll have to think about what to do for the costume.
Subscribe to:
Posts (Atom)