This weeks Throwdown was entitle Martian Mushroom Man. So he is my entry. Thanks for looking.
Sunday, May 26, 2019
Wednesday, May 22, 2019
King Brian Finale
I'm almost at the finish line with King Brian. For this session I started out by drilling another hole in his foot and super gluing a thin rod into the hole.
Next was to line everything up and create the hole in the base. While doing this I realized the the pour of resin shortened the first hole. I will have to re-drill that one too. There was no excitement about that and it the rods went right into place.
The next task was to glue 25mm magnets into the head and neck with the flat topped Dremel bit. There was no surprises here either. So the King is finished. Thanks for looking.
 |
| Now I wish I hadn't glued in that magnet. |
The next task was to glue 25mm magnets into the head and neck with the flat topped Dremel bit. There was no surprises here either. So the King is finished. Thanks for looking.
Sunday, May 19, 2019
Thurs Throwdown for May23
For this week the topic was Big Mustache. Having just watched Quigley Down Under on TV, and being a big fan of Tombstone, I wen with a cowboy.
I guess I could have made the 'stache bigger, but didn't want to to look dumb. Thanks for looking.
I guess I could have made the 'stache bigger, but didn't want to to look dumb. Thanks for looking.
Saturday, May 18, 2019
King Brian
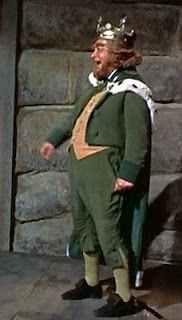
King Brian is a character from the 1959 Disney movie Darby O'Gill and the Little People. From IMDB.com :
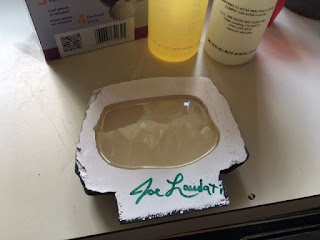
The kit was sculpted Joe Laudati and came in 4 parts - His head, body, cape and base. While the figure is cast in resin, the base was cast in plaster. My guess is to give the base some weight, and the figure is dancing, and all the weight is on one foot.
Looking at King Brian's costume, the main colors are 3 different shades of green, and then an orange tan for the vest. The shoes looked black, but I thought a very dark brown worked as well.
The coins (and crown) were painted gloss black in prep for painting them with Vallejo Metallics Gold.
The face was next, and it was impossible for me to find out the actors eye color, so I just defaulted for brown.
Most all the colors were painted and when I went to glue on the cape, there was some filling needed. So I broke out the Aves and blended it in.
To attach Brian to the base I added a rod thru his heel into the base. To save some weight the cater made part of the base hollow. No worries - the rod will still hold.
For safety, I added a rare earth magnet to his sole and the base. A few tries and it worked fine... until I added the cape. With the cape in place, the balance was lost and wanted to tip over backward.
I figured I needed another rod, and to play it safe I thought that I should fill the void in the base with resin, and then add that rod.
Check back for the conclusion. Thanks for looking.
A wily old codger matches wits with the King of the Leprechauns and helps play matchmaker for his daughter and the strapping lad who has replaced him as caretaker.
The kit was sculpted Joe Laudati and came in 4 parts - His head, body, cape and base. While the figure is cast in resin, the base was cast in plaster. My guess is to give the base some weight, and the figure is dancing, and all the weight is on one foot.
Looking at King Brian's costume, the main colors are 3 different shades of green, and then an orange tan for the vest. The shoes looked black, but I thought a very dark brown worked as well.
The coins (and crown) were painted gloss black in prep for painting them with Vallejo Metallics Gold.
The face was next, and it was impossible for me to find out the actors eye color, so I just defaulted for brown.
Most all the colors were painted and when I went to glue on the cape, there was some filling needed. So I broke out the Aves and blended it in.
To attach Brian to the base I added a rod thru his heel into the base. To save some weight the cater made part of the base hollow. No worries - the rod will still hold.
 |
| Thanks Joe for autographing this. |
I figured I needed another rod, and to play it safe I thought that I should fill the void in the base with resin, and then add that rod.
Check back for the conclusion. Thanks for looking.
Sunday, May 12, 2019
May 9 Thurs Throwdown
The latest Thursday Throwdown from Mc Devitt Studios Patreon page was Japanese Crab Monkey. Wow, that was a tuff one. I looked it up and there were images of just regular monkeys sitting in the water eating crabs. So I just went literal. Then I thought of these nature shows where the monkey's eyes are bigger than their bellies and the more food they pick up the more difficulty they have on hanging on to them.
Thanks for looking.
Thanks for looking.
Lady Valerious
Lady Valerious was a Kickstarter exclusive from their campaign a while back.
The miniature came with a card that differed from the above pic. Having forgotten I had this image, I followed the card. With the metal arm, I guess she's supposed to be a steam punk vampire...
It was a fairly straight forward paint up using my Vallejo paints. Thanks for looking.
The miniature came with a card that differed from the above pic. Having forgotten I had this image, I followed the card. With the metal arm, I guess she's supposed to be a steam punk vampire...
It was a fairly straight forward paint up using my Vallejo paints. Thanks for looking.
Sunday, May 5, 2019
Wednesday, May 1, 2019
Valier "Raketenschiff"
Another nice kit from Fantastic Plastic. It is #6 in their line of classic rocket ships. The craft was the idea of Max Valier, a fan of the rocket scientist Oberth. From FP's site:
The kit comes in 16 parts and a set of decals. The instructions are a little sparse this time, with a exploded view of the original CAD (I think) and you need to refer to the box art for decal placement.
As mentioned, the kit almost falls out of the box completed. ;) Check back for the completed model. Thanks for looking.
Valier's dream was a rocket-powered suborbital "Raketenschiff" (Rocket Ship) that could fly from Berlin to New York City in one hour. In a series of published articles, he proposed evolving his rocket plane from existing commercial aircraft, adding rocket boosters to augment conventional motors until the craft was 100% rocket powered.
The kit comes in 16 parts and a set of decals. The instructions are a little sparse this time, with a exploded view of the original CAD (I think) and you need to refer to the box art for decal placement.
As mentioned, the kit almost falls out of the box completed. ;) Check back for the completed model. Thanks for looking.
Subscribe to:
Comments (Atom)


